How to Enable and Use Do Not Disturb on Android 9 Pie

By default turned off Do not disturb mode on all Android devices. Let see how to turn on and use Do Not Disturb on Android Pie 9.0 devices. This Android 9 Pie Do not disturb settings will mute notifications, phone sound & vibration, block visual disturbances, and set other Android do not disturb exceptions such as Alarms, Media, touch sounds, events, messages, calls, and more. To easily use Android Pie DND mode, you’ll use “Shush Gesture” to hiding notification from the screen, mute sound, vibrate, and other disturbance.

Read Also:

How to Turn on and Use Do Not Disturb on android P 9.0

There are two ways to activate DND mode in Android 9.0 Pie devices. Let see one by one complete process.

1st Method: Enable Do Not Disturb in Android Pie using sound settings

Step 1: Swipe down the notification shade and tap the Settings icon.

Step 2: Tap Sounds.

Turn off Do Not Disturb in android P 9.0

Step 3: Tap Do Not Disturb.

By default turned off do not disturb.

How to use Do Not Disturb on android P 9.0

Step 4: Tap Turn on now button.

Now turn on Do not disturb mode in your Android devices. It will stay on until you turn it off. Here you can see below given Do not disturb settings for Android Poe 9.0 devices.

Block visual disturbance in DND mode

Android P Block visual disturbance in DND mode

You can change android P block visual disturbances settings for when the screen is off and the screen in on in your phone while turn on DND in Android Pie 9.0. When the screen is on, you can’t see notification dots even receive app notifications, don’t see pop up notification on the screen, and hide notification from the list. When the screen is off, don’t turn on the screen, blinking light, and wake up the screen while receiving notifications. You can’t hide status bar icons in Android Pie while enabling DND mode.

Do Not Disturb Exceptions

Android P Do Not Disturb exceptions

In this Android Pie Do Not disturb exceptions setting, you can enable/disable alarms, media, touch sounds, reminders, events, messages, calls, and turn on repeat callers in your devices.

Set time for turn off Do not disturb mode

By default, DND mode will turn on until you turn it off. You can set a duration time to automatically disable Do not disturb mode in android P 9.0 using below settings.

Set time for turn off Do not disturb mode in android P 9.0

Settings > Sounds > Do Not Disturb > Duration > Until you turn off/ for 1 hour (You can set your time)/Ask every time > OK

Automatically Turn on Do Not Disturb Mode in Android Pie 9.0

By default set “Never” in your android P devices. You can set automatic rules in the Android Pie DND mode for sleeping and event activity.

Sleeping: Select Days, start time, end time, and stop at the end time or next alarm, whichever comes first.

Set automatic rules in android P DND mode

Event: Set calendar events in your device.

2nd Method: Quickly Enable Do Not Disturb on Android Pie 9.0

Step 1: Swipe down the notification shade from any screen.

Turn on Automatically Do Not Disturb in android P

Step 2: Long press on Do not disturb mode.

Step 3: Tap Turn on Now.

Now enable DND mode and it’ll help to hide notifications in your devices.

And that’s all. We hope this makes it clear how to turn on and use Do Not Disturb on Android Pie 9.0. Don’t forget to share it with others if you found it helpful. Stay and connect with us for the latest Android Pie updates.

How to Fix WiFi Issue on Pixel 2 and Pixel 2 XL

Annoying by Google Pixel 2 Wi-Fi connected no internet issue? Several users facing WiFi keeps disconnecting, WiFi saved but not connecting, and other WiFi issues. Let see different methods to fix WiFi issue on Pixel 2 and Pixel 2 XL. First of all, check the entered password correctly. Also, try to restart your Pixel, enable & disable Airplane mode, try connecting WiFi to another device, delete saved WiFi network, and more. Pixel 2 XL users reported more Bluetooth issues to compare to a WiFi connectivity issue.

Read Also:

How to Fix WiFi Connectivity Issue on Pixel 2 and Pixel 2 XL

First of all, restart your Pixel 2 or Pixel 2 XL device and try to connect Wi-Fi in your device. If not fix the issue, follow the below methods to fix Pixel 2 XL Wi-Fi connection issues in your device.

Turn Airplane Mode On & Off

Swipe down the notification panel from the top of the screen > Tap Airplane mode> Tap Airplane mode again after 20-30 seconds to disable Airplane mode

Try to connect the WiFi network and check to fix the issue.

Connect WiFi with Another Device

Connect your WiFi network with another Android or Pixel device to check network related issue or your Pixel 2’s issue only.

Restart the Router & Modem

Sometimes the wireless router is the reason for your device can’t connect with the internet. Switch off the router 10-15 seconds and switch on again and retry the connection. Restart your Pixel 2 device and connect to the Wi-Fi network.

Delete Connected WiFi to Fix WiFi Issue on Pixel 2 and Pixel 2 XL

Remove the connected Wi-Fi network in your device. After removing it, again connect with Wi-Fi details.

Step 1: Go to Settings in your Pixel 2 & Pixel 2 XL.

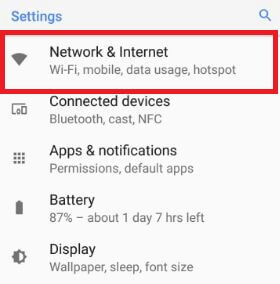
Step 2: Tap on Network & internet.

Step 3: Tap on Wi-Fi.

Here you’ll see a connected Wi-Fi connection in your device.

Step 4: Tap & hold the connected Wi-Fi network

Fix Pixel 2 XL Wi-Fi connection issues

Step 5: Tap on Forget network.

Restart your phone. Now go back to Wi-Fi settings.

Step 6: Select the Wi-Fi network and enter the password.

Fix WiFi connectivity issue on Pixel 2 XL

Step 7: Tap on Connect.

If none of the above-given methods fix wifi issues, try below the given method in your device. I hope it will work for you.

Reset Network Settings on Google Pixel 2 and Pixel 2 XL

If you’re facing any WiFi, mobile data, and Bluetooth issues on Pixel 2 XL, reset network settings in your device using the below steps. There are two ways to reset Pixel 2 network settings.

Reset Network Settings on Pixel 2 using Network & internet settings

This setting not available for the Android OS versions.

Step 1: Go to Settings in your Pixel 2 & Pixel 2 XL.

Step 2: Tap on Network & internet.

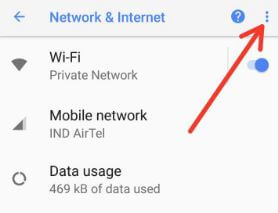
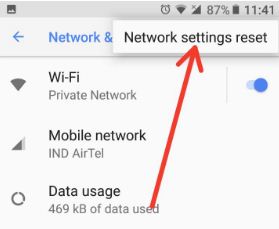
Step 3: Tap More at the top right corner.

Reset wifi settings in Pixel 2 device

Step 4: Tap on Reset Wi-Fi, mobile, and Bluetooth.

Reset settings on Google Pixel 2

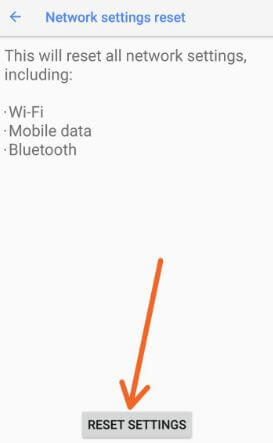
Step 5: Tap on Reset settings.

Confirm your pattern if set in your device to reset Pixel 2 XL settings.

Reset Pixel 2 settings in Oreo

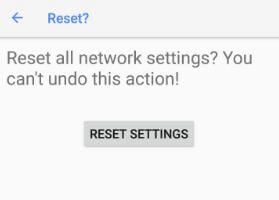
Step 6: Again tap on Reset settings.

Reset Network Settings on Pixel 2 XL Using System Settings – All Android OS

Step 1: Go to Settings in your Pixel 2 & Pixel 2 XL.

Step 2: Tap on System.

Reset network on Pixel 2 XL Oreo

Step 3: Tap on Reset options.

Reset Wi-Fi and Bluetooth connection in Pixel 2 XL

Step 4: Tap on Reset Wi-Fi, mobile & Bluetooth.

Step 5: Tap on Reset settings.

Step 6: Again tap on Reset settings.

It will reset all Pixel 2 XL network settings including Wi-Fi, mobile data, and Bluetooth from your Android devices.

How to Fix WiFi Issue on Pixel 2 and Pixel 2 XL

Alternative Way: Settings > System > Advanced > Reset options > Reset WiFi, mobile & Bluetooth > Reset Settings > Confirm PIN/Pattern > Reset settings – Stock Android 10 OS

End the list of possible solutions to fix WiFi connectivity issue on Pixel 2 and Pixel 2 XL. Do you have any tips want to share to fix Pixel 2 and Pixel 2 XL Wi-Fi problems? Share with us in below comment section. Don’t forget to check out our other Pixel 2 tips and tricks.

How to Block People on Facebook Using PC/Laptop

Here’s how to block someone of Facebook on PC or Laptop. You can block users, block pages, block messages, block apps, block events, and more on your Facebook account. Once you block someone, that user can not see you post your timeline, tag you, invite group or events, not a conversation with you, add you as a friend. Also not participate in groups, games, apps participate you. Also, unblock people on Facebook anytime you want on your Android or iPhone devices.

Facebook is one of the most use of social media apps to keep in touch with friends and family. Follow below given three ways to block Facebook user account on the web, desktop, or laptop.

Read Also:

How to Block Facebook User Account on Desktop PC or Laptop

Check out below given three different methods to block Facebook user account on desktop PC or laptop devices.

How to Block Facebook User Account Using Security Settings

Step 1: Sign in your Facebook account.

Block Facebook user using PC

Step 2: Tap on Menu (Down triangle) and tap Settings.

How to Block user on facebook page

Step 3: Tap on Blocking.

Step 4: Add name or email of block users on Facebook and press block button.

How to Block Someone on Facebook Using Privacy Shortcut

Step 1: Log in your Facebook account.

Tap on privacy shortcut to block facebook user page


Step 2: Tap on Privacy shortcut from top of the right side.

How to block facebook user account

Step 3: Tap on How do I stop someone from bothering me?.

Step 4: Enter name or email want to block and press the block button.

You can see the list of that person name if more than one, select from that particular person want to block.Block someone on facebook

After select it you can see this message on the screen: Are you sure you want to block Sagar?

Step 5: Tap on Block Sagar.

If you want to unblock that user then clicks on all blocked users and tap on the unblock button & confirm it.

How to Block User on Facebook Page Using Profile Settings

Step 1: Log in your Facebook account.

Step 2: Open the Facebook profile of that user.

Block user on facebook using profile settings

Step 3: Tap on Three horizontal dots.

Step 4: Tap on the block, confirm it, and press the Okay button.

You can see the page of the blocking settings page with the name of blocked users. To unblock Facebook users, tap on unblocking & confirm it. That’s all. It’s quite easy to block or unblock someone on Facebook on laptop or PC devices.

Above you can see the three different methods to block Facebook user account/pages. Did you find the above process helpful? Don’t hesitate to let me know on below comment box, would be a pleasure to help you. Connect with us for daily latest updates!

How to delete unnecessary files android phone

Do you want to Remove or delete unnecessary files android phone or tablet? You can delete unnecessary data such as residual, cached, junk files, clear internal storage, hidden files and advertisement files to increase data storage capacity on your android phone. In latest lollipop 5.1.1 and marshmallow 6.0 device, you can delete unnecessary data using smart manager app. Also delete junk files and redundant apps to make space on your device.

In smart manager user data section, you can also see details of images, videos, audio, apps and document data that unnecessary on your android phone. To rectify device performance, end the unused apps from device. You can turn on performance degradation feature to receive notifications when apps are run slowly or take a long time to open so easily remove unnecessary files. In this tutorial, i will show you the two different methods to delete unnecessary files android phone or tablet.

Read Also:

How to disable apps in Pixel 2 and Pixel 2 XL

How to delete unwanted apps on LG V30

How to recover deleted files from android device

How to delete unnecessary files android phone

Check out below given methods to remove unwanted files on Android devices.

1st Method: Delete unnecessary files android using “Smart Manger” app

Step 1: Tap on “Apps” from your device home screen

open-smart-manager-app-android

Step 2: Open “Smart managerapp

open-storage-under-smart-manager

Step 3: Click on “Storage

You can see the below screen on your android phone

delete-unnecessary-files-android-phone

Step 4: Tap on “Delete” under unnecessary data

delete unnecessary files android

You can see the process of cleaning device storage on your device. After that, you can see the message of cleared unnecessary data.

2nd Method: Clear all cache files form android phone

Step 1: Open “Settings” app

Step 2: Scroll down until see “Storage” and open it

clear-cached-data-android-phone

Step 3: Tap on “Cached data

You can see the below message: This will clear cached data for all apps.

clear-cached-data-for-all-apps-android

Step 4: Tap on “Delete

That’s it. If you’ve problem implementing above steps to delete unnecessary files android phone, let me know on below comment box, would be pleasure to help you. Fell free to share this trick with your friends on social network such as Facebook, Instagram, Twitter, LinkedIn etc.

Android Oreo Notifications Settings

How to use Android Oreo notifications settings. You can see notifications settings under apps & notifications sections. You can show or hide lock screen notification, use notification dots, enable override Do not disturb, and disable notification sound on Android Oreo 8.0 devices. Android 8.0 Oreo has several useful notifications features including notification dots, blink light, hide app running in the background notification, and more. Below you can see step by step process to change or reset notification settings Android Oreo 8.0.

Read Also:

How to Use Android Oreo Notifications Settings

Check out below-given notification settings of Oreo, which makes your android Oreo better than Android Nougat OS.

How to Enable/Disable Notification Dots on Oreo 8.0

Sometimes we busy working at home or office and got several notifications on different apps. This notification dots feature is helpful to see missed notifications on your device. You can see different color dots on apps not read by you.

Android Oreo app notification settings

To quickly turn off notification dots on Oreo device, Go to Settings > Apps & notifications > Notifications > Disable allow notification dots

Check out below given other ways to disable Android Oreo 8.0 notifications.

Step 1: Go to Settings in your android 8.0 devices.

Step 2: Tap Apps & notifications.

Step 3: Tap App info.

Step 4: Tap App wants to turn off notification dots.

Step 5: Tap App notifications.

By default enabled notification dots on android Oreo devices.

Step 6: Toggle off “Allow notification dots”.

Quickly Disable Notification Dots From Home Screen

Step 1: Tap & hold the Blank screen in your Oreo device home screen.

Step 2: Tap Settings gear icon.

By default enable notification dots on android Oreo devices.

Step 3: Toggle off “Allow notification dots” in Android Oreo.

How to Disable App Notifications on Android Oreo 8.0

Individually disable app notification in the Oreo device.

Step 1: Go to Settings in your Oreo devices.

Step 2: Tap Apps & notifications.

Step 3: Tap Notifications.

Step 4: Again tap Notifications.

List of installed apps views in your device.

Step 5: Tap App wants to disable notifications.

Turn off app notifications on android 8.0 Oreo device

Step 6: Turn off the toggle button.

Now you will not get any notifications of this app on your Android Oreo devices.

How to Disable App Notification Sound on Android Oreo

Disable app notification sound on android 8.0 Oreo

Settings > Apps & notifications > Notifications > Again notifications > App > Toggle off Allow sound

Change App Notification Settings on Android 8 Oreo

Step 1: Go to Settings in your Oreo devices.

Step 2: Tap Apps & notifications.

Step 3: Tap Notifications.

Step 4: Again tap Notifications.

Step 5: Tap App.

Android Oreo notifications settings

Here you can see various app settings such as lock screen notification content, notification dots, notification sound, Override Do not disturb, categories and more. Change app notification settings in android Oreo you want.

How to Show or Hide Lock Screen Notification Content on Android 8 Oreo

By default set show all notification content in your Oreo and other device. You can change lock screen notification content settings using below settings.

Step 1: Go to Settings > apps & notifications > Notifications > On the lock screen.


Hide lock screen notification content on android 8.0 Oreo

Step 2: Choose from Show all notification content/Hide sensitive notification content/Don’t show notifications at all.

You can also see the other two options in android Oreo notifications settings.

Swipe fingerprint for notifications

This is the shortcut to quickly check your notifications in Oreo. To see notifications, swipe down on the fingerprint sensor on the back of your Google Pixel and Pixel device.

Read: Android Oreo moves gesture

Blink light

This feature is useful to blink light when you get any call or message related notifications on your android Oreo device. Also known as LED notifications light. By default turn off blink light on android Oreo 8.0 devices. To enable LED notification light on android Oreo, Go to Settings > Apps & notifications > Notifications > Enable Blink light

And that’s all about android Oreo notifications settings. Do you have any Oreo notification tips want to share we missed above? Tell us in below comment box. Don’t miss out to check our other Android 8.0 Oreo tips and tricks.

How to Restrict Background Data For Individual Apps on Android 10

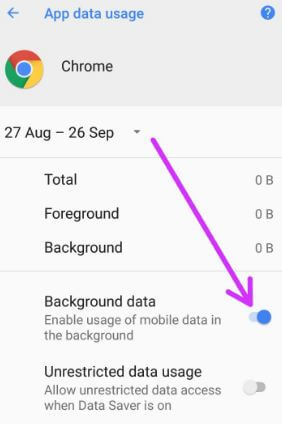
Get rid of background running apps on your android 10? This tutorial explains to you about restricting data usage on Android 10. You’ll enable or disable background data of the app to reduce data usage on android 10 and other devices. By default enable usage of mobile data in the background. Several apps running in the background even we don’t use. You can set data limits or data warning on android 10 if you don’t want to restrict app background data.

Individually restrict data usage by the app using network and internet settings in your android phone. Follow the below-given step by step process to reduce data usage on Android 10 devices.

Read Also:

How to Restrict Apps From Using Data on Android 10   

Two ways to prevent the app from using mobile data on background in your android 10 devices. Let see one by one.

1st Method: Restrict background data usage Android 10

Step 1: Go to settings.

Step 2: Tap on Network and internet.

Mobile network Settings Android 10 phone

Step 3: Tap Mobile network.

Restrict background data usage Android 10

Step 4: Tap on App data usage.

Reduce data usage on android 10

Step 5: Select the app from the list that usage more background data.

Disable background data of app Android 10

Step 6: Turn off toggle Background data

You can also use Wi-Fi settings to restrict app usage more WiFi data on your phone.

Settings > Network and internet > WiFi > WiFi data usage > Select app > Background data toggle off

2nd Method: Restrict data usage on Android 10 using apps & notifications settings    

Step 1: Go to settings.

Step 2: Tap Apps and notifications.

Step 3: Tap See all apps.

Step 4: Select the app from a list you want to reduce data usage.

Mobile data and WiFi usage Android 10

Step 5: Tap on Mobile data & WiFi.

How to restrict data usage on Android 10

Step 6: Turn off background data toggle.

You can also enable data saver on android 10 to reduce data usage. It will useful to prevent some apps from sending or receiving data in the background.

Step 1: Go to settings in your Android 10.

Step 2: Tap on Network and internet.

Step 3: Tap on Data saver.

Use data saver on Android 10 to restrict apps

Step 4: Turn on Use data saver toggle.

Turn off Background running Apps on Android 10

Swipe up one time only to open the recent apps > Swipe screen right side until seeing clear all > Clear all

And that’s it. I hope this little article useful to restrict data usage on Android 10. Do you still have any questions regarding this tip? Tell us in below comment box. Don’t forget to check out our other android tips and tricks.