How to Fix Home Button Not Working on Android Phone

Here’s how to home button not working Android phone. One of the most common reasons for the Android home button stopped working is a system update or hardware issue or screen replacement. The other reason is dust and moisture after a long time not use. Sometimes software key problem is also the common hardware problem after update OS. People annoying when the home or power button not working, they press the home button hardly to get a response but don’t work.

Read Also:

How to Fix Home Button Not Working on Android phone

Apply the below-given troubleshooting solutions to fix the home and back button not working on Android and Samsung Galaxy devices.

Restart your Android

Restart your Android to fix home button not working problem

Long press the power button and tap on the restart to reboot your phone and check the home button work.

Clear System UI Cache

Clear System UI Cache to fix home button issue Android

Settings > Apps & notifications > See all apps > Three vertical dots at the top right corner > Show system > Scroll down and tap on System UI > Storage & cache > Clear cache

Enable Safe Mode to Fix Home Button Not Working on Android Phone

Step 1: Long press the power button until view the power menu in your stock Android.

Home Button Not Working on Android or Samsung Galaxy

Step 2: Tap & hold the power off button until seeing Reboot to safe mode screen (Show below given screenshot).

Enable Safe Mode to Fix Home Button Not Working on Android

Step 3: Tap OK to boot your Android into a safe mode.

You can see the safe mode icon at the bottom left corner of the screen. Now, check the home button working in safe mode. If working then problem-related to hardware or OS issue. If you still facing issues in safe mode, downloaded the app causing this issue on your phone. Restart your phone to exit safe mode. Remove recently downloaded the app one by one and check to fix the issue. After finding the app that causing the issue, remove it, and re-install other apps.

Factory Reset Android

It will delete all your phone data, make sure backup & restore your phone data before performing the below settings.

Step 1: Open the “Settings” app on your phone.
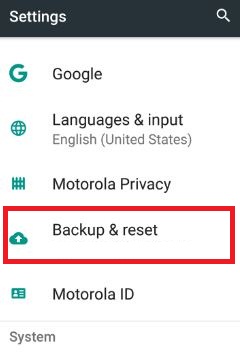
Backup & reset android phone 7.0 Nougat

Step 2: Tap “Backup & reset” under the personal section.
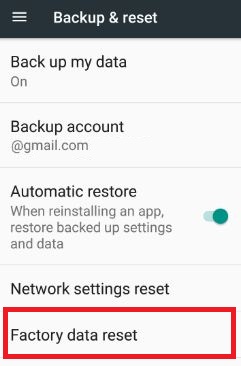
factory data reset phone 7.0 Nougat

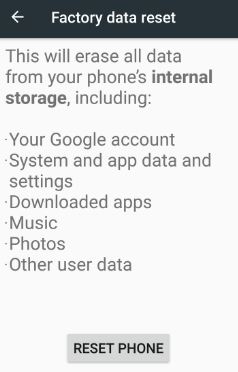
Step 3: Touch “Factory data reset”.

Reset phone on 7.0 nougat phone

Step 4: Tap on “Reset phone”.

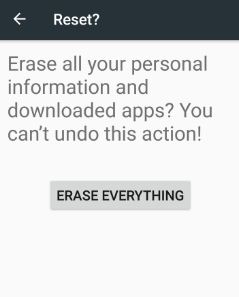
Erase everything on android 7.0 nougat

Step 5:  Tap “Erase everything”.

It will erase all data from you device’s internal storage.

How to Fix Home Button Not Working on Android Phone

Alternative Way (Stock Android 10): Settings > System > Advanced > Reset options > Erase all data (Factory reset) > Erase all data > Erase all data

Reset Android phone Using Recovery mode

Make sure back up your important data before wipe data or factory reset using the recovery mode.

Step 1: If turn on your phone, switch off it.

Step 2: Press & hold the volume down button and the power button at the same time until the phone switch on.

You can view the Android system recovery screen on your device. By default the “start” button seen on your Android device.
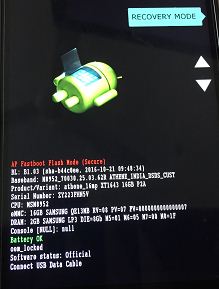
Home button not working android

Step 3: Press the volume down button until see “Recovery mode”.

Step 4: Press the power button to restart in recovery mode.
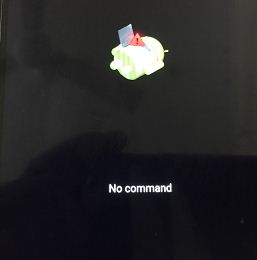
Android robot icon with red triangle

You can see the above screen of the Android robot with a red exclamation mark (red triangle) on the phone screen.

Step 5: Press the volume buttons to scroll to “Wipe cache/factory reset ”, press the power button to select it.

This message view on the screen: Wipe cache?
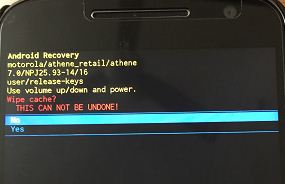
Android nougat Wipe cache partition

Step 6: To confirm, use the volume buttons to scroll to “Yes” and press the power button to select it.

Clearing the cache data may take 1-2 minutes.
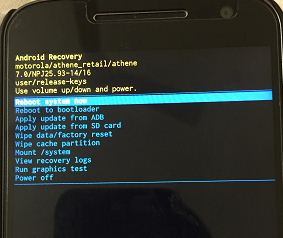
android nougat reboot system

Step 7: Use the volume buttons to scroll to “Reboot system now”, press the power button to select it.

We hope one of the above-listed solutions on how to fix home button not working Android phones will work for you. Do you have any alternative methods? Share it with us in the below comment box. Share this article with your friends on social networks!
How to Make a Call Using Google Voice Search on Android

Send a text message or make a call using Google voice search on your Android phone. It’s easy to use Google voice search in Android devices. Before use, this Google feature, make sure to enable “Ok Google” on your Android phone and internet working on your device. If you are offline, you can open a calendar, make a call, send messages, and create events using this Google voice search feature. Also, schedule an appointment, search music & videos and play it, set alarm reminders & create an event, turn on or turn off Wi-Fi and Bluetooth, easily find direction & places, search questions & instantly get answers, show pictures, send an email, and more. Just press the voice search button to start using this Google feature on your Android devices.

Read Also:

How to Make a Call Using Google Voice Search on Android

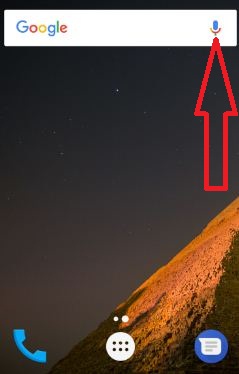
Tap on Googel voice search button on Android Nougat

Step 1: Tap on the “Google voice search” button form the home screen on your device.

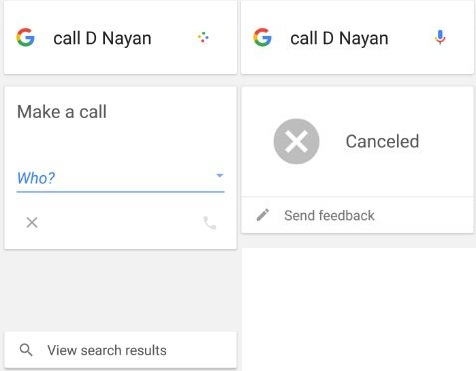
make a call using Google voice on android

Now, speak the name of the caller wants to call using voice search. If more than one contacts available for that name, it will ask to which one you call? If this contact is not available in your phone address book, it will ask you who calls. You can also cancel the call before calling.

make a call using Google voice search

Step 2: Say yes to make a call or say cancel to cancel a call.

You can also send SMS/WhatsApp messages and other messenger apps to send messages using this voice search feature on your android phone or tablet. That’s all.

Let me know on below comment box if you have any kind of trouble to make a call using Google voice search on Android. Do let us know about how your Google voice search features experience!

How to transfer contacts from Android device to PC

There are various different methods to transfer contacts from Android device to PC. To transfer contacts, first of all Export contacts into SD card & using USB cable connection easily transfer into PC. Sync your gmail account and transfer contact PC and using Samsung Kies software, you can add, delete and export music, photos, text messages and videos one device to other. Also you can check this best data transfer apps for Android devices.

Don’t worry, here you can see simplest solution to easily transfer contacts android to android and android to PC or laptop. No need have installed any software on your device such as Samsung kies, Android data manager and more. Below you can see various ways to transfer contacts from Android device to PC / Laptop.

Don’t Miss this:

How to transfer data from Android to OnePlus 6T

How to move data from Android to iPhone using Xender

How to transfer SMS from android to PC

4 different methods to transfer contacts from Android device to PC

Check out below given different methods to transfer data from Android phone or Samsung galaxy phone to desktop or laptop devices.

1st way: Export contact to SD card & transfer it from Android device to PC

Step 1: Open “Contacts” app on your device

Contacts More option

Step 2: Tap on “More” option from top right side corner

Tap on Settings under contact

Step 3: Tap on “Settings”

Import or Export contacts under settings

Step 4: Under manage and back up contacts section, tap on “Import / Export contact”

Step 5: Click on “Export”

Export contacts SIM to device storage

Step 6: Select contacts from device storage / SIM 1 / SIM 2

Open Contacts vcf files on PC

Now on your device storage you can see the “Contacts.vcf” files, it contents your entire contact list.

Step 7: Now connect your phone to PC via USB cable

Step 8: Copy this “Contacts.vcf” file to PC

Now you can view all of your android phone contacts in PC.

2nd way: Direct transfer contacts android phone to PC using Google account

Step 1: Follow above given steps 1 to 3

Step 2: Under manage and back up contacts section, tap on “Google account”

Step 3: Now log in your Gmail account in PC

Tap on Google Apps in Gmail account

Step 4: Tap on “Google apps” symbol

Click in Contacts in Google account

Step 5: Click on “Contacts”

You can see all your phone contacts transfer to PC or laptop device.

Read Also:

How to export files from Dropbox to Android device

How to transfer SMS from Android to PC or Laptop

3rd Way: Transfer contacts to PC using Gmail Sync

Step 1: Go to “Settings” app

Step 2: Tap on “Accounts”

Tap on Google under accounts section

Step 3: Tap on “Google”

Step 4: Tap on “More”

transfer contacts from Android device to PC

Step 5: Tap on “Sync now”

Before click on contacts, must import all your contacts from android device to Gmail account.

Step 6: Click on “Sync Contacts”

Now follow above given method 2 steps number 3 to 5 on your PC or laptop.

4th way:  Transfer contacts from Android device to PC using Samsung Kies / Android data manager

First of all download Samsung Kies software from below link. This Samsung Kies connects your android phone or PC, you can synchronize your phone data including contacts, photos, videos and other data between phone and PC or laptop.

Samsung Kies3 for Windows

Samsung Kies for MAC OS

That’s all. Don’t forget to mention which of the above methods work for you to transfer contacts from Android device to PC or Laptop device. If you have any problem, let us know on below comment box, would be pleasure to help you.

Charging slowly android phone & tablet: How to fix

When your android phone is charging and it takes more time to charge or sometimes not charge properly. Are you tired about this problem of charging slowly android phone? There are several issues that cause of slowly charging android phone such as USB cable damage, battery depleted, charger not works properly, physical damage and more.

Follow below given tricks to fix slow charging on android phone such as Moto G4 plus (Android 7.0 Nougat), Samsung galaxy S7 & S7 edge, Galaxy note 4, LG V20 / V10 and more. To make faster charging android device, try below troubleshooting steps. After each step check if charging slowly android phone is fixed or not.

Don’t miss this:

How to fix Google Pixel charging issues

How to fix Pixel 3 XL Won’t turn on issues

Fix wireless charging issues on Galaxy S9 & S9 Plus

How to fix slow android phone or tablet

How to fix Charging slowly android phone or android tablet

  1. Only use original charger to charging device that came with your phone
  2. Check micro-USB cable fits perfectly into the device and also check any damage to the plug or wire
  3. Reboot the phone

To reboot your android phone, just pressing and holding the power button for few seconds.

  1. Scroll down top of the status bar & tap on USB notifications and click on “Charging only”
  2. Check the electrical outlet switch, it is turn on or off
  3. Check the wall outlet for loose connection or damage on wire, if not work properly then try another switch outlet for charging.
  4. If battery is completely depleted, connect charger and wail at least 15 minutes until it has enough voltage to charge, press the power button.
  5. Reset your android phone

Reset you phone will erase all your internal storage data from phone such as photo, videos, text messages, Google account, downloaded apps, system & app data and other information. Before erase and reset you phone, back up your android phone data to your PC using USB cable or Wi-Fi connection.

You might like this: 

How to transfer files from android to PC using Dropbox

How to transfer files from android to iPhone 6 using Xender

Follow below given settings to reset android Nougat 7.0 (Moto G4 plus) phone and other android devices.

Charging slowly android

Settings > Personal > Backup & reset > Factory data reset > Reset phone

The list of tips ends. Do let us know which one trick is worked for you to fix Charging slowly android phone & tablet devices. If you have known other simple & easy method to fix slow charging android phone then please share with us. Don’t forget to share this article with your friends!

How to Clear Cache on Android 16 (Beta)

Do you know that your phone has temporary files known as cache? You can’t clear all cache at once on your Android device. Let’s look at the steps below to clear cache on Android 16 (Beta)/15/14/13/12/11/10 and make your Android Phone faster. If you are using latest Android, you can utilize the steps to clear the app cache on Android. You can clear the cache Android phone with just one click. It will help you to remove the app’s temporary data and free up space, and this will help you to improve the app’s performance on your device. Also, your app will run without any problem.

Sometimes apps run in the background, and you don’t need the application. You can force-stop the app or clear the cache on your Android Device. Let’s check out the step-by-step process to clear the cache on your Android phones and tablets.

Read More: How to Clear Spotify Cache on Android, iPhone, PC, Mac

How to Clear Cache on Android 16 (Beta)

You will also get some apps in the play store to clear the cache on Android, like the clean master, CCleaner, and much more you can download. These apps will delete all the unnecessary data and cache files. This clear cache in Android devices will free up your smartphone’s storage and improve phone performance. Apply the below steps to your Android clear cache process.

How to Clear the App Cache Android 16 (Beta)

It will temporary delete that app’s data from your Android phone.

Step 1: Open the App drawer on your device.

or

Go to Settings > Apps > See all apps > Tap the App you want to clear the cache.

Step 2: Long-press the app icon and tap the i icon.

You can see specific app settings here.

Step 3: Tap on Storage & cache.

Step 4: Tap on Clear Cache.

How to Clear Cache on Android 13 and Android 12 for Individual Apps

Step 1: Go to Settings.

Go to Apps settings to select the App you want to clear cache on Android

Step 2: Tap on Apps.

You can see list of all installed apps here.

Open the App you want to clear cache on Android Phones

Step 3: Scroll down and tap on See all apps.

How to Clear the Cache on Android 12 for Individual Apps

Step 4: Select the App you want to clear the cache.

Clear Cache on Android using App settings

Step 5: Tap the Storage & Cache.

How to Clear Cache on Android 12 and Android 11

Step 6: Tap the Clear cache.

Now, clear the Android phone cache on your device.

How to Clear Cache Android for Permanently Delete Data

Clear App Data on Android 12 and Android 11

Settings > Apps > See all apps > Select the App > Storage & cache >Tap Clear data or Clear storage > Delete.

How to Clear System (System App) Cache Android

You can clear the Android system cache in the latest devices using the below-given settings.

How to Clear System (System App) Cache Android Phones

Settings > Apps > See all apps > Tap three dots at the top right > Show system > Select the System app > Clear cache.

How to Clear Cache on Google Play Store Android 13, Android 12, and Android 11

You can clear the play store cache using the settings below on your latest Android phones and tablets.

How to Clear Cache on Google Play Store on Android Phones

Settings > Apps > See all apps > Google play Store > Storage & cache > Clear cache

How to Clear Message Cache on Android 13, Android 12, and Android 11

How to Clear Message Cache on Android Phones and Tablets

Settings > Apps > See all apps > Message > Storage & cache > Clear cache

Read More: How to Clear Instagram Cache

How to Clear App Cache on Samsung (One 5.1)

Settings > Apps > Select the App > Storage > Clear cache

How to Clear Cache on Tablet – Samsung (One UI 4.1)

Settings > Apps > Select the App > Storage > Clear cache at the bottom right

How to Clear Google Play Cache

Settings > Apps > See all apps > Google play > Storage & cache > Clear cache

How to Clear Cookies on Android 13/12/11 – Google Chrome Browser

Step 1: Open the Google Chrome browser on your phone.

Step 2: Tap Three vertical dots (More) at the top right corner.

Step 3: Tap the Settings.

Step 4: Tap the Privacy and Security.

Step 5: Tap on Clear browsing data.

Step 6: Tick marks the box you want to clear (Browsing history, Cookies and site data, Cache images, and files).

How to Clear Cookies on Android 12 for Chrome Browser

Step 7: Tap on the Clear data button.

How to Clear App Cache Android 11

Step 1: Go to Settings.

Step 2: Tap the Apps & Notifications.

Step 3: Scroll and tap the See all apps.

Step 4: Choose an App you want to clear the cache.

Step 5: Tap on Storage & Cache.

Step 6: Tap on Clear cache.

How to Clear App Cache on Android 10/Android 9 (Pie)

Settings > Apps & notifications > Select the App > Storage > Clear cache.

How to Clear Android Cache and Data on Android 8.1 & 8.0 (Oreo)

Step 1: Go to Settings on your device.

Step 2: Tap Apps & Notifications.

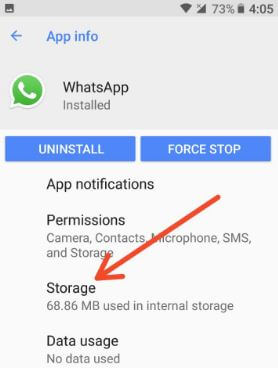
Step 3: Tap App info.

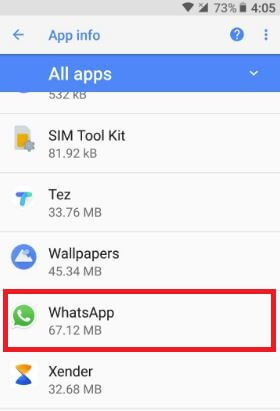
Tap WhatsApp under list of all apps in Oreo

Step 4: Tap the App name want to clear the cache.

Tap storage under app info in android Oreo

Step 5: Tap Storage.

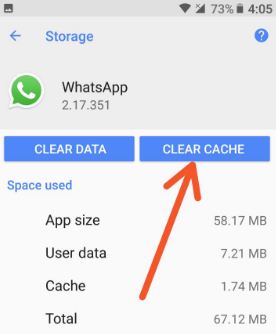
Clear cache data in Android Oreo 8.0

Step 6: Tap Clear cache.

Now delete the cache Android device.

Clear Data Android: Settings > Apps & notifications > App info > App > Storage > Clear data > OK.

How to Clear All Cache at Once on Android 8.1 (Oreo) Clear System Cache/Wipe Cache

It will clear all app’s cache at once on your Android device. Not all Android devices support this setting.

Step 1: Turn off your Android devices.

Step 2: Press & hold the volume down button and the power button at the same time until the phone vibrates.

You can view the Android system recovery screen on the screen. By default, the Start button view on your device.

Step 3: Press the volume down button until you view recovery mode.

Step 4: Press the power button to restart into recovery mode.

You can see the above screen of the Android robot exclamation mark with a red triangle logo on your phone.

Step 5: Press & hold the power button and volume up buttons once. Now press the volume down button until highlighting wipe cache partition, and press the power button to select it.

This message view on your devices: Wipe all user data?

Step 6: To confirm, press the volume down button to scroll to Yes and press the power button to select it.

Clearing the cache may take 4-5 minutes.

Step 7: Press the volume down buttons to scroll to reboot system now, and press the power button to select it.

I hope all the above steps are clear to you. Please feel free to ask any questions in the comment section. Also, never miss our latest post for your Android Device.

Read More:

How to Activate Call Waiting in Android 10, 9 Pie, 8.0 Oreo

Here’s the complete guide to enable call waiting in android 8.0 Oreo. Call waiting feature is useful when your phone is during a call and someone makes trying to call you. So if turn on call waiting in your Oreo and other latest android devices, it will notify you about incoming calls. You can find a call waiting option in android 8.1 & 8.0 Oreo (Compatible with Android 10, 9 Pie) under call settings.

In android Oreo call settings, you can see SIP settings, call forwarding, call waiting and caller ID settings. Several users can’t find calls waiting in their devices. Have you been ever facing this type of issue? Follow the below-given step by step process to activate call waiting in android 8.0 Oreo devices such as Google Pixel, Pixel XL, Pixel 2, Pixel 2 XL, Galaxy S9/S8, Note 8, Mi A1 and more.

Read Also:

How to Enable Call Waiting in Android 8.0 Oreo

Let see steps to activate call waiting for Android 10, 9 Pie and earlier up to marshmallow 6.0 devices.

Activate Call Waiting Android 10 & 9 Pie

Step 1: Open the Phone app in your latest Android device.

Step 2: Tap on Three Vertical Dots (More) at the top right corner.

Step 3: Select Settings.

Step 4: Tap on Calls.

Here you can activate call forwarding, Wi-Fi calling (Only Android 10), and more.

Step 5: Tap on Additional settings.

Step 6: Make sure toggle on Call waiting.

Also, choose default called ID settings from Network default, hide the number, or Show number in your latest android 10 devices only.

For Android 8.1 & 8.0 Oreo

Step 1: Open phone call app in your android Oreo devices.

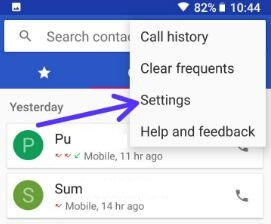
Step 2: Tap on Three vertical dots (Menu) at the upper right side corner.

Contacts app in android Oreo

Step 3: Select Settings.

Here you can see android Oreo phone call settings such display options, calls, call blocking, voicemail, accessibility, caller ID & spam and more.

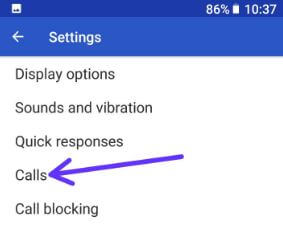
Calls in android 8.0 and 8.1 Oreo

Step 4: Tap on Calls.

Additional settings in android 8.0 Oreo

Step 5: Tap on Additional settings

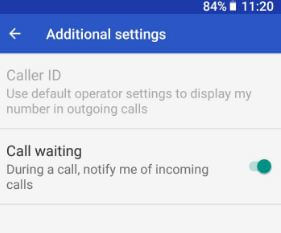
In additional settings, you can see caller ID and call waiting options.

How to activate call waiting in android 8.0 Oreo

Step 6: Turn on call waiting toggle button.

If you don’t want to use call waiting, disable it in your android Oreo devices.

How to Enable or Disable Call Waiting in Android 7.1.2 Nougat

Step 1: Open the Phone app.

Step 2: Tap on Menu at the upper right corner.

Step 3: Select settings.

Step 4: Tap on calling accounts.

Step 5: Choose from SIM 1/SIM 2.

Step 6: Tap on Additional settings

Step 7: Tick mark the box “Call Waiting”

Now turn on call waiting in android 7.1.1 Nougat devices.

How to Enable call waiting in Android Marshmallow 6.0

Settings > More > Settings > call settings > More settings > call waiting

Did you find the above tutorial helpful to activate call waiting in Android 8.0 Oreo? If you have any kind of question, tell us in below comment box. We will respond as soon as possible. Stay and connected with us for latest technology updates. Check out our other android 8.0 tips.