How to Record Your Screen on Android in 2026 (Samsung, Pixel, OnePlus + More)

Does Your Android Phone Have a Built-In Screen Recorder?

Most Android phones released after 2020 have a built-in screen recorder. Here is a quick check:

Phone BrandBuilt-in Screen Recorder?Android Version Required
Samsung Galaxy (S, A, Z series)YesOne UI 2.0+ (Android 10+)
Google PixelYesAndroid 11+
OnePlusYesOxygenOS 10+ (Android 10+)
Xiaomi / Redmi / POCOYesMIUI 10+ / HyperOS
Oppo / RealmeYesColorOS 7+
Vivo / iQOOYesFuntouch OS 10+ / OriginOS
MotorolaYesAndroid 11+
Nokia / Stock AndroidYesAndroid 11+

If your phone runs Android 11 or newer, you almost certainly have a screen recorder. If you have an older phone running Android 10 or below, use a third-party app (see bottom of this article).

How to Screen Record on Samsung Galaxy

  1. Swipe down from the top of the screen twice to open the Quick Settings panel in your Samsung phone
  2. Find and tap Screen Recorder (swipe left in Quick Settings if you do not see it)
  3. Choose your sound option: No sound, Media sounds, or Media sounds and mic
  4. Tap Start Recording
  5. A 3-second countdown appears, then recording begins
  6. A small floating toolbar shows at the top with Pause, Stop, and Camera (selfie) buttons
  7. Tap Stop when done. The recording is saved to Gallery > Screen Recordings
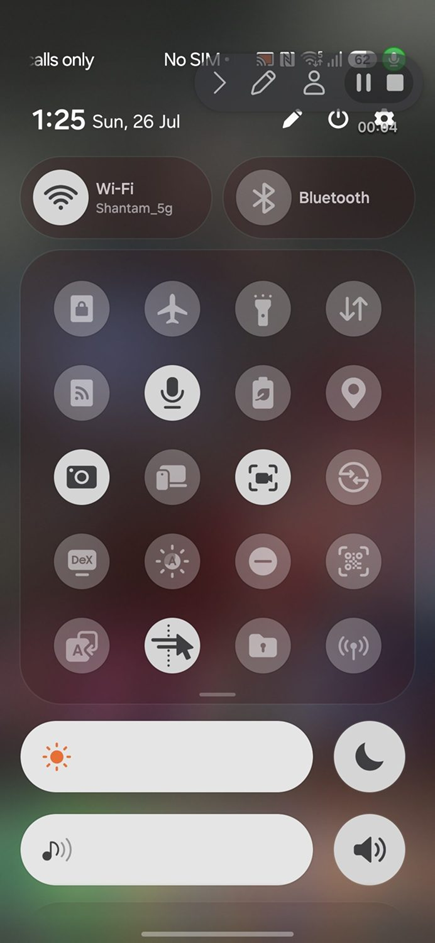
Swipe down twice on a Samsung phone to reach the full Quick Settings grid where Screen Recorder lives
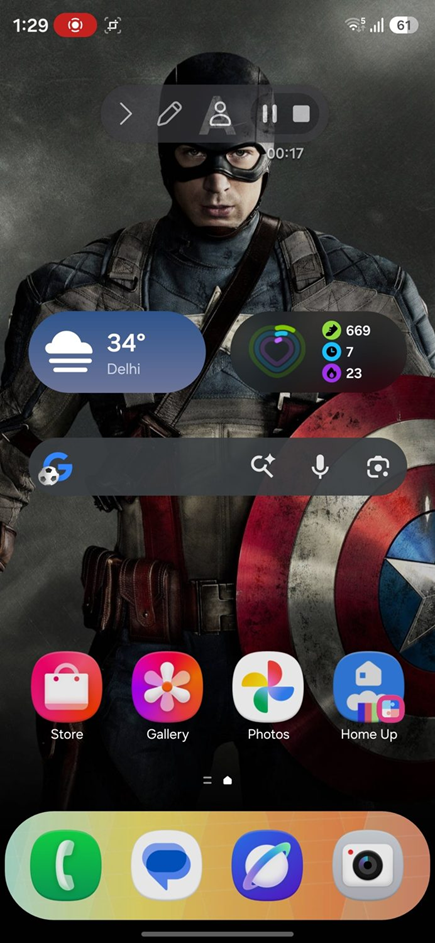
Once recording starts, Samsung shows a floating toolbar with draw, selfie camera, pause and stop, plus a live timer.

Samsung Extra Features

  • Selfie overlay: Tap the person icon in the floating toolbar to show your face from the front camera in a small circle
  • Draw on screen: Tap the pencil icon to draw or annotate during recording
  • Pause and resume: Tap the pause button to pause without creating a new file
  • Video quality: Settings > Advanced Features > Screenshots and Screen Recorder > Video Quality (720p, 1080p, or WQHD+)

How to Screen Record on Google Pixel

  • Swipe down from the top twice to open Quick Settings in your Pixel phone
  • Tap Screen Record (if not visible, tap the pencil icon to add it to Quick Settings)
  • Choose: Record audio (Device audio, Microphone, or Device audio and microphone)
  • Toggle Show touches on screen if you want tap indicators visible in the recording
  • Tap Start
  • A 3-second countdown begins, then recording starts
  • To stop, swipe down and tap the Screen Recorder notification > Stop
  • The recording is saved in Files > Movies or Photos > Library
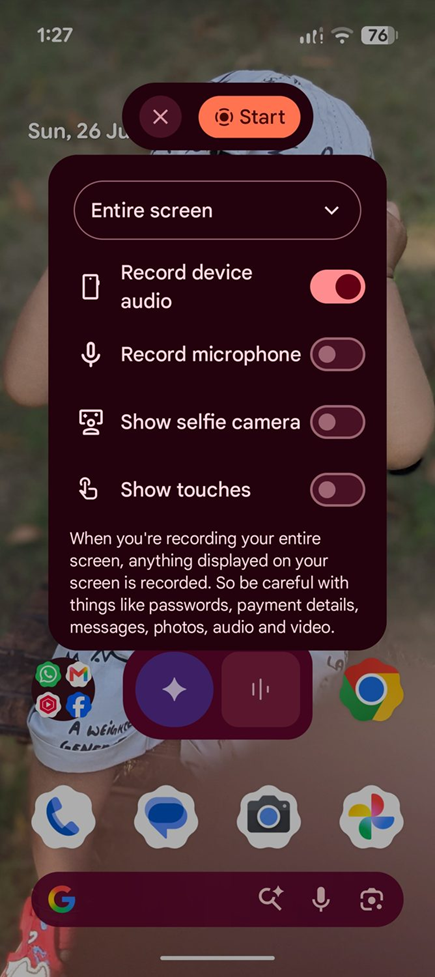
The Pixel Screen Record dialog: choose Entire screen or a single app, then toggle device audio, microphone, selfie camera and Show touches.

Pixel Extra Features

  • Show touches: Displays a white dot wherever you tap on screen. Useful for tutorials.
  • Device audio recording: Pixel can record internal audio from games and apps without picking up ambient noise from the microphone

How to Screen Record on OnePlus

  1. Swipe down from the top twice to open Quick Settings in your OnePlus phone
  2. Tap Screen Recorder
  3. A floating control panel appears with Start, Settings, and Close buttons
  4. Tap the Settings gear icon to configure: Video resolution (720p/1080p), Audio source (Internal audio/Microphone/Both/None), Show touches
  5. Tap the Record button to start
  6. Tap the Stop button in the floating panel when done
  7. Recording is saved in Files > Screen Recordings
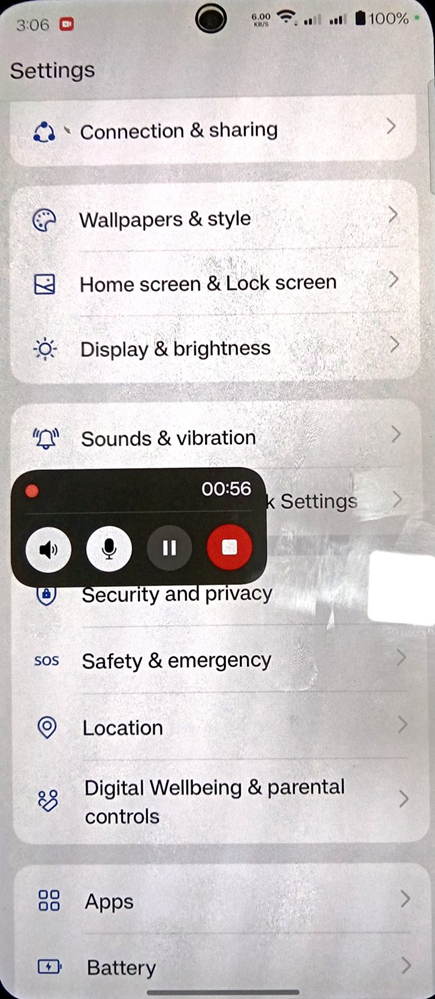
OnePlus (OxygenOS) shows a compact floating panel while recording: speaker audio, microphone, pause and the red stop button, with the elapsed timer above.

How to Screen Record on Xiaomi / Redmi / POCO

Xiaomi has one of the most feature-rich built-in screen recorders:

  • Open the Screen Recorder app (find it in your app drawer or search for it)
  • Tap the Settings gear icon in the top right corner to configure: Resolution (720p, 1080p, 1440p), Frame rate (24, 30, or 60 fps), Audio source, Video quality
  • Tap the red Record button
  • A floating Stop button appears. Tap it to stop recording.
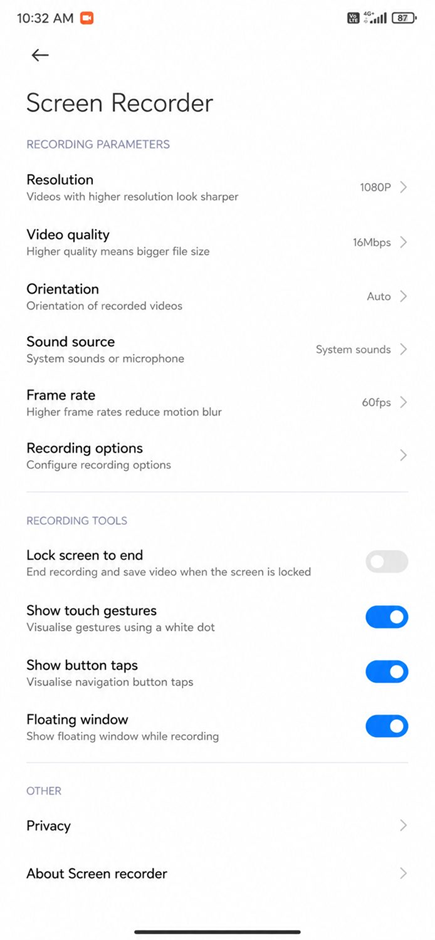
Xiaomi’s Screen Recorder has the most settings of any built-in recorder: resolution up to 1080p, bitrate up to 16 Mbps, frame rate up to 60fps, sound source, and toggles for touch gestures and button taps.

Xiaomi Extra Features

  • 60 fps recording: One of the few brands that offers 60 fps recording by default, which is great for gameplay
  • Custom resolution: You can set a custom resolution, not just preset options
  • System sound only: Clean internal audio recording without microphone noise

How to Screen Record on Stock Android (Motorola, Nokia, etc.)

  • Swipe down twice from the top of the screen
  • Tap Screen Record
  • Choose: Record audio (Device audio, Microphone, Device audio and microphone)
  • Toggle Show taps if needed
  • Tap Start. A countdown begins.
  • To stop, swipe down and tap Stop on the notification

Screen Recording Audio Options Explained

One of the most confusing parts of screen recording is the audio settings. Here is what each option means:

Audio OptionWhat It RecordsWhen to Use It
No audio / NoneVideo only, completely silent recordingRecording sensitive content, or when you plan to add a voiceover later
Device audio / Internal audio / Media soundsOnly sounds from apps (game audio, music, video call audio from the other person)Gameplay clips, app demos, recording a YouTube video playing on your phone
MicrophoneOnly your voice and ambient sounds from the microphoneNarrating a tutorial without app sounds
Device audio + Microphone / BothInternal app audio AND your voice from the microphoneTutorial with voiceover, commentary over gameplay, video call recording (both sides)

Note: On Android 10 and older, internal audio recording was not supported by Android. Only microphone audio was available. Starting with Android 11, Google added official support for internal audio recording, and most phone brands have implemented it.

How to Screen Record While Gaming

If you want to record your gameplay, here are the best settings for a smooth recording:

  • Set resolution to 1080p (not higher). Recording at 1440p or 4K while gaming can cause frame drops because your phone is rendering the game AND encoding the recording simultaneously.
  • Set frame rate to 30 fps. Recording at 60 fps during gaming doubles the processing load. Unless you have a flagship phone with a powerful chip (Snapdragon 8 Gen 3 or newer), stick to 30 fps.
  • Use Device Audio only (not microphone). This gives clean game sound without background noise.
  • Close other apps before recording to free up RAM.
  • Make sure you have at least 2-3 GB of free storage. A 10-minute gameplay recording at 1080p/30fps creates a file of approximately 250-400 MB.

Best Third-Party Screen Recorder Apps for Android

If your phone does not have a built-in screen recorder, or if you need additional features, these are the best third-party options:

AppBest FeatureInternal AudioAdsPrice
AZ Screen RecorderNo time limit, no watermark, can livestream to YouTube/FacebookYes (Android 11+)Yes (removable)Free, Pro $2.99
XRecorder by InShotBuilt-in video editor, facecam overlay, clean interfaceYes (Android 11+)Yes (removable)Free, VIP $7.99/year
MobizenClean recording mode (hides notification bar and buttons)Yes (Android 11+)YesFree, Premium $3.99
ADV Screen RecorderTwo recording engines (default + advanced), no root requiredYes (Android 11+)MinimalFree

Note: All third-party screen recorders that claim to record internal audio on Android 10 and below either require root access or are using a workaround that records from the speaker via the microphone (lower quality). On Android 11 and newer, internal audio recording works properly through all these apps.

Troubleshooting: Screen Recording Not Working

Screen recorder option not in Quick Settings

On most phones, you need to add it manually: Swipe down twice > tap the Edit (pencil) icon > find Screen Recorder in the available tiles > drag it to the active area > tap Done.

Screen recording is greyed out or disabled

  • Some apps (banking apps, DRM-protected streaming services like Netflix, Disney+, and Amazon Prime Video) actively block screen recording for security reasons. You will see a black screen or receive an error.
  • Some workplace device management (MDM) policies disable screen recording. Contact your IT department.
  • Make sure you are not in a phone call. Some phones disable screen recording during active calls.

Recording has no audio

  • Check that you selected an audio option before recording (not ‘No audio’)
  • Some apps mute internal audio during recording (video call apps may do this for privacy)
  • Make sure Do Not Disturb mode is off

Recording is laggy or stuttering

  • Lower the recording resolution (switch from 1080p to 720p)
  • Lower the frame rate to 30 fps or 24 fps
  • Close background apps to free up RAM and CPU
  • Make sure your phone is not overheating. Phones throttle performance when hot, which makes recordings choppy.

Frequently Asked Questions

How do I enable screen recording on Android?

On Android 11 and newer, screen recording is built in. Swipe down twice from the top of the screen to open Quick Settings and look for the Screen Record tile. If it is not visible, tap the pencil/edit icon to add it. On older Android versions, download a third-party app like AZ Screen Recorder from the Play Store.

Why can I not screen record on Android?

The most common reasons are: your phone is running Android 10 or older (no built-in recorder), the app you are trying to record blocks it (banking and streaming apps), your workplace MDM policy disables it, or the screen recorder tile is not added to your Quick Settings yet.

Can you screen record with internal audio on Android?

Yes, starting with Android 11 (released 2020). When you start a screen recording, select ‘Device audio’, ‘Internal audio’, or ‘Media sounds’ as the audio source. This records audio directly from apps without using the microphone, giving you clean audio without background noise.

Does Android have a built-in screen recorder?

Yes. Android has had a built-in screen recorder since Android 11 (September 2020). All major phone brands including Samsung, Google Pixel, OnePlus, Xiaomi, Oppo, Vivo, and Motorola include it. Samsung actually added their built-in screen recorder earlier, starting with One UI 2.0 on Android 10.
How to Free Up Space on Android in 2026: 15 Methods That Actually Work

First: Check What Is Using Your Storage

Before deleting anything, see what is actually taking up space:

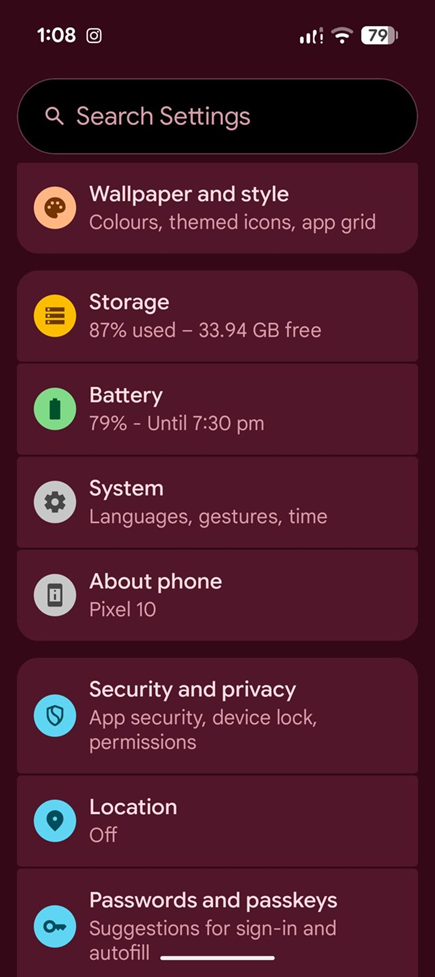
  1. Go to Settings > Storage (Samsung: Settings > Device Care > Storage)
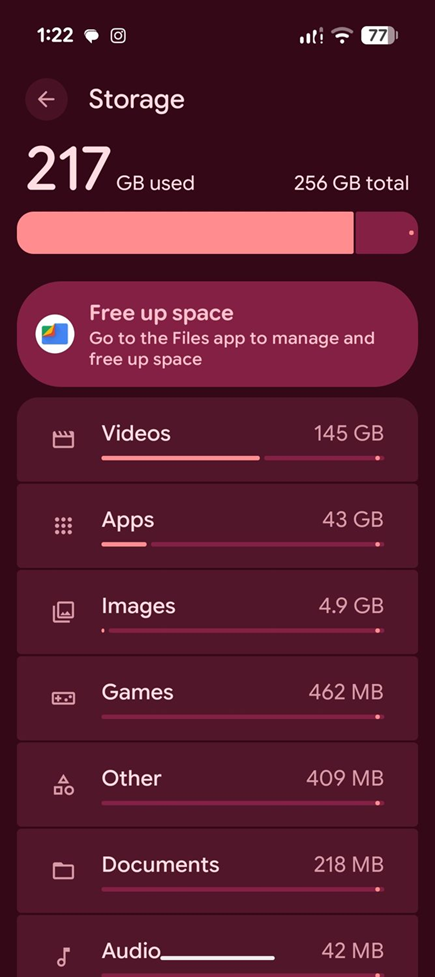
  2. You will see a breakdown: Apps, Images, Videos, Audio, Documents, System, Other
  3. Tap on each category to see details

The Settings list shows storage at a glance: 87% used, 33.9 GB free.

Storage breakdown: 217 GB of 256 GB used, with Videos alone taking 145 GB.

On most phones, the biggest space consumers are: Photos and Videos (40-50%), Apps (20-30%), and System files (15-20%).

Method 1: Delete Old Photos and Videos You Do Not Need (Saves 2-20 GB)

Photos and videos are almost always the biggest storage hog. A single 4K video can be 300-500 MB. A year of daily photos can easily use 5-10 GB.

  • Open Google Photos or your Gallery app
  • Sort by size if possible (in Google Photos: search ‘videos’ to find large files first)
  • Delete videos you no longer need, blurry photos, screenshots you have already used, and duplicate images
  • After deleting, empty the Trash/Recycle Bin (deleted photos stay in trash for 30-60 days and still use storage)

If you want to keep photos but free up space, back them up to Google Photos cloud (free up to 15 GB with a Google account, then $1.99/month for 100 GB) and select ‘Free Up Space’ in Google Photos settings.

Method 2: Clear App Cache (Saves 1-5 GB)

Every app stores temporary data called cache. Over time, apps like Instagram, Facebook, Chrome, Twitter/X, and TikTok can accumulate 500 MB to 2 GB of cache each.

Clear Cache for Individual Apps

  • Go to Settings > Apps
  • Tap on an app (start with social media and browser apps – they use the most cache)
  • Tap Storage
  • Tap Clear Cache (NOT Clear Data – Clear Data will log you out and delete saved information)

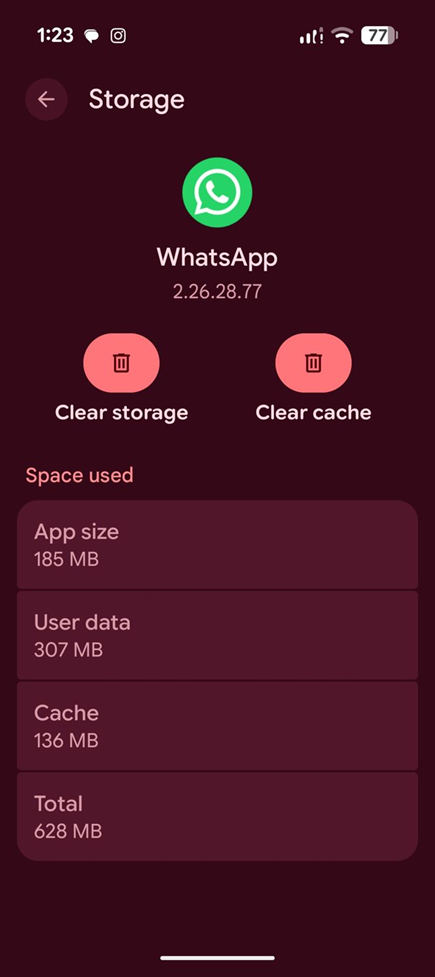
WhatsApp using 628 MB total, with 136 MB of it cache. Clear cache removes only the cache.

Clear All Cache at Once (Samsung)

Samsung phones let you clear all app cache at once:

  1. Go to Settings > Device Care > Storage
  2. Tap Clean Now or Temporary Files
  3. Confirm to delete all cached data

Clear All Cache at Once (Other Brands)

Most other Android phones do not have a one-tap cache clear option. You need to clear cache app by app, or use the Recovery Mode method: Power off your phone, hold Power + Volume Up to enter Recovery Mode, select ‘Wipe Cache Partition’, then restart. This clears system cache without deleting personal data.

Method 3: Uninstall Apps You Do Not Use (Saves 1-10 GB)

Check how many apps you have installed. Most people use only 10-15 apps regularly but have 50-80 installed.

  1. Go to Settings > Apps > Sort by size (largest first)
  2. Review apps you have not opened in the last 3 months
  3. Uninstall the ones you do not need

Games are often the biggest culprits. A single game like Genshin Impact uses 15-20 GB, Call of Duty Mobile uses 10-15 GB, and PUBG Mobile uses 5-8 GB. If you are not playing these games, uninstalling them frees up massive amounts of space.

Method 4: Delete Old Downloads (Saves 500 MB – 3 GB)

  1. Open the Files app (or My Files on Samsung)
  2. Go to the Downloads folder
  3. Sort by date (oldest first) or size (largest first)
  4. Delete old PDFs, APK files, ZIP files, and documents you no longer need

Many people forget about their Downloads folder. Old APK files, PDF attachments from emails, and ZIP files can accumulate over months and take up several gigabytes.

Method 5: Use Google Files to Find and Delete Junk (Saves 1-5 GB)

Google’s ‘Files by Google’ app (free) is one of the best storage management tools. It automatically identifies junk files, duplicate photos, old screenshots, and large files.

  • Download ‘Files by Google’ from the Play Store if not already installed
  • Open the app and go to the Clean tab
  • You will see suggestions like: Junk files, Duplicate files, Old screenshots, Large files, Backed-up photos
  • Review each suggestion and delete what you do not need

Files by Google is safer than third-party cleaner apps because it does not delete system files or anything important. It only suggests truly unnecessary files.

Method 6: Delete WhatsApp Media (Saves 1-10 GB)

WhatsApp is one of the biggest hidden storage consumers. Every photo, video, GIF, and document shared in your chats is saved to your phone’s storage.

  • Open WhatsApp > Settings > Storage and Data > Manage Storage
  • You will see total space used and which chats use the most storage
  • Tap on the heaviest chats and select media to delete
  • Use the ‘Larger than 5 MB’ filter to find and delete large videos first

Alternatively, go to your phone’s file manager and navigate to Internal Storage > WhatsApp > Media. You can delete entire folders like WhatsApp Video or WhatsApp Images. The messages in your chats will still be there, but the media will show as ‘download’ instead of displaying directly.

Method 7: Delete Old Text Messages with Attachments (Saves 200 MB – 2 GB)

MMS messages with photos and videos can add up over time. If you have years of text message history:

  • Open your Messages app
  • Long-press on old conversations you no longer need
  • Delete entire conversation threads, especially those with lots of photo attachments

You can also set messages to auto-delete after a certain period: In Google Messages, go to Settings > Message Organization > Auto-delete OTP messages after 24 hours.

Method 8: Offload Unused Apps (Samsung and Pixel)

Offloading removes the app but keeps its data, so if you reinstall it later, you do not lose anything.

  • Samsung: Settings > Device Care > Storage > Apps > select unused apps to offload
  • Pixel: Settings > Apps > Unused Apps > toggle on auto-remove permissions and free up space

This is a good option for apps you rarely use but want to keep the option to restore later.

Method 9: Move Apps to SD Card (If Your Phone Supports It)

Some Android phones have a microSD card slot that lets you expand storage. If yours does:

  • Insert a microSD card (128 GB cards cost around $15-20)
  • Go to Settings > Apps > select an app > Storage
  • If the option ‘Move to SD Card’ or ‘Change storage location’ is available, tap it
  • Not all apps support this. System apps and some large apps cannot be moved.

Note: Samsung Galaxy A series, Motorola phones, and many budget phones support microSD cards. Flagship phones like Samsung Galaxy S series, Pixel, and OnePlus do NOT have microSD card slots.

Method 10: Clear Browser Data (Saves 200 MB – 1 GB)

  • Open Chrome (or your default browser)
  • Tap the three-dot menu > Settings > Privacy and Security > Clear Browsing Data
  • Select: Cached images and files, Browsing history, Cookies and site data
  • Set the time range to ‘All time’
  • Tap Clear Data

Note: Clearing cookies will log you out of all websites. If you only want to free space without losing your logins, select only ‘Cached images and files’.

Method 11: Delete Offline Maps and Music Downloads (Saves 500 MB – 5 GB)

If you have downloaded maps for offline use in Google Maps, or downloaded music in Spotify, YouTube Music, or Apple Music, these files take up significant space.

  • Google Maps: Open Maps > tap your profile > Offline Maps > delete maps you no longer need
  • Spotify: Open Spotify > Settings > Storage > Delete Cache or remove individual downloaded playlists
  • YouTube Music: Open YT Music > Library > Downloads > remove downloaded albums

Method 12: Compress Photos (Saves 30-50% of Photo Storage)

If you do not want to delete photos but need to free space:

  • Open Google Photos
  • Tap your profile icon > Google Photos Settings > Backup > Backup Quality
  • Select ‘Storage saver’ instead of ‘Original quality’. This compresses photos to 16 MP and videos to 1080p, which is still excellent quality for viewing on phones and computers.
  • Then go to Google Photos > Free up space to delete local copies of backed-up photos

Method 13: Delete System Update Files (Saves 500 MB – 2 GB)

After your phone installs a software update, the downloaded update file may still be taking up space.

  • Go to Settings > Storage > Other (or System)
  • Look for downloaded update files and delete them
  • On Samsung: Settings > Software Update > delete any pending download files

Method 14: Check Telegram and Signal Storage (Saves 500 MB – 5 GB)

Like WhatsApp, Telegram and Signal download and cache media files locally.

  • Telegram: Settings > Data and Storage > Storage Usage > Clear Cache. Telegram often caches 2-5 GB of media.
  • Signal: Settings > Storage > Review and delete large media

Method 15: Factory Reset as Last Resort

If nothing else works and your phone is still showing full storage despite deleting files, the ‘System’ and ‘Other’ categories might be bloated. A factory reset clears everything and gives you a fresh start.

  • Back up all your data first (Google Backup, photos to Google Photos, files to Google Drive)
  • Go to Settings > System > Reset > Factory Data Reset
  • After reset, set up your phone and restore from backup
  • Only install apps you actually use

This is the nuclear option but it often recovers 5-15 GB of space that was being used by accumulated system files and fragmented data.

What NOT to Delete

Some files should never be deleted manually because they can break your phone:

Do Not DeleteWhy
Anything in the Android/data folderContains app data. Deleting can corrupt apps.
System files or foldersCan brick your phone or cause bootloop.
Files you do not recognize in root storageMay be system or app dependencies.
Cached data for Google Play ServicesCan cause Play Store and Google app errors.

Stick to the methods above which only target safe-to-delete files. If you are unsure about a file, leave it alone.

Frequently Asked Questions

Why is my Android storage full when I have nothing?

The most common causes are: app cache (especially social media and browsers), WhatsApp and Telegram media, system files and updates, and hidden data in the ‘Other’ category. Run through methods 2, 5, 6, and 14 above to find hidden storage consumers. The ‘Other’ category in storage settings often contains cached streaming data from Netflix, YouTube, and music apps.

What takes up the most space on Android?

On average: Photos and Videos (40-50%), Apps and App Data (20-30%), System (15-20%), and Other files (10-15%). Videos are the single biggest space consumer because even a short 1-minute 4K video can be 300-500 MB.

Is it safe to clear cache on Android?

Yes, clearing cache is completely safe. Cache is temporary data that apps store to load faster. When you clear cache, the app will recreate it as you use the app. You will not lose any personal data, photos, messages, or login information. The only effect is that apps may take a few extra seconds to load the first time after clearing cache.

How do I clear junk files on Android?

The safest way is to use Google’s ‘Files by Google’ app (free). Open it, go to the Clean tab, and it will identify junk files, duplicates, old screenshots, and large unused files. Avoid using third-party cleaner apps that promise to ‘boost performance’ as most of them show ads, run in the background, and can actually slow down your phone.

How to Transfer Data from Android to iPhone in 2026 (Move to iOS + Alternatives)

Before You Start: Switching from Android to iPhone Checklist

  1. Charge your Android phone to at least 50%
  2. Make sure your iPhone is not yet set up (if it is already set up, go to Settings > General > Transfer or Reset iPhone > Erase All Content and Settings to start fresh)
  3. Connect your Android phone to Wi-Fi
  4. Back up your WhatsApp chats on Android (more on this below)
  5. Note all your app subscriptions – some will need to be re-purchased on iOS
  6. Download any files you want to keep from Google Drive
  7. Disable iMessage on any old iPhone (if you previously had one) to avoid missing text messages
  8. Check your storage: make sure your iPhone has enough space for all your data

Method 1: Move to iOS App (Apple’s Official Method)

Move to iOS is Apple’s free app designed specifically for Android-to-iPhone transfers. It is the easiest and most comprehensive method.

Step-by-Step Instructions

  • On your Android phone, download ‘Move to iOS’ from the Google Play Store
  • Turn on your new iPhone and start the setup process
  • When you reach the ‘Apps & Data’ screen during setup, select ‘Move Data from Android’
  • Your iPhone will display a 6-digit or 10-digit code
  • Open the Move to iOS app on your Android phone
  • Tap Continue and agree to the terms
  • Enter the code shown on your iPhone
  • Your Android will connect to a temporary Wi-Fi network created by the iPhone
  • Select what to transfer: Contacts, Message History, Photos, Videos, Web Bookmarks, Mail Accounts, Calendars
  • Tap Continue and wait for the transfer to complete. Do not use either phone during the transfer.
  • When the loading bar on iPhone finishes, tap Done on your Android and Continue on your iPhone to finish setup

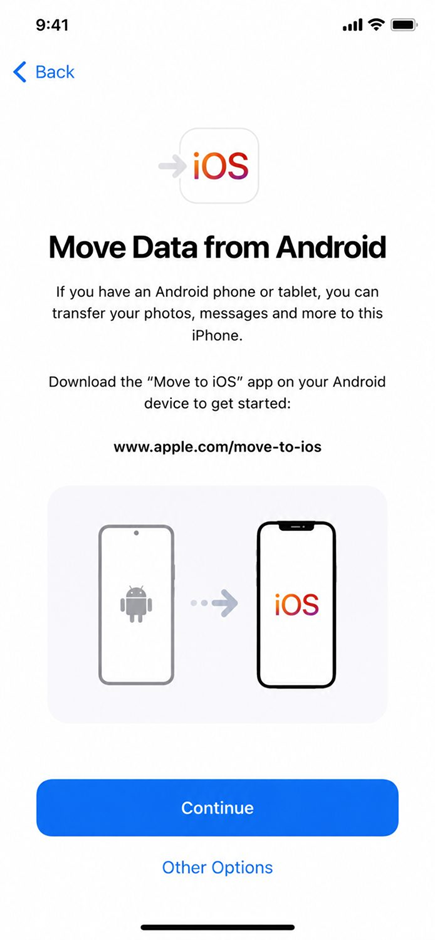
STEP 1 – on the iPhone. During setup the ‘Move Data from Android’ screen appears. Tap Continue and the iPhone will display a 6-digit code.

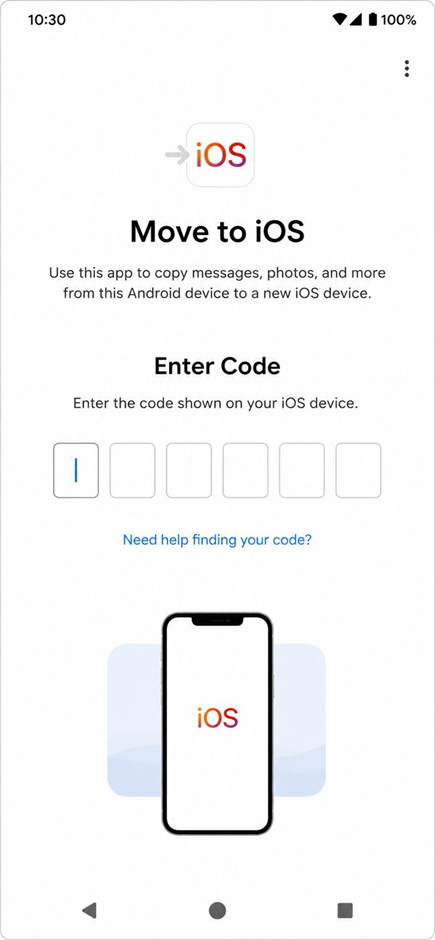
STEP 2 – on the Android phone. Open the Move to iOS app and type the code shown on the iPhone into the six boxes.

What Move to iOS Transfers

Data TypeTransfers?Notes
ContactsYesAll contacts from your Google account
Message history (SMS/MMS)YesText messages transfer to the Messages app
Photos and videosYesFrom your camera roll and screenshots
Web bookmarks (Chrome)YesChrome bookmarks transfer to Safari
Mail accountsYesGmail and other email account settings
CalendarsYesGoogle Calendar events sync over
Free appsYesIf the same app exists on both Play Store and App Store, it is suggested for download
WhatsApp chatsYesAdded in 2023. Transfers chats, photos, and videos (not call history)
Music filesNoMust transfer manually (see below)
Paid appsNoMust be re-purchased on App Store
App data/progressNoUnless the app uses cloud sync
RingtonesNoiOS uses its own ringtone system
Call historyNoAndroid call log does not transfer to iPhone

What Move to iOS Does NOT Transfer (And How to Fix It)

Music Files

Move to iOS does not transfer music stored on your Android phone. Here is how to move your music:

  • If you use Spotify, YouTube Music, or Apple Music: Just sign into the same account on your iPhone. All your playlists and saved songs will sync automatically.
  • If you have MP3 files on your phone: Connect your Android to a computer, copy the music files, then use iTunes (Windows) or Finder (Mac) to sync the music to your iPhone. Alternatively, upload your music files to Google Drive and download them on your iPhone.
  • To transfer playlists between music services: Use the free app SongShift (iOS) or the website TuneMyMusic.com to transfer playlists between Spotify, YouTube Music, Apple Music, and other services.

App Data and Game Progress

Most app data and game progress does not transfer between Android and iPhone because they are different platforms. However, many modern apps and games save your progress to the cloud:

  • Games: Check if the game supports cross-platform cloud saves (most games by Supercell, Epic Games, and Mojang do). Sign into the same game account on iPhone.
  • Social media: All your data is in the cloud. Just sign into Instagram, TikTok, Facebook, X, etc. on your iPhone.
  • Banking and finance apps: Download the app on iPhone and sign in with your credentials. Your account data is server-side.

Documents and Downloaded Files

Files in your Android Downloads folder do not transfer via Move to iOS. To move these files:

  • Upload them to Google Drive, Dropbox, or OneDrive from your Android phone
  • Install the same cloud storage app on your iPhone
  • Download the files to your iPhone’s Files app

Method 2: Transfer WhatsApp from Android to iPhone

WhatsApp chat transfer was one of the biggest pain points when switching platforms. As of 2023, Move to iOS can transfer WhatsApp directly. But here is the dedicated method if you need more control:

Using Move to iOS (Easiest)

During the Move to iOS transfer process, WhatsApp will appear as one of the apps you can transfer. Select it and your entire chat history, photos, videos, and voice messages will move to your iPhone’s WhatsApp. After the transfer, you will need to verify your phone number in WhatsApp on iPhone.

Using WhatsApp’s Built-in Transfer (Alternative)

  • Make sure WhatsApp is updated to the latest version on both devices
  • On your Android, open WhatsApp > Settings > Chats > Move Chats to iPhone
  • Follow the QR code scan process shown on screen
  • Connect both devices to the same Wi-Fi network
  • The transfer happens over Wi-Fi Direct between the two phones

Note: WhatsApp transfer moves your chat messages, photos, videos, voice messages, and documents. It does NOT transfer your call history, your status updates, or peer-to-peer payment history.

Method 3: Transfer Contacts Manually (Google Account)

If you only need to transfer contacts (not messages or photos), the simplest method is through your Google account:

  • On your iPhone, go to Settings > Mail > Accounts > Add Account > Google
  • Sign in with the same Google account you used on Android
  • Enable Contacts sync
  • All your Google contacts will appear in the iPhone Contacts app within a few minutes

This method keeps your contacts synced between Google and iPhone. Any contact you add or edit on either platform will update on both.

Method 4: Transfer Photos Manually (Google Photos)

If Move to iOS did not transfer all your photos, or if you want to transfer photos after the initial setup:

  • On your Android phone, open Google Photos
  • Make sure all photos are backed up: tap your profile icon > Google Photos Settings > Backup > turn on Backup
  • Wait for all photos to upload to Google Photos cloud
  • On your iPhone, download Google Photos from the App Store
  • Sign in with the same Google account
  • All your photos and videos will be available in Google Photos on iPhone

If you want the photos in your iPhone’s native Photos app instead, you can select photos in Google Photos and tap ‘Save to device’ to download them to the Camera Roll.

Method 5: Transfer Using a Computer (iTunes or Finder)

For a complete file transfer when other methods do not cover everything:

  • Connect your Android to your computer via USB and copy all files (Photos, Music, Documents, Downloads) to a folder on your computer
  • Disconnect Android and connect your iPhone
  • On Windows: Open iTunes > Select your iPhone > File Sharing to transfer documents, or Photos to sync photos
  • On Mac: Open Finder > Select your iPhone > Drag and drop files

This method gives you the most control over exactly which files are transferred.

Troubleshooting Move to iOS Problems

Move to iOS stuck on ‘Preparing’ or ‘Transferring’

  • Make sure both phones are connected to power or have sufficient battery
  • Turn off mobile data on your Android phone (the Wi-Fi Direct connection can be disrupted by cellular data)
  • Disable any VPN or battery optimization apps on your Android
  • If it has been stuck for more than 30 minutes, cancel and restart the process

Move to iOS says ‘Unable to Communicate with Device’

  • Restart both phones and try again
  • On your Android, go to Settings > Wi-Fi and forget all saved networks, then try again
  • Make sure no other devices are connected to the iPhone’s temporary Wi-Fi network

Move to iOS not showing in setup

The ‘Move Data from Android’ option only appears during the initial iPhone setup. If you already set up your iPhone, you need to erase it first: Settings > General > Transfer or Reset iPhone > Erase All Content and Settings. Then start the setup process again.

Frequently Asked Questions

What does Move to iOS transfer?

Move to iOS transfers contacts, message history (SMS), photos, videos, web bookmarks, email accounts, calendars, WhatsApp chats, and suggests equivalent free apps for download. It does not transfer music files, paid apps, app data, call history, or ringtones.

How long does Move to iOS take?

The time depends on how much data you are transferring. For 10-20 GB of data (typical phone), expect 15-30 minutes. For 50 GB or more, it can take 1-2 hours. The transfer uses Wi-Fi Direct between the two phones, so internet speed does not matter.

Can I transfer WhatsApp from Android to iPhone?

Yes. WhatsApp can be transferred using Move to iOS during iPhone setup, or using WhatsApp’s built-in ‘Move Chats to iPhone’ feature. Both methods transfer your chat history, photos, videos, and voice messages. You cannot transfer WhatsApp call history.

What happens to my apps when I switch to iPhone?

Free apps that exist on both Google Play Store and Apple App Store will be suggested for download during setup. You will need to download them from the App Store. Paid apps must be purchased again because Google Play and Apple App Store are separate platforms. App subscriptions managed through Google Play will need to be canceled and re-subscribed through Apple.

How to Transfer Data from Android to Android in 2026 (All Methods)

5 Things to Do Before You Transfer Data

Before you start the transfer process, complete this checklist to avoid problems:

  1. Charge both phones to at least 50% – Data transfers can take 30 minutes to over an hour depending on how much data you have. A dead battery mid-transfer can corrupt your data.
  2. Update your old phone – Go to Settings > System > Software Update and install any pending updates. This ensures compatibility with the transfer tools.
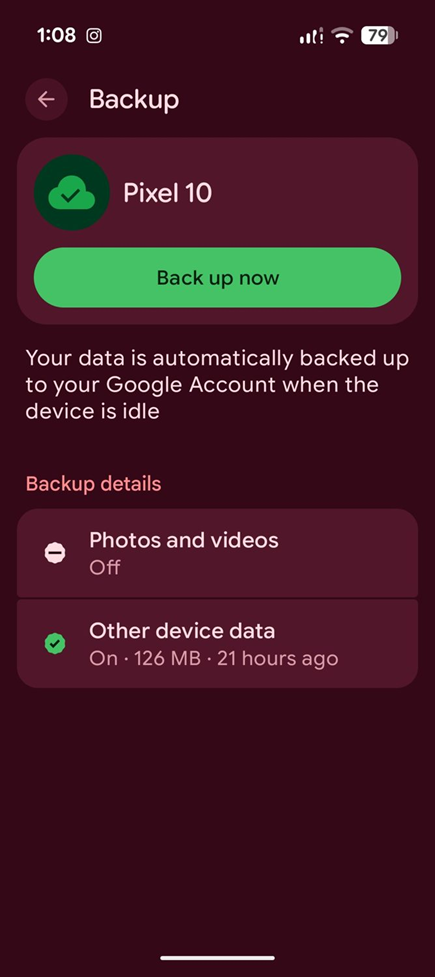
  3. Back up your old phone to Google – Go to Settings > System > Backup and make sure Google Backup is turned on. Tap Back Up Now. This is your safety net if anything goes wrong during the transfer.
  4. Note your accounts and passwords – Make a list of all accounts you are logged into. Some apps like banking apps and authenticator apps do not transfer automatically and you will need to log in again manually.
  5. Check your storage – Go to Settings > Storage on your new phone and make sure it has enough space for all your data. If your old phone has 80 GB used and your new phone only has 64 GB of storage, you will need to clean up files first.

Method 1: Google Backup and Restore (Works on All Android Phones)

This is the universal method that works between any two Android phones regardless of brand. Google automatically backs up your contacts, call history, SMS messages, app data, device settings, and Wi-Fi passwords to your Google account.

Step 1: Back Up Your Old Phone

  • Open Settings on your old phone
  • Go to System > Backup (on Samsung: Accounts and Backup > Back Up Data)
  • Make sure the toggle for Back Up to Google is turned on
  • Tap Back Up Now and wait for it to complete
  • You will see the date and time of the last backup when it is done

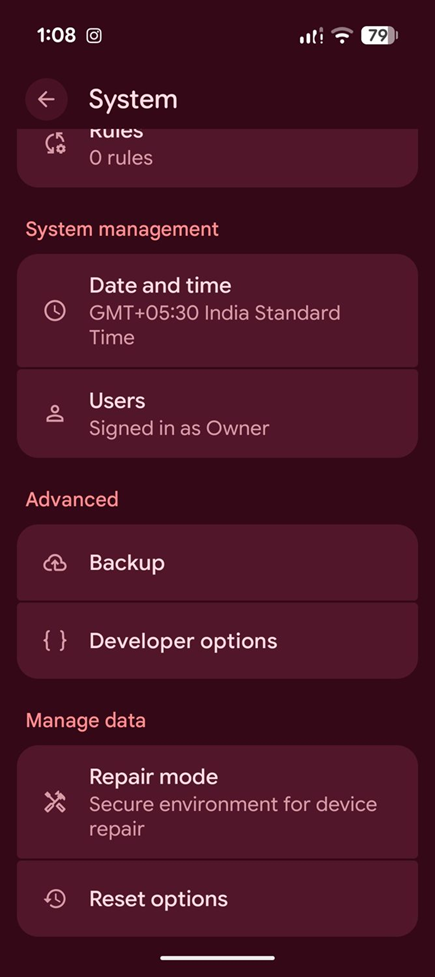
Settings > System on Android 16. Backup sits under the Advanced group.

The Backup screen showing the Back up now button, plus what is included in the backup.

Step 2: Restore on Your New Phone

  1. Turn on your new Android phone and go through the initial setup
  2. Connect to Wi-Fi when prompted
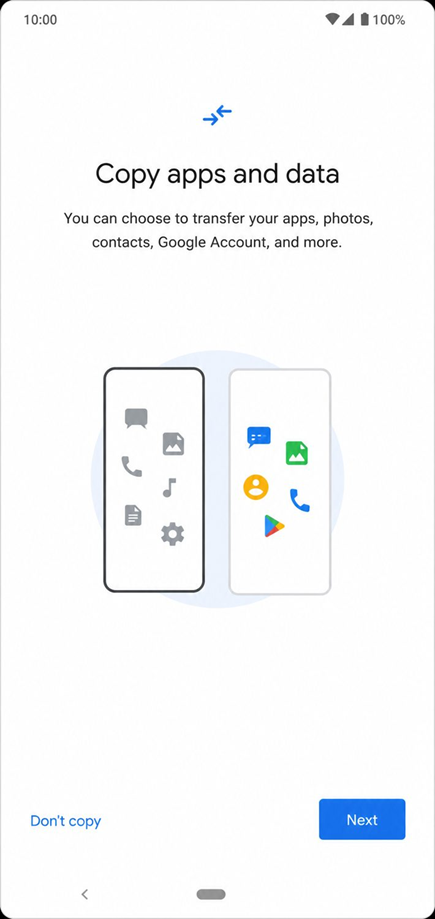
  3. When asked ‘Copy apps and data’, tap Next
  4. Select ‘Can’t use old device’ if your old phone is not nearby, or ‘Use your old device’ if it is
  5. Sign in to the same Google account you used on your old phone
  6. Select the backup from your old phone (it will show the device name and date)
  7. Choose what to restore: Apps, Contacts, SMS, Device Settings, Call History
  8. Tap Restore and wait. This can take 15 minutes to 1 hour depending on how many apps you had.

On a brand new Android phone, the setup wizard offers ‘Copy apps and data’. Tap Next here – if you tap ‘Don’t copy’ you will have to transfer everything manually later.

What Google Backup Transfers

Data TypeTransfers?Notes
ContactsYesAll contacts synced to Google account
Call historyYesRecent call log
SMS text messagesYesRequires Google Messages or Samsung Messages backup
Photos and videosPartiallyOnly if backed up to Google Photos. Check Google Photos > Library > Utilities > Backup
App installsYesApps are re-downloaded from Play Store
App data and progressPartiallyOnly if the app developer enabled cloud backup. Game progress may be lost.
Wi-Fi passwordsYesSaved Wi-Fi networks and passwords
Device settingsYesDisplay, sound, notification preferences
WhatsApp chatsYesIf backed up to Google Drive within WhatsApp > Settings > Chats > Chat backup
Music filesNoUse YouTube Music, Spotify, or transfer manually
Downloaded filesNoTransfer via USB cable or cloud storage

Method 2: Quick Share (Previously Near Share) – Wireless Transfer

Quick Share is Google’s built-in wireless file sharing feature, available on all Android phones running Android 6.0 and newer. It was renamed from Near Share to Quick Share in early 2024. Quick Share uses a combination of Bluetooth and Wi-Fi Direct to transfer files between phones without needing an internet connection.

How to Use Quick Share

  1. On your old phone, open the Files app or Gallery
  2. Select the files you want to transfer (you can select multiple files, photos, and videos)
  3. Tap the Share button, then select Quick Share
  4. Your old phone will start looking for nearby devices
  5. On your new phone, make sure Quick Share is turned on: swipe down from the top and tap the Quick Share icon in Quick Settings
  6. Your new phone will appear on your old phone’s screen. Tap on it.
  7. Accept the transfer on your new phone
  8. Files will transfer wirelessly. Speed is typically 30-50 MB per second.

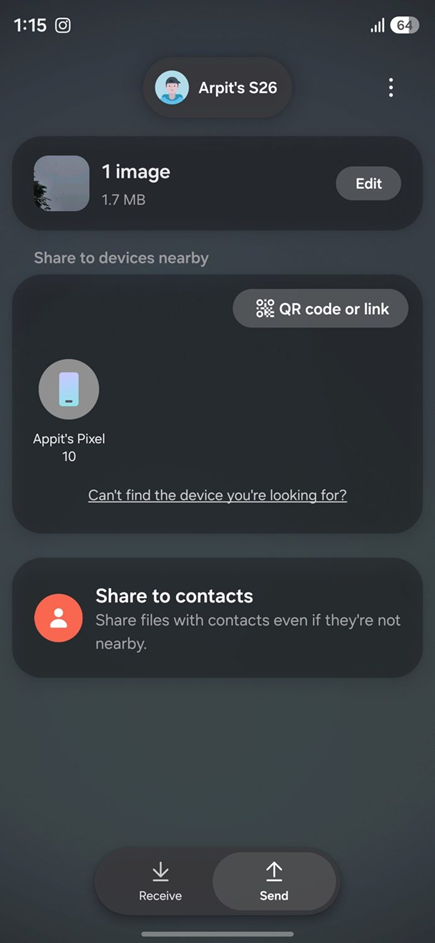
Quick Share detecting a nearby Pixel 10, with Send and Receive options at the bottom.

Best for:

  • Transferring specific files, photos, or videos (not a full phone backup)
  • Moving files when you do not have a USB cable or internet connection
  • Sharing files between different Android brands (Samsung to Pixel, etc.)

Method 3: Samsung Smart Switch (Samsung Phones Only)

Samsung Smart Switch is the best method if your new phone is a Samsung Galaxy. It transfers almost everything from your old phone, including app data, home screen layout, and even your wallpaper. Smart Switch works with both Samsung-to-Samsung transfers and transfers from other Android brands to Samsung.

Smart Switch via USB Cable (Fastest)

  • On your new Samsung phone, open Settings > Accounts and Backup > Smart Switch (or download Smart Switch from Galaxy Store if not pre-installed)
  • Connect both phones using a USB-C to USB-C cable (included in most Samsung phone boxes) or a USB-C to USB-A adapter
  • On the old phone, tap Allow when prompted for USB connection
  • On the new Samsung, Smart Switch will detect the old phone and show what data can be transferred
  • Select what to transfer: Accounts, Apps, Contacts, Messages, Photos, Settings, Home Screen, etc.
  • Tap Transfer and wait. A typical transfer of 50-60 GB takes about 30-45 minutes via cable.

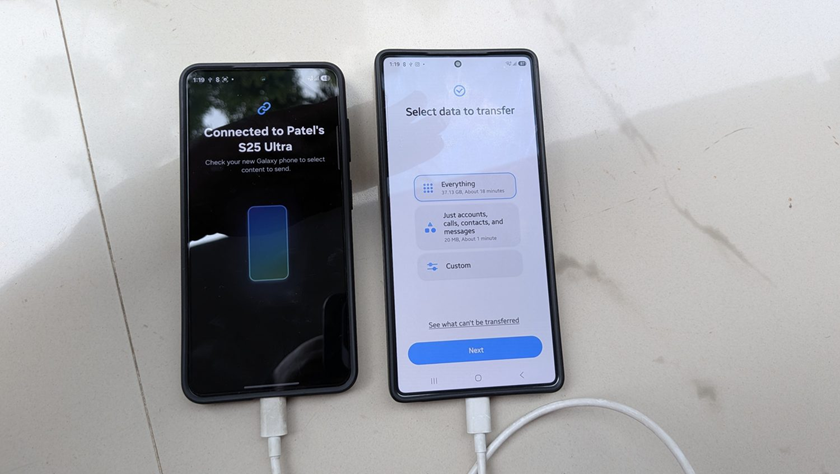
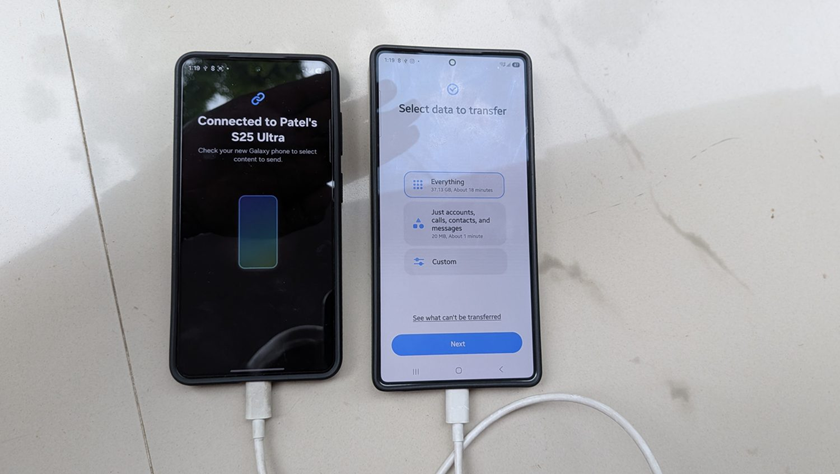
Both phones linked by USB-C cable. The new phone shows ‘Select data to transfer’ with Everything, accounts-only, and Custom options.

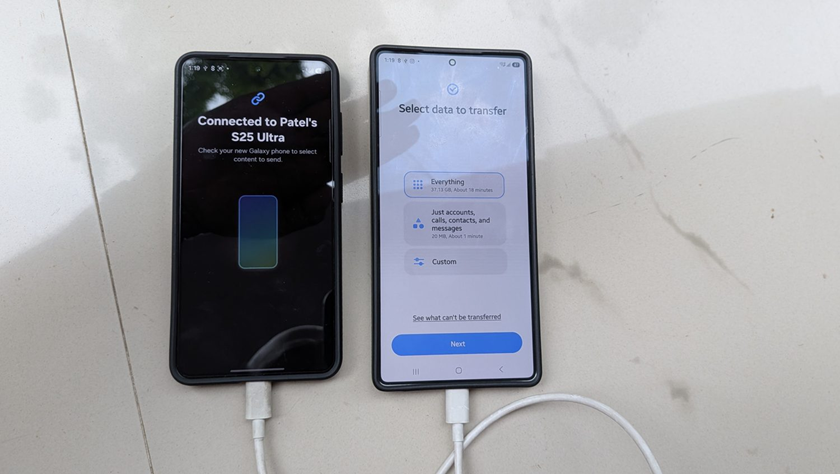
The old phone confirms ‘Connected to Patel’s S25 Ultra’ once the cable handshake completes.

The wireless route: both phones show ‘Transfer your data’ with Send from this phone / Receive on this phone.

Smart Switch Wirelessly

  • Open Smart Switch on both phones (download from Play Store on the non-Samsung phone)
  • On the new Samsung, tap Receive Data
  • On the old phone, tap Send Data
  • Select Wireless
  • The phones will connect over Wi-Fi Direct
  • Select your data and tap Transfer

Wireless transfer is slower than cable. Expect 50-60 GB to take 1-2 hours wirelessly.

What Smart Switch Transfers That Google Backup Does Not

Data TypeSmart SwitchGoogle Backup
Home screen layoutYesNo
App data (most apps)YesPartial
Internal storage filesYesNo
Music filesYesNo
Downloaded documentsYesNo
Alarm and clock settingsYesYes
S Pen notes (Samsung)YesNo
WallpaperYesNo

Method 4: USB Cable Direct Transfer (During Setup)

When you set up a new Android phone for the first time, Android offers the option to connect your old phone directly via USB cable. This is built into the Android setup wizard and works on all Android phones.

  • Turn on your new phone and start the setup process
  • When you see ‘Copy apps and data’, tap Next
  • Select ‘Use your old device’
  • Connect both phones with a USB-C cable
  • Follow the on-screen instructions to select what data to copy
  • Wait for the transfer to complete

This method uses Android’s built-in migration tool and transfers contacts, messages, photos, apps, and most settings. It is faster than Google Backup because data moves directly between phones instead of downloading from the cloud.

Method 5: Manual Transfer via Computer

If the above methods do not transfer specific files you need, you can manually move files using your computer as a bridge.

  • Connect your old phone to your computer via USB cable
  • On your phone, change USB mode to File Transfer (MTP)
  • Open your phone’s storage on the computer and copy the files you need (DCIM for photos, Music for songs, Download for downloaded files)
  • Disconnect the old phone and connect the new phone
  • Copy the files from your computer to the corresponding folders on the new phone

This is the most reliable method for music files, documents, and downloaded content that other methods may miss.

Which Method Should You Use?

SituationBest MethodWhy
New phone is SamsungSamsung Smart Switch via cableTransfers the most data including home screen layout and all files
New phone is PixelCable transfer during setupGoogle’s built-in migration tool works best with Pixel phones
Old phone is broken or lostGoogle Backup restoreOnly method that works without the old phone. Requires prior backup.
Only moving some filesQuick ShareFastest for selective file transfers without cables
Different brands, no cableGoogle Backup + Quick ShareUse Google Backup for contacts/apps, Quick Share for photos/files

Troubleshooting: Transfer Failed or Incomplete

Transfer stuck at a certain percentage

This is usually caused by a large file that is taking longer to copy. Wait at least 30 minutes before canceling. If it is truly stuck, try these fixes:

  • Restart both phones and try again
  • If using wireless, switch to cable transfer
  • Clear the cache of the Smart Switch app (Settings > Apps > Smart Switch > Clear Cache)
  • Make sure both phones are on the same Wi-Fi network (for wireless methods)

Some apps are missing after transfer

Some apps may not transfer because they are no longer available on the Google Play Store, they are region-locked, or they are not compatible with your new phone. Check the Play Store directly and search for the missing app. If the app was a paid app, it should be available for re-download if you used the same Google account.

WhatsApp chats did not transfer

WhatsApp uses its own backup system, separate from Android backup. You need to back up WhatsApp chats before the transfer:

  • On your old phone, open WhatsApp > Settings > Chats > Chat Backup
  • Tap Back Up to create a fresh backup to Google Drive
  • On your new phone, install WhatsApp and sign in with the same phone number
  • WhatsApp will detect the Google Drive backup and offer to restore it

Google Authenticator codes are missing

Google Authenticator now supports cloud sync (added in 2023). If you have the cloud sync feature enabled, your codes will automatically appear on your new phone when you sign into Google Authenticator with the same Google account. If not, you will need to re-register each account for two-factor authentication.

Frequently Asked Questions

Can I transfer everything from one Android to another?

You can transfer most things including contacts, messages, photos, videos, apps, Wi-Fi passwords, and device settings. However, some items cannot transfer: app-specific data from apps that do not support cloud backup, DRM-protected content, some game progress (unless the game uses cloud saves), and login sessions. You will need to sign into most apps again on your new phone.

Does transferring data delete it from the old phone?

No. All transfer methods copy data, they do not move it. Your old phone will still have all its data after the transfer. This is useful because you can keep the old phone as a backup until you are sure everything transferred correctly to the new phone.

How long does Android data transfer take?

It depends on how much data you have and which method you use. Here are typical times:

Data AmountUSB CableWirelessGoogle Backup
10 GB5-10 minutes15-20 minutes20-30 minutes (depends on internet speed)
30 GB15-20 minutes30-45 minutes45-60 minutes
60 GB25-35 minutes1-1.5 hours1.5-2 hours
100 GB+40-60 minutes2-3 hours2-4 hours

Does Samsung Smart Switch transfer text messages?

Yes. Samsung Smart Switch transfers SMS and MMS text messages from your old phone to your new Samsung phone. It also transfers the message timestamps so your conversations appear in the correct order. If your old phone is not Samsung, Smart Switch can still transfer messages from most Android brands including Pixel, OnePlus, and Xiaomi.

WhatsApp Username Update Is Here! How to Reserve Your Username

WhatsApp Username is finally here! In this article, I’ll explain you how to reserve WhatsApp username, how to set up a WhatsApp username, and everything you need to know about the latest WhatsApp Username update. Follow the below given step-by-step guide to create your WhatsApp username, reserve your preferred username before someone else does, and enhance your privacy without sharing your phone number.

Several users already got notifications about reserve username for WhatsApp account on Android or iPhone devices. You can also change WhatsApp username using this tutorial. Let’s see how to use WhatsApp username feature on your Android or iPhone devices.

Don’t Miss This: What’s New in Android 17 Beta

How to Reserve WhatsApp Username on Android: Samsung Galaxy, Google Pixel, Vivo, Oppo, Motorola

Open the WhasApp app on your device.

You can see the notification message of WhatsApp username, tap on it if available.

In my Google Pixel device, we already reserve WhatsApp username. So, let’s see the settings to edit WhatsApp username on Android.

How to Change Username on WhatsApp Android

Step 1: Open the WhatsApp app.

Step 2: Tap on Three vertical dots in the top right corner.

Step 3: Tap Settings.

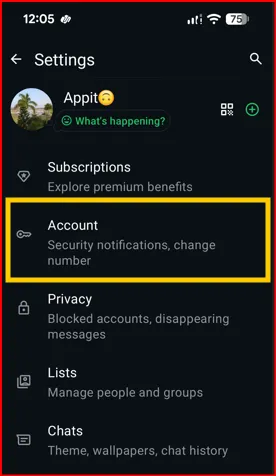
WhatsApp account settings for username

Step 4: Tap Account.

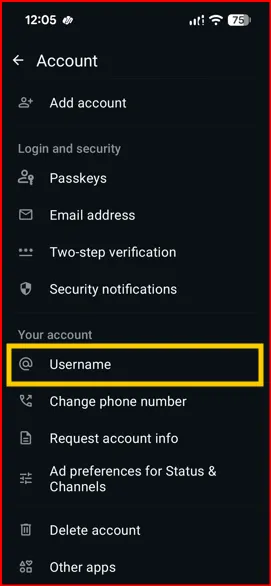
WhatsApp username settings on Android

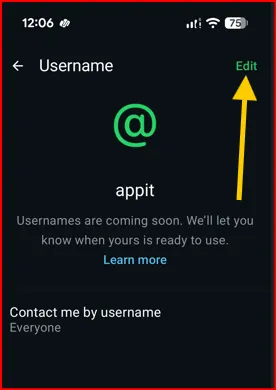
Step 5: Tap Username in your account section.

We already reserved my WhatsApp username.

WhatsApp Username Update Android Phone

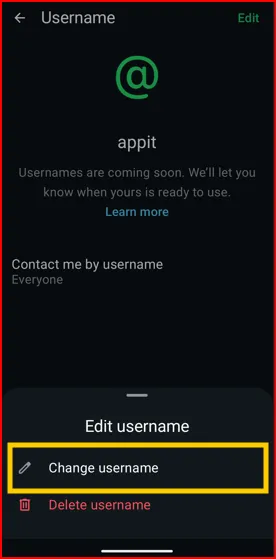
Step 6: Tap Edit in the top right corner.

How to Change Username on WhatsApp

Step 7: Tap Change username (Another option is Delete username)

WhatsApp Username Update Is Here! How to Reserve Your Username

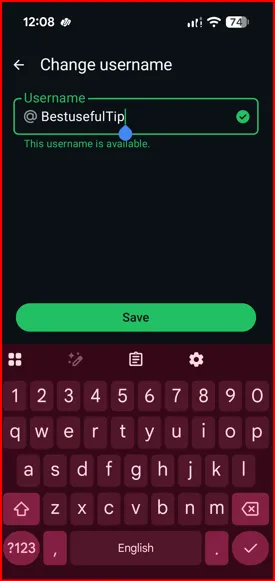
Step 8: Enter the username and tap Save.

You can set your Instagram username as WhatsApp username. You must log into Instagram account and add your account here.

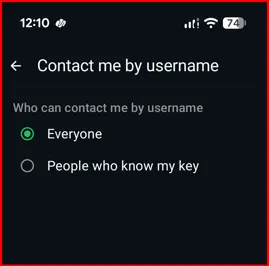
Step 9: Tap Contact me by username to choose who can contact you using your username.

Whatsapp username Android Device

Step 10: Choose from Everyone or People who know my key.

When you choose a people who know my key, you can see the WhatsApp username key. Just save your key and share with any contact you want to chat without sharing your mobile number.

That’s all about WhatsApp username feature update 2026.

How to Fix Internet Connection Issues on Samsung S26 Ultra, S26+, and S26

Is your internet not working on your Samsung Galaxy S26 series? Whether you’re using WiFi or mobile data, slow speeds, WiFi connected but no internet, dropped connections, or “No Internet” errors can be frustrating.

This step-by-step guide will help you quickly and easily fix internet connection issues on your Samsung Galaxy S26 Ultra, S26+, and S26.

Common Internet Problems on Samsung Galaxy S26

You might notice:

  • WiFi connected, but no internet
  • Mobile data is not working
  • Apps not loading
  • Internet Slow
  • Frequent disconnections
  • “No network connection” error

Let’s fix them step by step.

Read More: How to Fix WiFi Not Working on Samsung Galaxy S26 Series

Restart Your Device

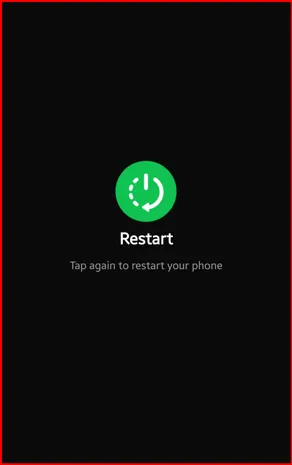
Restart Your Samsung S26 to Fix Mobile Data Issue

Most temporary internet issues are fixed with a simple restart.

How to Restart:

  1. Press and hold Power + Volume Down
  2. Tap Restart
  3. Tap Restart again to reboot

This refreshes your phone’s network services.

Toggle Airplane Mode

This resets all wireless connections instantly.

  1. Swipe down to open Quick Settings
  2. Turn Airplane Mode ON
  3. Wait 30 seconds
  4. Turn it OFF

Test your internet again.

Check Your WiFi Connection

How to Fix Internet Connection Issues on Samsung S26 Ultra, S26+, and S26

If using WiFi:

  • Make sure your router is working
  • Restart your router (unplug for 60 seconds)
  • Try connecting another device to confirm the internet is active

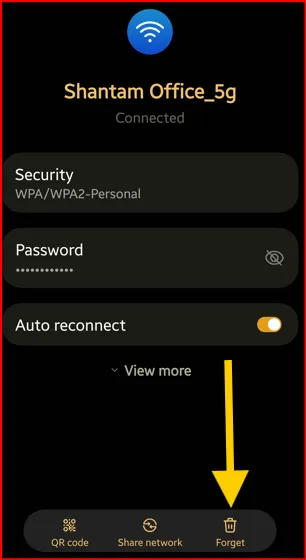
If WiFi shows “Connected but no internet”, forget the network:

  1. Go to Settings > Connections > WiFi
  2. Tap the Settings gear icon of your connected network
  3. Tap Forget
  4. Reconnect and enter the password

Check Mobile Data Settings

If mobile data isn’t working:

  1. Go to Settings > Connections > SIM manager
  2. Tap Mobile Networks
  3. Make sure Mobile Data is ON

Also ensure:

  • You have an active data plan
  • You’re in a coverage area
  • Check the mobile Data limit

Reset Network Settings (Very Effective Fix)

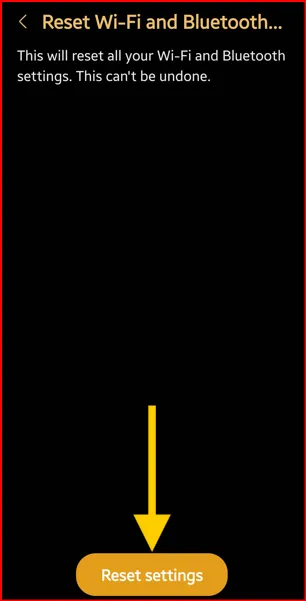
Reset Network Settings to Fix Internet Connection Issue on Samsung Galaxy S26 Series

If the internet keeps dropping:

  1. Open Settings
  2. Tap General Management
  3. Select Reset
  4. Tap Reset Mobile network settings > Reset settings > Go back
  5. Tap Reset WiFi & Bluetooth settings > Reset settings
  6. Confirm

This removes saved WiFi networks, Bluetooth devices, and VPN settings.

Check for Software Updates

Samsung regularly fixes network bugs with updates.

  1. Go to Settings
  2. Tap Software Update
  3. Tap Check for updates
  4. Select Download and Install the update if available for your Samsung phone

Install any available updates and restart the phone.

Disable VPN or Proxy

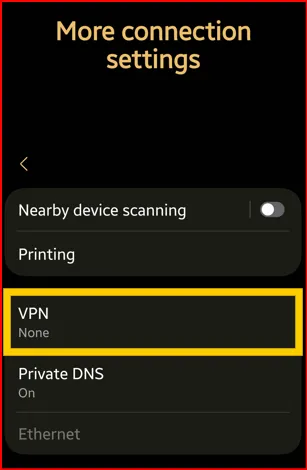
Turn Off VPN to Fix Internet not working on Samsung Galaxy S26 Ultra

If you’re using a VPN:

  • Turn it OFF temporarily: Settings > Connections > More connection settings > VPN > Choose None
  • Check if the internet works normally

VPN apps can sometimes cause slow or blocked internet connections.

Check APN Settings (For Mobile Data Issues)

If mobile data still isn’t working:

  1. Go to Settings > Connections > Mobile Networks
  2. Tap Access Point Names (APN)
  3. Make sure the correct APN is selected (check with your carrier, like Verizon, AT&T, or T-Mobile)

You can reset the APN to the default if needed.

Boot into Safe Mode

Boot into Safe Mode to Fix Internet is not working on Samsung Galaxy S26

A third-party app may be interfering.

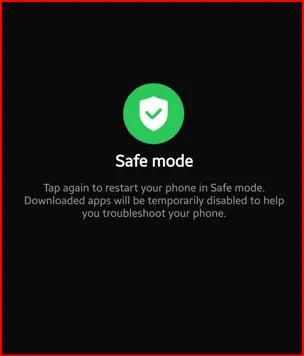
  1. Press and hold the Power button
  2. Long-press the Power Off until view the Safe mode icon
  3. Tap the Safe Mode
  4. Check your internet connection

If it works in Safe Mode, uninstall the recently installed apps on your device.

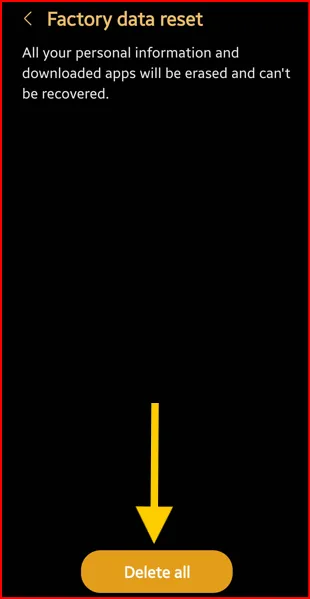
Factory Reset

Factory Data Reset Samsung S26 Ultra to fix Internet Problems

If nothing fixes the issue:

  1. Make sure to Backup your important data
  2. Go to Settings > General Management > Reset
  3. Tap Factory Data Reset
  4. Tap Reset
  5. Unlock your phone
  6. Tap Delete all to Confirm

This restores your phone to its original settings.

Why is the Internet Not Working on Samsung S26 Series?

Common reasons include:

  • Weak network signal
  • Corrupt network settings
  • Carrier outage
  • Router issues
  • SIM card issue
  • Outdated software
  • App conflicts

When to Contact Support

You should contact Samsung Support or your carrier if:

  • SIM is not detected
  • No signal bars in the status bar
  • WiFi won’t turn ON
  • The issue continues after a factory reset

It could be a hardware or carrier-side issue.

Final Thoughts

Internet connection issues on the Samsung Galaxy S26 Ultra, S26+, and S26 are usually caused by minor software or network problems. In most cases, restarting the phone or resetting network settings solves the issue.

Follow this troubleshooting guide step-by-step, and your Galaxy S26 should be back online in minutes.

FAQs:

Why is my Galaxy S26 connected to WiFi but has no internet?

Your router may not be connected to the internet. Restart it or contact your Internet Service Provider (ISP).

Why is mobile data not working on my S26?

Check your data plan, APN settings, and signal coverage.

How do I fix slow internet on the Samsung Galaxy S26?

Move closer to the router, disable VPN, reset network settings, or check the carrier signal strength.

If this guide helped you, bookmark it and share it with other Galaxy S26 users facing internet problems!