How To Star A Message in WhatsApp Android

Here’s how to use WhatsApp starred message on Android devices. This new Star feature is useful to bookmark your important WhatsApp messages on your android/Windows phone/iPhone device. To star any WhatsApp message, just tap & hold the message and tap on the star icon at top of the screen. So you can easily find that specific messages later. To unstar those messages, select that message and tap on the remove star icon button. Removing stars will not delete the original chat message.

When you start a WhatsApp message, that message can only view by that person. It is not visible to other WhatsApp people or group members. WhatsApp is one of the most used instant messaging apps to share photos, videos, and other information with your friends or family. Here you can see steps to mark star message in the WhatsApp app.

Read Also:

How To Use WhatsApp Starred Messages Android

Let see one by one to star, find and delete starred messages on WhatsApp Android phone.

How to Star A Message on WhatsApp Android

Step 1: Open the WhatsApp app on your phone.

Step 2: Tap the Chats tab.

Step 3: Open any Contact or group you want to star messages.

How To Star A Message in WhatsApp Android

Step 4: Tap & hold any message to select it (Select multiple messages also) and tap the Star icon at the top.

Star A Message on WhatsApp Android

Step 5: You can see the Star icon in the message.

How to Find or See Starred WhatsApp Messages Android

Step 1: Open the “WhatsApp” app on your android device.

Tap on chats tab on WhatsApp android

Step 2: Tap on the “Chats” tab.

Tap on 3 vertical dots WhatsApp settings

Step 3: Click on “Three vertical dots” from the top of the right corner.

Tap on Starred messages

Step 4: Select “Starred messages”.

You can see the list of WhatsApp starred messages on your screen.

Use WhatsApp starred messages android

Step 5: Tap on Starred message to directly go to that contact.

Don’t Miss This:

How To Unstar All WhatsApp Messages on Android

Step 1: Open the WhatsApp app.

Step 2: Tap Three vertical dots at the top right corner.

Step 3: Select Starred messages.

See Starred WhatsApp Messages Android

Step 4: Tap Three vertical dots (More) at the top right corner.

How To Unstar All WhatsApp Messages on Android

Step 5: Tap Unstart all.

Unstar All WhatsApp Messages on Android

Step 6: Tap UNSTAR.

How to Remove WhatsApp Starred Messages on Android

Let see the steps to find starred messages and delete them from your device.

Step 1: Open the WhatsApp app.

Step 2: Tap Three vertical dots at the top right corner.

Step 3: Select Starred messages.

Step 4: Tap and hold the single or multiple messages want to remove from a bookmark.

How to use WhatsApp starred messages android

Step 5: Tap on the “Remove star” icon to delete all.

Now delete all WhatsApp bookmark messages from your android devices.

Above you can see the process to use WhatsApp starred messages on Android mobile or tablet. Did you find the above process helpful? Don’t hesitate to let me know in below comment box. Connect with us for daily technology updates.

How To Turn Off Notifications Android

Do you want to turn off notifications Android phone? By default, turn on notifications on your phone. Here’s how to enable or disable notifications on Android phones or tablets. When you receive new notifications, you can see the notification as a display message on the status bar with an app symbol on your device’s home screen or lock screen. Push notification is one type of message alert when you are not using your device or are inactive on an Android device. You can individually disable app notifications on your phone using app settings on your Google Pixel, Samsung Galaxy, OnePlus, and other devices.

You can show or hide notifications on the lock screen on Android devices. Also, mute notifications or silent notifications on your phone.

Read More: How to Turn Off Pop-up Notifications WhatsApp Android

How To Turn Off Notifications Android 13 to 5.1.2

You can turn off Android notifications using the below-given methods.

How to Turn Off Android Lock Screen Notifications: Android 13 and Android 12

Step 1: Go to Settings.

Open the Notifications settings on your Android phone

Step 2: Tap Notifications.

Notifications on Lock Screen Settings on Android Phone

Step 3: Scroll down and tap on Notifications on lock screen in the privacy section.

Three options are available here: Show conversations, default, and silent, Hide silent conversations & notifications, and don’t show any notifications.

How To Turn Off Notifications Android Phone

Step 4: Choose Don’t show any notifications.

How to Turn Off Android Lock Screen Notifications

Alternative Way: Settings > Display > Lock screen > Privacy > Choose Don’t show notifications at all.

How to Turn Off Notifications for Specific Apps on Android 13 and Android 12

Step 1: Go to Settings.

Step 2: Tap Notifications.

Step 3: Tap App settings in the manage section.

Step 4: Tap Three vertical dots (More) at the top right corner.

Step 5: Tap the Hide system.

How to Turn Off Notifications for Specific Apps on Android Phone

Step 6: Toggle off the App button you want to disable notifications.

How to Hide Sensitive Notification Content on the Lock Screen Android Stock OS

Settings > Notifications > Toggle off Sensitive notifications

How to Turn Off Notifications Android 11 Stock OS

How To Disable Notifications on Android (All Version) Stock OS

Settings > Apps & notifications > See all apps > Select App> Notifications > Toggle off  All App notifications

How to Turn Off Notifications Android 10

Settings > Apps & notifications > See all apps > Select App> Notifications > Turn off  Show notifications toggle. 

Hide Notifications From Lock Screen Android 10

Long press on the blank space on the home screen > Home settings > Notification dots > Lock screen > Notification on lock screen > Don’t show notifications.

Disable Notifications on Android 9 (Pie)

Settings > Apps & notifications > See all apps > Select App> Notifications > Turn off  Show notifications toggle. 

Hide Sensitive Content on Lock Screen Android 9 

Settings > Security & location > Device security > Lock screen preferences > on lock screen > Hide sensitive content

Read More: How to Turn off Notifications on Android 8.1 (Oreo)

Show or Hide lock screen notifications on Android 8.0 (Oreo)

Settings > Apps & notifications > Notifications > on the lock screen > Show all notification content/hide notification content > don’t show notifications at all

Related:

How to Turn Off Notifications Android Nougat 7.1.2 & 6.0 Marshmallow (6.0)

Settings > Device > Notifications > Select App from list > Turn on Block all toggle

Hide Lock Screen Notifications Content on Android 7.1.2 (Nougat)

Settings > Device > Notifications > Settings gear icon at the top of screen > On the lock screen > Hide sensitive notifications content

How to Turn Off Push Notifications on Android 5.1.1 (Lollipop)

Step 1: Open the Settings App on your Android device.

Tap on application under device category

Step 2: Under the device section, tap on Applications.

Tap on application manger under application

Step 3: Tap on the Application Manager.

Tap on WhatsApp to disbale push notifications

Step 4: You can see the 5 different tabs. Select the Downloaded tab.

Step 5: Tap on any Android app that wants to hide message notifications of that App from your Android device’s home screen or lock screen.

How to disable push notifications android lollipop

You can see the above screen on your Android lollipop 5.1.2 and marshmallow 6.0 device. By default, checkmark the show notifications box.

disable push notifications android lollipop

Step 6: Uncheck the box of Show notifications. You can see the message: Turn off notifications?

Step 7: Tap OK to disable push notifications on the Android device.

If you turn off notifications for this App, you may miss important alerts and updates on your android lollipop and KitKat device.

How to Block Notifications Android 5.1.1 (Lollipop)

Step 1: Open the Settings App.

Tap on Sound and notificaitons under device section

Step 2: Tap on Sounds and notifications under the quick settings section/Device section.

Block app notificaitons

Step 3: Scroll down until seeing App notifications under the notifications section & tap on it.

Step 4: Tap on any app that wants to Block notifications.

block WhatsApp app notificaiton android

By default, disable block notifications of that Android App.

Step 5: Turn on the toggle button of Block notifications.

Now you cannot get any notifications, sound, and vibration alerts of this block app on your android phone or tablet home screen or lock screen.

Above, you can see the simple steps to turn off push notifications on Android devices. If you have any concerns or questions regarding the above steps, please let us know in the comment box below.

FAQs:

How to Turn Off Notifications on Instagram?

To turn off or disable Instagram notifications, go to Settings > Apps > See all apps > Instagram > Notifications > Toggle off All Instagram notifications. You can’t view any Instagram notifications on your phone home and lock screen. Open the Instagram app chat to view the notifications.

How to Turn Off Silent Notifications?

To hide or turn off silent notifications in the status bar on Android stock OS (Google Pixel), go to Settings > Notifications > Toggle on Hide silent notifications in the status bar.

How to Turn Off Twitter Notifications?

To turn off notifications for the Twitter app, go to Settings > Apps > See all apps > Twitter > Notifications > Toggle off All Twitter notifications.

How to Turn Off Notifications Sound?

To silence or turn off notifications sound on your Android, go to Settings > Sound & vibration > Default notification sound > Choose None or Silent you want to set the Android notifications sound.

How to Turn Off YouTube Notifications?

To turn off YouTube notifications, go to Settings > Apps > See all apps > YouTube > Notifications > Toggle off All YouTube notifications.

How to Turn Off Linkedin Notifications?

To turn off Linkedin notifications, go to Settings > Apps > See all apps > Linkedin> Notifications > Toggle off All Linkedin notifications.

How to Turn Off Messenger Notifications?

To turn off Facebook messenger notifications, go to Settings > Apps > See all apps > Facebook messenger> Notifications > Toggle off All Facebook notifications.

How To Add a Google Account to your Android

Do you want to make another Google accounts on your Android phone or Samsung Galaxy? Using account settings, you can easily add a Google account to your Android devices. You can switch Gmail accounts on Android to check the mail list without logging out. Once you add another Gmail account on your Android device, you can’t sign out of Google on your phone. You can only remove that account from the device. Also, turn Gmail sync on/off to automatically sync your data like contacts, messages, photos, calendar, etc. Below you can see the 3 different ways to add another Google account on Android, Samsung, OnePlus, and other devices.

Read Also:

How To Add Google Account Android Phone or Tablet

Apply below given three different methods to add a new Gmail account on your android devices.

How to Sign in Another Gmail Account in Mobile

Step 1: Open the Gmail app on your Android devices.

Gmail settings to add second account in your Android


Step 2: Tap on Three horizontal lines (Menu) at the top left corner.

Open Gmail app settings in your Android device

Step 3: Tap on Settings.

How To Add Multiple Google Accounts to Android Device

Step 4: Tap on Add account.

Set up email account on Stock Android

Step 5: Tap on Google.

Step 6: Enter the Email and tap on Next.

Step 7: Enter your Password and tap on Next.

Follow the on-screen instructions to set up a new mail.

Step 8: Add another Gmail account on your Android device.

Alternative Way:

Manage multiple Google accounts on Android Device

Open Gmail app > Menu > Settings > Three vertical dots at the top right corner > Manage accounts > Add account > Google > Enter Email> Next > Add password > Next

How To Add Account to Gmail App On Android Phone or Tablets

Open Gmail app > Profile icon at the top right > Add another account > Google > Add Email> Next > Enter password > Next

Related:

How to Add Another Gmail Account in Phone

Step 1: Pull down the notification panel from the top and tap on the Settings icon.

Step 2: Scroll down and tap on Passwords & accounts or Accounts.

Add Multiple Gmail Accounts on Android Using Gmail App

Step 3: Tap on Add account.

How to Add Multiple Accounts to Gmail App in Android Smartphone

Step 4: Tap on Google.

Step 5: Add Email and tap Next.

Step 6: Enter the Password and tap on Next.

Above, you can see the different ways to add an account to Gmail app on an Android device. If you’re having problems implementing this, do let me know in below comment box. It would be a pleasure to help you. Connect with us for daily updates.

How to Remove Google Account from Phone

If you don’t want to use your second account, you can remove Gmail account from phone using the settings below.

Step 1: Go to Settings.

Step 2: Scroll down and tap Passwords & accounts.

Step 3: Tap the Gmail account you want to delete.

How to Remove Google Account from Phone

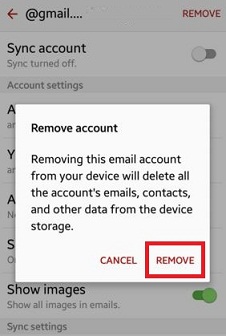
Step 4: Tap Remove account.

It will delete this account’s contacts, messages, and other data from the phone.

Remove Gmail account from phone

Step 5: Tap Remove account to confirm it.

Frequently Asked Questions:

Can you have two Google accounts on Android?

You can add multiple Google accounts (Gmail) on your Android and other devices. To add a second Google account on Android, Go to Settings > Passwords & accounts > Add account > Google > Enter the Email> Next > Password > Next.

How To Change Desktop Background Windows 7, 8, 10

Here’s how to Change desktop background Windows 7/Windows 8/Windows 10 starter and home basic. You can easily change your wallpaper on your Windows 10/8/7 PC to choose picture location or browse to the PC folder that containing the wallpaper or pictures you want to use for your Windows desktop background. Also set picture position as Fill, Fit, Stretch, Tile and center.

You can select more than one wallpaper to create a slide show on your desktop and set interval times to change picture that time. In Windows 7 starter only one desktop background so you can’t change or customized it. Follow below given two methods to change desktop background Windows 7/8/10.

Also read:

How To Change Desktop Background Windows 10, Windows 8, Windows 7

Apply below given two different methods to change the Windows 7 background picture or wallpaper.

Method 1: For Windows 7

Step 1: Tap on Windows “Start” button.

Tap on Control panel from Windows start button

Step 2: Click on “Control Panel”.

Tap on appearance and personalization

Step 3: Tap on “Appearance and Personalization”.

Tap on personalization

Step 4: Click on “Personalization”.

How to change desktop background Windows 7PC

Step 5: Tap on “Desktop Background” from bottom of the page.

change desktop background Windows 7

You can see the above screen on your Windows 7 PC.

Step 6: Tap on “Picture location” drop down box or browse button to find picture from PC & choose it your desktop background picture

Step 7: Tap on “Picture position” to set on background. In the fit & center wallpaper position you can change background color.

Step 8: Click on the “Save Changes” button.

Method 2: Change Desktop Background Picture on Windows 7/Window 8

Step 1: Tap on right-click on your Windows 7 desktop or laptop.

Tap on personalization from desktop

Step 2: Click “Personalize”.

Step 3: Tap on “Desktop background”.

Step 4: Select wallpaper location or browse from PC & select wallpaper position on the desktop.

Step 5: Click on “Save changes” button.

Related:

Method 3: Change Desktop Background on Windows 10

Step 1: Right-click on the blank area on your Windows 10 desktop.

Step 2: Tap Personalize.

Step 3: Click the dropdown menu of Background heading.

You can see below given three options.

Change Desktop Background on Windows 10 desktop PC or Laptop

Picture

Choose your picture from the list or browse from your PC to set background wallpaper on your PC.

Solid color

Choose your background color or custom color you want to set.

Slide Show

Choose pictures from the list or browse from the PC to make your slideshow. Also, choose a time for a slideshow, toggle on Shuffle, and choose a fit from fill/Stretch/Tile/Center/Span.

Step 4: Click on the picture you want to set.

Now, change the Windows 10 background pictures on your PC or Laptop devices.

That’s all. Above you can see the process of change desktop background Windows 7/8/10 PC or laptop. If you have any concerns or question regarding change desktop wallpaper, don’t hesitate to let me know on below comment box. It would be a pleasure to help you and connect with us for daily updates.

How to Enable SMS Delivery Report in Android 12/11/10/9

Here in this guide, we will see the steps to enable SMS delivery report in Android 12/11/10/9 (Pie) devices. While doing this setting, you can get all the delivery reports on your Android phone. By this, it’s easy for you to enable the SMS delivery reports and request read reports for all the messages you send on your android mobile device. So If you send the message to another person, you will get the notification “Message Sent,” which means you have successfully sent the message to another person but are not sure if that person read the message or not. When you enable this feature on your Android Device, you will receive a confirmation about the message that has been received and the message that has been sent.

So this guide is helpful to enable all delivery reports of the text messages in your Android 12 and Android 11 device. It is perfect for all Android devices. Check out the below-given steps to enable delivery reports of text messages on the latest Android device.

Read More: How to Turn Off Flashlight Android

How To Enable Delivery Report of Text Messages on Android 12/11/10/9 (Pie)

Check out the methods to check if a text message was delivered on your Android or Samsung Galaxy devices.

Enable SMS Delivery Report in Android 12 and Android 11

Step 1: Open the Messages app (Google Messages) in your stock Android.

Step 2: Tap on the Profile icon at the top right corner.

Step 3: Tap the Message settings.

Enable SMS Delivery Report in Android Phone

Step 4: Scroll down and tap on Advanced.

How to Enable SMS Delivery Report in Android 12 and Android 11

Step 5: Toggle on Get SMS delivery reports.

Turn On Android Message Delivery Report: Android 10

Message app > Three vertical dots (More) > Settings > Advanced > Toggle on Get SMS delivery reports

Read More:

For Android 9 (Pie) and Android 8.1 (Oreo)

Step 1: Open the Messages app on your Android devices.

Step 2: Tap Three vertical dots at the top right corner.

Step 3: Click Settings.

Step 4: Tap Advanced.

Step 5: Toggle on Get SMS delivery reports.

For Android 5.1.2 (Lollipop) and Android 6.0 (Marshmallow)

Step 1: Open the Message app on your Android device.

Tap on more option in top right side corner on android lollipop

Step 2: Tap More in the top right corner.

Select settings

Step 3: Tap on Settings.

Tap on more settings on android

Step 4: Tap on More settings.

Tap on text messages under more settings

Step 5: Tap on Text messages.

Disable delivery report of text messages

By default, text message delivery reports are Disabled on your Android phone and tablet.

How to enable delivery report of text messages on android

Step 6: Toggle the Delivery reports button to enable delivery reports of text messages on Android devices.

Now, after sending the message or multimedia messages to others, you can see the delivery report for each message you send from your Android device.

It’s done. Did you find this article helpful? Please reply in the comment section if you have any further queries.

Related:

How To Add WhatsApp Chat Shortcuts on Android Home Screen

Here’s how to create a shortcut for a WhatsApp contact on Android phone and tablet. You can add a shortcut of WhatsApp important contacts or WhatsApp group shortcut on your android device home screen so you can directly chat with those people from your device home screen without open WhatsApp. In daily routine, you have chat with several people on WhatsApp. You can directly create a shortcut of WhatsApp contact using WhatsApp contact settings.

Recently WhatsApp is the most used messaging apps than any other chat apps on social media sites. One of the most advantages of WhatsApp is supported most of all the latest OS smartphones including Android, iPhone, Blackberry, Nokia Lumia, etc. It’s quite simple to add a shortcut of WhatsApp individual contact or group contact on your Android mobile or tablet devices.

Read Also:
How To Add A Shortcut Of WhatsApp Contact on Android Devices

Step 1: Open “WhatsApp” on your android devices.

Tap on WhatsApp contact profile

Step 2: Tap on any individual WhatsApp contact or contact profile want to add WhatsApp shortcut.

Tap on the top right side corner

Step 3: Tap on Three vertical dots (More) at the top right side corner.

Tap on More on WhatsApp contact

Step 4: Tap on “More”.

How to add shortcut of WhatsApp contact on android


Step 5: Tap on “Add shortcut”.

create shortcut of WhatsApp contact on android

Go to your home screen and see the WhatsApp contact shortcut. Now you can chat with this person directly from the home screen.

Create Shortcut For WhatsApp Group on Android

Step 1: Open the WhatsApp group.

Step 2: Tap Three vertical dots at the upper right corner.

Step 3: Select More at the last in the list.

Step 4: Click Add shortcut.

Step 5: Tap Add automatically.

You can see a round icon chat bubble on your android device home screen.

How to remove WhatsApp chat shortcut from home screen Android

To remove chat shortcut in WhatsApp, long-press the chat bubble of WhatsApp contacts from your home screen and drag it to “Remove” at top of the middle screen.

Above you can see the perfect steps to add a shortcut of WhatsApp contact on android. If you’re having problems implementing this, don’t hesitate to let me know in below comment box.