How to Disable Apps on Pixel 2 and Pixel 2 XL

Annoying by the app running slow or freezing app issue on Google Pixel 2 or Pixel 2 XL? Here’s a guide to enable or disable apps on Pixel 2 and Pixel 2 XL devices. When you disable app on Google Pixel 2 XL, that app may no longer function as intended. And replace this app with the factory versions & all data will be removed. You can disable only pre-installed apps (System apps) in your devices. After disabling the app in your device, hide this app from your app drawer & home screen. To use app again, enable app on Pixel 2 and Pixel 2 XL. You can delete unwanted apps in Google Pixel 2, 2 XL, Pixel 3, 3 XL and other Pixel devices.

Read Also:

How to Enable or Disable Apps on Pixel 2 XL and Pixel 2

Step 1: Swipe down the notification panel and tap on the Settings gear icon.

Step 2: Tap on Apps and notifications.
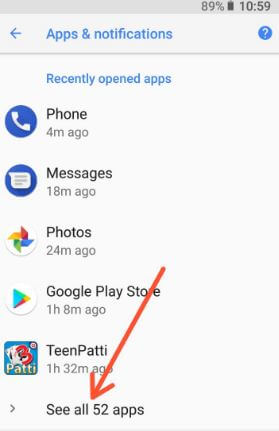
Pixel 2 XL apps list

Step 3: Tap on see all apps in recently opened apps list.

You can see the app info screen in your Google Pixel 2 and other devices.
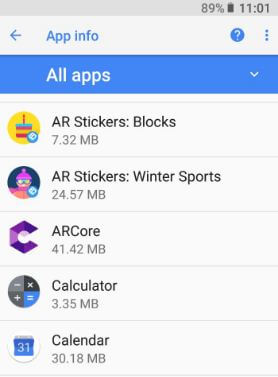
Delete apps on Pixel 2 XL Oreo

Step 4: Tap on the app you want to disable or force stop.

Disable app in Google Pixel 2 XL

Step 5: Touch on Disable button.

Disable apps on Pixel 2 and Pixel 2 XL

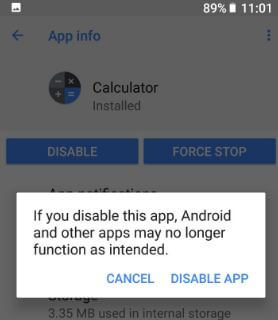
Step 6: Tap on Disable app.

You can see this message on screen: Replace this app with the factory version? All data will be removed

Step 7: Tap on OK.

If turn off app can’t fix your issue, delete or uninstall apps using below given settings.

How to Enable App Again in Pixel 2 XL and Pixel 2

Settings > Apps & notifications > See all apps > Select the system app you disabled > Enable

How to Uninstall or Delete Apps on Pixel 2 and Pixel 2 XL

Step 1: Open Google Play Store in your Pixel 2 & Pixel 2 XL.

Step 2: Tap on Three horizontal lines (Menu) at upper left corner.

Step 3: Select My apps and games.

You can see a list of installed apps in your Google Pixel 2 and other devices.

Step 4: Tap on App you want to delete or uninstall.
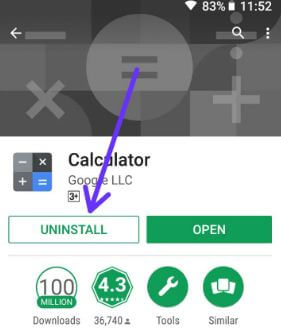
Uninstall apps in Pixel 2 XL Oreo

Step 5: Tap on Uninstall.

You can see this message on screen: Do you want to uninstall all updates to this android system app?

Step 6: Tap on OK.

And that’s it. We hope this makes it clear how to enable or disable apps on Pixel 2 and Pixel 2 XL. Do you have known any other tricks? Tell us in below comment section. Read more about best Pixel 2 tricks.
How to fix call on speaker issue Galaxy S9 and Galaxy S9 Plus

Annoying by low sound quality call on speaker issue Galaxy S9 and Galaxy S9 plus Oreo? One of the most common reasons for this problem is weak signal or poor network connectivity on your galaxy S9. First of all make sure your galaxy S9 call volume is high. Have you been ever facing phone call issue while use speaker on Samsung galaxy devices?

In Samsung galaxy S9 phone call issues, you can see low volume on speaker, dropping calls, can’t hear voice on calls and more. Also try microphone and check any issue occur while on call in your S9. Apply below given possible solutions to fix call on speaker issue Galaxy S9 and Galaxy S9 Plus.

You Might Like This:

How to fix Wi-Fi connected but not working in Galaxy S9 & S9 Plus

How to fix black screen problem on Galaxy S9 and Galaxy S9 Plus

How to fix call on speaker issue Galaxy S9 and Galaxy S9 Plus Oreo

How to fix call on speaker issue Galaxy S9 and Galaxy S9 Plus

Follow each one listed below methods to fix speaker call volume problem on galaxy S9 and galaxy S9 plus.

1st Method: Check phone volume

Settings > Sound > Volume settings

2nd Method: Restart your Galaxy S9 & S9 plus

Press and hold the power button and tap on restart button in your Samsung galaxy S9 & S9 plus. Now make a call on speaker and check fix call sound issue or not.

 3rd Method: Check network signal strength to fix call on speaker issue Galaxy S9 and Galaxy S9 Plus

Because of weak network signal, you can face disturbance on call or call dropping problem. Find nearby place where good network strength and trying to call on speaker.

4th Method: Use Microphone or earphone

Try to using earphone or headphone in your galaxy S9 and galaxy S9 plus and make call and check any error occur while use speaker on incoming or outgoing calls.

5th Method: Check system software update is available or not

Check any system software update is available for your galaxy S9 and galaxy S9 plus.

Settings > about phone > system update

If none of the above given method fix speaker call volume problem, hard reset galaxy S9 and galaxy S9 plus.

End the list of possible solutions to fix call on speaker issue Galaxy S9 and Galaxy S9 Plus. Do you know any other tips? Share with us in below comment box. Read more about best galaxy S9 tricks.

How to use Apps Edge Galaxy S9 and Galaxy S9 plus Oreo

We already discussed about customize edge panel on galaxy S9 and galaxy S9 plus Oreo. But in this tutorial, I’ll show you guide to use apps edge galaxy S9 and galaxy S9 plus devices. The app edges displays five most last used apps for quickly access from home screen edge panel. You can add your favorite apps shortcuts to S9 apps edge screen.

In Samsung galaxy S9 edge screen settings, you can see Edge panel and Edge lighting settings. You can maximum add 9 panels at once in galaxy S9 and S9 plus. Also create app pair and use as split screen mode on galaxy S9 apps edge screen. Follow below given step by step process to use Apps Edge Galaxy S9 and Galaxy S9 plus.

Don’t Miss This:

How to send picture message from Galaxy S9 and Galaxy S9 Plus

How to manage edge screen content on Galaxy Note 8

How to disable edge screen on Galaxy Note 8, Galaxy S8 & S8 plus

How to use Apps Edge Galaxy S9 and Galaxy S9 plus Oreo

Let see complete process to use Samsung apps edge feature in your devices.

Step 1: Swipe screen left or right side to access edge panel display

Step 2: Swipe edge panel screen until display Apps edge screen

In Samsung apps edge screen, you can access the most recent use apps and open two apps at same time using app pair galaxy S9 and S9 plus. You can see by default added apps on apps edge S9 & S9 plus.

Step 3: Tap on + icons to add app to apps edge screen

How to use Apps Edge Galaxy S9 and Galaxy S9 plus Oreo

You can see list of available apps and create app pair settings.

Step 4: Select apps you want to add

Step 5: Tap on create app pair

List of supported multi window apps are view in your galaxy S9 device.

Step 6: Select two apps you want to use split screen view on galaxy S9 & S9 plus

The first app will appear at the top of the screen and the second will appear at bottom of the screen.

Step 7: Tap on Done at upper right corner

Now created app pair on galaxy S9 and galaxy S9 plus Oreo devices. You can also clear and switch apps on galaxy S9 and S9 plus.

How to use app pair on galaxy S9 and galaxy S9 plus

Step 1: Swipe home screen from left or right to open edge panel

Step 2: Swipe edge panel screen until see Apps edge

Step 3: Tap on App pair you created

You can see two apps will open in split screen mode on galaxy S9 and galaxy S9 plus.

And that’s it. Do you still have questions about use Apps Edge Galaxy S9 and Galaxy S9 plus? Are you using the Apps edge on galaxy S9 & S9 plus? Let us know your thought related this S9 feature.

How to Attach a Picture to a Text Message on Google Pixel Oreo

Do you know how to send MMS as a picture message on Google Pixel Oreo devices? Here’s how to attach a picture to a text message on Google Pixel or Pixel 2 XL Oreo. In the Android Oreo 8.0 and 8.1 devices, you can send a picture message from Google Pixel and other devices using messages app. You can attach pictures from the camera or gallery of your Google Pixel, Pixel XL, Pixel 2, 2 XL, and other supported devices. Also, send stickers, Emoji, location, record audio in your Google Pixel Oreo devices.

Read Also:

How to Attach a Picture to a Text Message on Google Pixel Oreo

Step 1: Open the Messages app in your Google Pixel Oreo 8.1 and 8.0.

Step 2:  Tap on + icon at the bottom right corner of the screen.

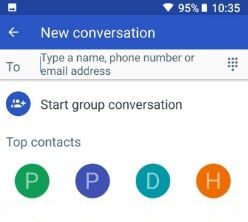
Add number or name to send picture message from Google Pixel

Step 3: Enter the Name, mobile number, or email address you want to send a picture.

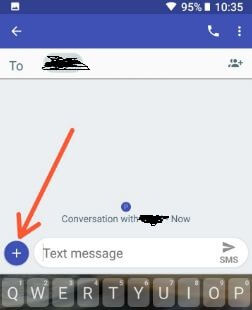
Send MMS from Google Pixel Oreo

Step 4: Tap on + icon.

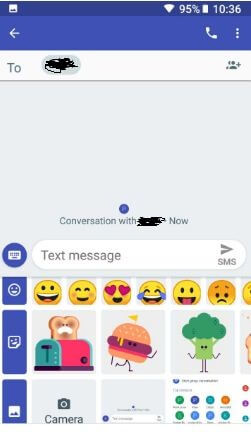
You can see below the given screen in your Google Pixel and other devices.

Send picture message from Google Pixel

Step 5: Choose a photo from camera or gallery you want to send MMS.

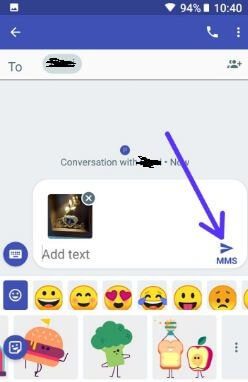
Now, attach a photo to a text message on the Pixel device.

How to attach a picture to a text message on Google Pixel

Step 6: Enter text message if send with picture and tap on MMS.

Now, send a picture as a text message on Google Pixel, Pixel XL, and other Android Oreo 8.0 & 8.1 devices. You can use group messaging to send as MMS to all recipients. Also, enable/disable auto-download MMS in Google Pixel devices.

Group Messaging Settings For Android 8 Oreo: Google Pixel

Step 1: Open the Messages app in Google Pixel.

Step 2: Tap on Three vertical dots (Menu) at the upper right corner.

Step 3: Select Settings.

Here you can see settings for change default SMS app, message app notification settings, and advanced settings.

Step 4: Tap on Advanced.

Step 5: Tap on Group messaging.

You can see below the given two options.

Mass Text: Send an SMS reply to all recipients and get individual replies

Group MMS: Send an MMS reply to all recipients

Step 6: Choose from Mass Text or Group MMS.

And that’s it. I hope this tutorial helpful to attach a picture to a text message on Google Pixel Oreo. If you have any trouble, tell us in below comment box. Read more about the best Google Pixel tricks.

How to clear memory on Galaxy S9 and Galaxy S9 Plus

Annoying by Samsung galaxy S9 and galaxy S9 plus speed slow? You can clear storage and memory to improve the performance of your galaxy S9 and S9 plus Oreo device. Let see complete guide to clear memory on Galaxy S9 and Galaxy S9 Plus. This clear device memory on galaxy S9 is free up space by stopping background apps which are unnecessary.

You can clear storage on galaxy S9 and S9 plus using device maintenance settings. It’ll remove unnecessary data from your device such as residual files, cached data and other unneeded data. We already discussed about free up storage on galaxy S9 & S9 plus. Follow below given step by step process to clear memory on Galaxy S9 and Galaxy S9 Plus.

Read More:

How to check app usage battery data on Galaxy S9 and Galaxy S9 Plus

Galaxy S9 and Galaxy S9 Plus Performance mode: How it works

How to clean storage and clear memory on Galaxy S9 and Galaxy S9 Plus

How to clear memory on Galaxy S9 and Galaxy S9 Plus

Let see one by one process to clear memory and clean storage on galaxy S9 and galaxy S9 plus devices.

Clear memory on Galaxy S9 and Galaxy S9 plus Oreo

Step 1: Swipe down notification panel from any screen and tap on Settings gear icon

Step 2: Tap on Device maintenance

In galaxy S9 and galaxy S9 plus device maintenance settings, you can see quick optimization, Battery, performance, storage and memory settings.

Step 3: Tap on Memory

Here you can see memory used by system and apps, available space and used apps.

Step 4: Touch Clean now button

Now it’ll free up memory in your Samsung galaxy S9 and galaxy S9 plus devices.

Clear storage on Galaxy S9 and Galaxy S9 Plus Oreo

Step 1: Swipe down notification panel and tap on Settings gear icon

Step 2: Tap on Device maintenance

Step 3: Tap on Storage

Step 4: Tap on Clean now

And that’s all. Hope this solutions worked for you to clear memory on Galaxy S9 and Galaxy S9 Plus. If you have know any other ways, let me know in the below comment section. Don’t forget to check out our other galaxy S9 plus tricks.

How do I Attach a Photo to a Text Message on my Samsung Galaxy S10 Plus/S10/S10e/S9 Plus/S9/S8 Plus/S8

Do you want to send photos as SMS on your Samsung Galaxy One UI? Here’s how to attach a photo to a text message on my Samsung Galaxy S10 Plus/Galaxy S10/Galaxy S10e/Galaxy S9 Plus/Galaxy S9/Galaxy S8 Plus/Galaxy S8. You can attach a gallery photo, GIFs, Stickers, or add files on your Samsung devices. To send a picture as MMS on Samsung galaxy, make sure to enable mobile data. If your cellular data is turned off, the message will be sent once your cellular data is enabled again. Several users facing can’t send or receive picture messages on Samsung Galaxy devices due to network issues or disable MMS.

How Do I Send a Picture from my Gallery in a Text Message on Samsung Galaxy?

How to send picture message from Galaxy S9 and Galaxy S9 plus

Step 1: Open the Messages app on your Samsung.

Step 2: Tap on the Chat icon.

Step 3: Tap the Contact icon and select a contact you want to send a picture.

Step 4: Tap on Done.

Step 5: Tap on the + icon.

You can see here gallery, camera, location, stickers, emoji, GIFs, etc.

Step 6: We will select the Gallery.

Step 7: Select a Picture you want to send and tap on Send icon.

How to Send Picture to a Text Message on Samsung Galaxy using Gallery 

Step 1: Open the Gallery on your Samsung device.

Step 2: Tap on Photo you want to send as a text message.

Step 3: Tap on the Share icon.

Step 4: Find the Messages and tap on them.

Step 5: Tap on the Contact you want to send.

Step 6: Tap on Send icon to send the photo as MMS.

How to Send Photo Via Link Sharing on Samsung Galaxy

Step 1: Open the Messages app.

Step 2: Tap on Any contact.

Step 3: Tap on the + icon.

Step 4: Tap on the Gallery icon.

Step 5: Tap on the Link sharing icon at the bottom right corner.

Step 6: Tap on the Send button.

Note: Once you disabled the link sharing, then be able to select a picture to send via MMS on your Samsung One UI.

Don’t Miss: 

And that’s it. I hope this article helps send a picture message from Samsung Galaxy. If you have questions regarding this tutorial, let us know in the comment box below. We’ll respond as soon as possible.