How to Set Keep WiFi On During Sleep Samsung Galaxy S9 and S9 Plus

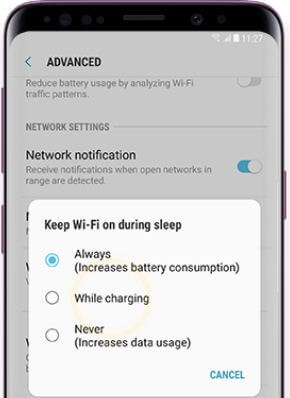
Here’s how to enable or disable keep WiFi on during sleep galaxy S9 and galaxy S9 plus. You can change to keep Wi-Fi on during sleep on S9 from always/while charging or never using Advanced Wi-Fi settings. By default set always as keep WiFi on during sleep galaxy S9 and galaxy S9 plus devices. This will reduce battery life on your Samsung S9 plus devices.

This Samsung Galaxy S9 & S9 plus keep Wi-Fi on during sleep decide whether Wi-Fi remains on while the phone is sleep. Have you ever keep wifi on during sleep? Follow the below-given step by step process to set keep WiFi on during sleep galaxy S9 and galaxy S9 plus devices.

Read Also:

How to Enable or Disable Keep WiFi on During Sleep Samsung S9 and S9 Plus

Step 1: Swipe down the notification panel and tap on the Settings icon.

Step 2: Tap and hold on the Wi-Fi symbol.

Step 3: Tap on Three vertical dots (Menu) at the upper right side corner.

Step 4: Select Advanced.

Step 5: Tap on View more.

Here you can see the WPS push button, WPS PIN entry, keep Wi-Fi on during sleep and more settings.

Step 6: Tap on keep Wi-Fi on during sleep.

By default set always in your Samsung S9 & S9 plus.

How to set keep WiFi on during sleep Galaxy S9 and Galaxy S9 plus

Step 7: Choose from Always/While charging/Never.

How to turn on Wi-Fi automatically on Samsung Galaxy S9 and Galaxy S9 Plus

Settings > Wi-Fi > Three vertical dots > Advanced > Turn on Wi-Fi automatically

And that’s it. Did you find the above-given tutorial helpful to set keep WiFi on during sleep galaxy S9 and galaxy S9 plus? If you have any kind of trouble, tell us in below comment box. Don’t forget to check out our other Samsung Galaxy S9 tricks.
How to Enable Switch to Mobile Data on Samsung Galaxy S9 and S9 Plus

By default turned off switch to mobile data on Galaxy S9 and Galaxy S9 plus. When you enable a switch to mobile data on Galaxy S9 & S9 plus, it’ll automatically switch between Wi-Fi and cellular networks whenever your Wi-Fi connection speed is slow or unstable. You can turn on the automatic use of mobile data using Advanced Wi-Fi settings. Now automatic turn on mobile data in your Samsung S9+.

Also, turn on Wi-Fi automatically and enable Wi-Fi power saving mode to extend battery life in your galaxy S9 and S9 plus devices. Follow the below-given step by step process to turn on switch to mobile data on Samsung Galaxy S9+ and S9.

Read Also:

How to Enable Switch to Mobile Data on Galaxy S9 and Galaxy S9 plus

Step 1: Swipe down the notification panel from top of the screen and tap on the Settings icon.

Step 2: Tap Connection.

Step 3: Tap WiFi.

Step 3: Tap on Three vertical dots (Menu) at the upper right side corner.

Step 4: Select Advanced.

How to enable switch to mobile data on Galaxy S9 and S9 Plus

Step 5: Toggle on Switch to mobile data under the adaptive Wi-Fi section.

Step 6: Tap Switch to mobile data.

Two modes available here.

Normal mode (By default):

Aggressive mode: Use mobile data to access the internet when your WiFi internet connection is slightly interrupted or unstable. This may increase your data usage.

Step 7: Choose from Normal mode/Addressive mode.

Now, your Samsung Galaxy S9 and Galaxy S9 plus automatically switches to mobile data when Wi-Fi is turned off or slow Wi-Fi speed or unstable connection.

Turn On Mobile Data on Samsung Galaxy S9 and S9 Plus

Step 1: Swipe down the notification panel from top of the screen and tap on the Settings gear icon.

Step 2: Tap on Connections.

Step 3: Tap on Data usage.

Here you can see data saver, mobile data, mobile data usage, billing cycle & data warning, Wi-Fi data usage, and more options.

Step 4: Toggle on Mobile data under the mobile section.

Now, access data using mobile network in your Samsung Galaxy S9 and S9 plus devices.

Alternative Ways: Swipe down the notification panel from the top of the screen > Tap Mobile data to on or off

And that’s all. I hope this tutorial helpful to enable a switch to mobile data on Galaxy S9 and Galaxy S9 plus. If you have any questions regarding this article, tell us in below comment box.

How to transfer contacts via Bluetooth on Galaxy S9 and S9 plus

There are many different methods to transfer contacts from one Samsung phone to other such as Bluetooth, Samsung smart switch, sync your account, Samsung cloud and more. But in this tutorial, I’ll show you complete guide to transfer contacts via Bluetooth on Galaxy S9 and Galaxy S9 Plus Oreo devices.

You can import contacts from old android devices to Samsung galaxy S9 and galaxy S9 plus device using contact settings. In latest android Oreo 8.0 and 8.1 devices, you can use Bluetooth as phone calls, media audio and contact sharing. Follow below given step by step process to transfer contacts via Bluetooth on Galaxy S9 and Galaxy S9 Plus.

Also Read:

How to switch texting from iMessage to android phone

How to transfer data from iPhone X/10/8 to Google Pixel 2 XL

How to transfer contacts via Bluetooth on Galaxy S9 and Galaxy S9 plus Oreo

How to transfer contacts via Bluetooth on Galaxy S9 and S9 plus

Step 1: Open contacts app in your Samsung galaxy devices

List of contacts are view in your devices.

Step 2: Tap & hold the contacts you want to send on galaxy S9 & S9 plus

Step 3: Select share at upper right corner

Step 4: Select file type from vCard (VCF file) or Text

Step 5: Tap on Bluetooth

You can see this pop up message on screen: Turn on Bluetooth now?

Step 6: Tap on Turn on

When Bluetooth is turned on, your Samsung galaxy device can communicate with other nearby Bluetooth devices. List of available devices see in your android or Samsung galaxy devices.

Step 7: Tap on galaxy S9 or galaxy S9 plus device you want to send contacts from old Samsung devices

Step 8: Tap on Receive on your Samsung S9 & S9 plus Oreo

Now wait for sending contacts from old Samsung phone to new galaxy S9 and S9 plus devices. If you want to back up data on galaxy S9 and galaxy S9 plus, you can use Samsung cloud, Smart switch and Sync Google account. You can backup galaxy S9 data to Samsung cloud including apps, messages, call logs, document, voice recordings, music and more.

How to transfer contacts using Bluetooth on android lollipop 5.1.1 & marshmallow 6.0

Step 1: Open contacts app in android 5.1.1

Step 2: Tap on More at upper right corner

Step 3: Select Share

Step 4: Select checkbox of contact you want to send

Step 5: Tap on Share

Step 6: Select Bluetooth

Step 7: Tap on device you want to send contacts

Step 8: Tap on Accept in device you want to receive contacts

And that’s it. If you know any other ways to easily transfer contacts via Bluetooth on Galaxy S9 and Galaxy S9 plus, let me know in the comment section. Share your thought related to this tutorial in below comment section.

How to turn on wifi automatically Galaxy S9 and Galaxy S9 plus

By default disable turn on wifi automatically galaxy S9 and galaxy S9 plus Oreo devices. You can turn on wifi automatically on galaxy S9 & S9 plus using advanced settings in Wi-Fi. When enable this settings in your S9, it’ll connect the Wi-Fi network automatically. And turn off Wi-Fi automatically when leave room or particular area.

To stop Wi-Fi from turning on automatically on galaxy S9, disable it in your device. You can also enable switch to mobile data on galaxy S9, so whenever Wi-Fi connection speed is slow or unstable, it’ll automatically switch to mobile data. Follow below given step by step process to turn on wifi automatically galaxy S9 and galaxy S9 plus.

You Might Like This:

How to turn on Google Pixel Wi-Fi assistant in android Oreo

How to use Super slow-mo mode Galaxy S9 and Galaxy S9 Plus

How to set Metered Wi-Fi network on android Oreo 8.0 and 8.1

How to turn on wifi automatically galaxy S9 and galaxy S9 plus Oreo

You can enable Wi-Fi power saving mode also to reduce battery usage by analyzing Wi-Fi in your Samsung S9 and S9 plus.

Step 1: Swipe down notification panel and tap on Settings gear icon

Step 2: Tap and hold the Wi-Fi symbol

Step 3: Tap on Three vertical dots (Menu) at upper right corner

Step 4: Select Advanced

How to turn on wifi automatically Galaxy S9 and Galaxy S9 plus

Step 5: Turn on toggle button Turn on Wi-Fi automatically under advanced settings

Now automatically enable Wi-Fi in home and other places where you use Wi-Fi internet connection frequently. You can see switch to mobile data and Wi-Fi power saving mode options.

How to turn on Wi-Fi automatically android Oreo 8.0 & 8.1

Step 1: Go to settings in your android Oreo devices

Step 2: Tap on Network & Internet

Step 3: Select Wi-Fi

Step 4: Tap on Wi-Fi preference

Now enable automatically Wi-Fi on android Oreo device. You can see below given two options.

Connect to open network:

Turn on this option to turn on Wifi automatically in android Oreo 8.0 and 8.1.

Open network notification:

By default activate this option. When your phone can’t find automatic connection, you can use your Wi-Fi or mobile data.

Step 5: Turn on toggle button connect to open network

Now turn on WiFi automatically Android Oreo 8.1 and 8.0 devices.

And that’s it. Did you find above tutorial helpful to turn on wifi automatically galaxy S9 and galaxy S9 plus Oreo? If you have any question, tell us in below comment box. Stay and connect with us for latest updates.

How to transfer data from old Samsung phone to Galaxy S9

Here’s how to transfer data from old Samsung phone to galaxy S9 and galaxy S9 plus Oreo using Samsung smart switch feature. You can use the Samsung smart switch feature to transfer data from Samsung phone to iPhone or Blackberry or Windows phone. By default installed smart switch app on galaxy S9 and S9 plus devices. Download Samsung smart switch app for android devices here.

You can easily transfer content from old Samsung galaxy devices to new galaxy S9 or S9 plus using smart switch via USB cable or Wireless or MAC or PC. Use Samsung smart switch to transfer important data from iPhone 8/X/10 to Samsung such as contacts, music, calendar, apps, photos & videos and other phone settings.  Let see step by step process to transfer data from old Samsung phone to Galaxy S9 and S9 plus.

Don’t Miss This:

How to transfer files from android to PC using Dropbox

How to transfer files android to Windows 10/8/7 via Xender

How to transfer contacts from Android phone to PC

How to transfer data from old Samsung phone to Galaxy S9 and S9 plus Oreo

You can transfer files from iPhone using smart switch to Samsung galaxy S9, S9 plus, S8, S8 plus and other devices. One of the best ways to switch your old device to your new Galaxy devices. Also use Dropbox and Xender to transfer files from iPhone to android or android to Samsung galaxy devices.

Step 1: Open app drawer in your galaxy S9 & S9 plus devices

Step 2: Tap Samsung folder

Step 3: Tap Smart switch

Step 4: Now follow on screen instruction to use Samsung smart switch

Step 5: Select method to transfer photos or video from old Samsung galaxy to new galaxy

Step 6: Select from USB cable/Wireless/Computer/MAC

Step 7: Choose Send or Receive

How to transfer data from old Samsung phone to Galaxy S9 Plus

Here you can see four options including iOS/android/ Blackberry/Windows phone.

Step 8: Select android

Step 9: Open Smart switch app in your old device, if smart switch isn’t installed then download from play store.

Step 10: Now open Samsung smart switch

Step 11: Select method you selected on your new galaxy S9 device

Step 12: Tap send or receive

Step 13: Tap connect

Step 14: Select content you want to transfer from old Samsung to new Samsung galaxy S9 & S9 plus and then tap Send

Step 15: Tap Receive

Step 16: Wait for transfer content to new galaxy S9 & S9 plus

Now transfer data from old Samsung phone to galaxy S9 and galaxy S9 plus Oreo devices.

Step 17: Tap on close app after completed transfer data

And that’s it. We hope this makes it clear how to transfer data from old Samsung phone to Galaxy S9 and S9 plus Oreo. If you have any question regarding this tutorial, tell us in below comment box.

How to use Samsung smart switch app to transfer data Galaxy S9

Bought a new Samsung S9/S9+/S8 or other devices? Now you need to transfer data from your old Samsung phone to galaxy S9/S8 or other devices. You can use Samsung smart switch app to transfer data from android to Samsung galaxy S9/S9+ and other devices. This Samsung smart switch feature is helpful to transfer contacts, messages, photos, call history, music, videos and more docs.

Using this Samsung smart switch app, you can transfer content to your Samsung galaxy S8/S9/S9 plus and other devices via wireless or USB cable or external storage options. You can also use smart switch to transfer data from Samsung galaxy to iPhone X/10/8/7. Check out below settings to use Samsung smart switch app to transfer data from old Samsung to new Samsung galaxy and other devices.

You May Like This:

How to move apps to SD card on Android Oreo

How to transfer content from iPhone 8/10/X to Pixel & Pixel 2 XL

How to switch texting from iMessage to android phone

How to transfer photos, contacts from iPhone to Samsung S8/S9/S9+ using Xender

How to use Samsung smart switch app to transfer data Galaxy S9, S9+,S8

If you can’t see Samsung smart switch app in your device for android, MAC or Windows PC, download it using below links.

Samsung smart switch for Android App – Download

Samsung smart switch for MAC and Windows PC – Download

Let see how to transfer content from old Samsung phone to galaxy S9, S9 plus, S8, S8 plus and other android, Blackberry and Windows devices.

Step 1: Open app drawer in your Samsung galaxy devices

Step 2: Tap Samsung folder

Step 3: Tap Smart switch

Step 4: Now follow on screen instruction to use Samsung smart switch feature

Step 5: After completed process, select method to transfer content from old android to Samsung galaxy

How to use Samsung smart switch app to transfer data Galaxy S9

Step 6: Choose from USB cable/Wireless/SD card

Step 7: Select Send or Receive

Step 8: Select your old device from android/iOS/Blackberry/Windows phone

Step 9: Open Smart switch app in your old device, if smart switch isn’t installed then download app from above given links

Step 10: Now open Samsung smart switch

Step 11: Select method you selected on your new device

Step 12: Tap send or receive

Step 13: Tap connect

Step 14: Select content you want to transfer from old phone to new Samsung and then tap Send

You can see pop up message on your device: Samsung galaxy wants to send you some data.

Step 15: Tap Receive

Step 16: Wait for transfer your old Samsung content to new Samsung galaxy

Step 17: After completed transferred, close app in your device

Also switch data from iPhone to Samsung galaxy S9/S9+/S8 and other devices using this Samsung smart switch feature.

And that’s it. I hope this tutorial helpful to understand how to use Samsung smart switch app to transfer data from one phone to another. Don’t forget to share with others, if you found it helpful. Read more about Samsung galaxy S9 tricks.