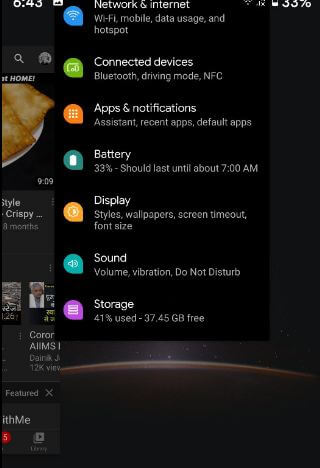
How to Turn Off Background Apps in Pixel 3a and Pixel 3a XL

By default several apps running on the background even we don’t use that reduce battery life in your Google Pixel 3a and Pixel 3a XL. Annoying by battery draining issue on your Pixel 3a? Here’s how to turn off background apps in Pixel 3a and 3a XL. By default turned on the usage of mobile data in the background on android device.

You can enable unrestricted data usage in your device to allow unrestricted data when data saver is on. To stop apps from draining android battery life, remove unnecessary apps or disable apps running in background on Google Pixel 3a XL. Follow the below-given step by step process to turn off background apps in Pixel 3a and 3a XL.

Read Also:

How to Stop Apps Running in the Background in Google Pixel 3a and Pixel 3a XL

You can close background running apps in Google Pixel 3a and Pixel 3a XL using the below settings.

Close apps on Pixel 3a XL and Pixel 3a

Step 1: Swipe up once only to view recent apps list in your latest updates Pixel 3a & 3a XL.

You can close apps individually or clear all at once in your Pixel devices.

How to Stop Apps Running in the Background in Google Pixel 3a

Step 2: Swipe up the app to remove the app individually.

Close apps on Pixel 3a XL and Pixel 3a

Step 3: Swipe screen right side until seeing Clear all, tap on Clear all to close all running background apps at once.

Restrict App Background Data on Pixel 3a and 3a XL

To prevent an app from using background data on Pixel 3a & 3a XL, apply below given settings.

Step 1: Swipe up from the bottom of the home screen to open the app drawer.

Step 2: Tap the Settings app.

Step 3: Tap Network & internet.

Prevent an app from using background data on Pixel 3a

Step 4: Tap Data usage.

Check app data usage and Wi-Fi data usage in your Google Pixel 3a and Pixel 3a XL.

Disable apps running in background on Google Pixel 3a XL

Step 5: Tap App data usage under a mobile section.

You can see app usage data in the background in your latest android device. Now restrict app background that usage more data and unnecessary.

Turn off background apps in Pixel 3a and 3a XL

Step 6: Tap app you want to stop apps running in the background Pixel 3a.

How to turn off background apps in Pixel 3a and 3a XL

Step 7: Turn off Background data toggle to restrict app background data.

To save battery, stop the app from using a battery in the background using the above given simple tutorial. After restrict app, that app may not properly and may be delayed app notifications.

And that’s all. I hope this little tip useful to turn off background apps in Pixel 3a and 3a XL. If you have any kind of trouble, tell us in below comment box. Stay and connect with us for the latest updates.

How to Reset Network Settings on OnePlus 7 Pro, 7T Pro, 7T, 7

Here’s how to reset OnePlus 7 pro network settings. If your device facing network-related issues such as WiFi connected no internet, Bluetooth connectivity, or mobile data not working and any other problems. You need to try reset network settings in OnePlus 7 Pro and OnePlus 7. This OnePlus 7 Pro reset network settings will remove all saved Wi-Fi and Bluetooth paired already connected. After performing this setting, it will automatically set default network configuration in your OnePlus (Available on OnePlus 7T Pro, 7T, 7) and other android devices.

You can network settings reset using backup & reset settings in your device. Follow the below-given step by step process to reset OnePlus 7 Pro network settings.

Read Also:

How to Reset OnePlus 7 Pro Network Settings

How to reset OnePlus 7 Pro network settings

To perform reset network settings on OnePlus 7 Pro and OnePlus 7, apply below-given settings.

Step 1: Swipe up from the bottom of the home screen to access the app drawer.

Step 2: Tap the Settings app.

Step 3: Tap Backup & reset at end of the page.

Four options available including backup my data, automatic restore data, network settings reset and factory data reset options.

Step 4: Tap Network settings reset.

Step 5: Tap Reset settings on the bottom of the screen.

It will reset OnePlus 7 Pro all network settings including Wi-Fi network, mobile data, and Bluetooth pair. This pop-up message appears on the screen: Reset all network settings? You can’t undo this action!

Step 6: Tap Reset settings.

Now, a network setting has been reset in your OnePlus 7 Pro devices. To use Wi-Fi and Bluetooth, you need to enter a Wi-Fi password and pair with Bluetooth devices in your android device. Also, check the fix network issue on OnePlus 7 Pro. If the above given can’t fix the issue, you need to factory data reset using below given settings.

Factory Reset OnePlus 7 Pro using phone settings

It will remove all data from your device. First of all, back up & restore important data safely to PC or other devices.

Settings > System > Reset options > Erase all data (Factory reset) > Reset phone > erase everything

And that’s it. Do you still have questioned regarding reset OnePlus 7 Pro network settings? Let us know in below comment box. If you found it useful, don’t forget to share it with others. Stay and connect with us for the latest updates.

How to Reset OnePlus 7 Pro – Factory Reset

Here’s how to factory reset OnePlus 7 Pro and OnePlus 7. You can factory data reset OnePlus 7 Pro using phone settings or enter your device into recovery mode using a hardware key. There are several reasons to reset OnePlus 7 Pro such as phone won’t turn on, touch screen not working, phone freezing or crashing, black screen and other issues. This OnePlus 7 Pro factory reset data will remove all data from your device. So back up & restore data safely in other devices using Google account. You can bypass screen lock if you forgot password, PIN, or pattern lock in your OnePlus devices using recovery mode.

It will erase all data including Google account, photos, videos, music, internal storage, and more. Also, enable internal storage data if you want. Check out below given two different methods to factory reset OnePlus 7 Pro (Available on OnePlus 7T Pro, 7T, 7).

Read Also:

How to Factory Reset OnePlus 7 Pro and OnePlue 7

How to Factory Reset OnePlus 7 Pro

Fix some of the OnePlus 7 Pro problems to follow below steps to reset OnePlus 7 Pro using phone settings.

Factory Reset OnePlus 7 Pro using phone settings

Step 1: Open the app drawer and tap the Settings app.

Step 2: Tap the System at the end of the page.

Here you can see Language & input, backup, accessibility, reset options, multiple users, OTG storage, and more.

Step 3: Tap Reset options.

Step 4: TapErase all data (Factory reset).

Step 5: Tap Reset phone.

You can see System data and toggle switch for erase internal storage to enable or disable it.

Step 6: Tap Reset phone.

Step 7: Tap on Erase everything.

It will remove all your personal data and the third party downloaded apps from your device.

Reset OnePlus 7 Pro using Recovery Mode

This will same as master reset or hard reset OnePlus 7 Pro and OnePlus 7. Make sure your OnePlus device switch off.

Step 1: When the phone is powered off, hold down the power key and volume down key at the same time until the screen wakes up or the OnePlus logo appears.

Step 2: You will see Recovery mode in your device.

Step 3: Tap on Advanced.

You can see Reset system settings, Wipe cache, and Erase everything options.

Step 4: Tap Erase everything (Music, Picture, etc).

Now, remove all your phone data and set default factory settings in your OnePlus 7 Pro and OnePlus 7.

Wipe Cache in OnePlus 7 Pro and OnePlus 7T Pro

Step 1: Make sure to switch off your phone.

Step 2: Press & hold the power and volume down key at the same time until seeing the OnePlus logo, release all buttons.

Step 3: Select the language from the list.

Step 4: Tap on Wipe data and cache.

Step 5: Tap Wipe cache.

This message appears: Cache will be wiped, continue?

Step 6: Tap Yes.

You can see a “Wipe success” message when complete the process.

Step 7: Tap Reboot.

And that’s it. I hope this little tip useful to factory reset OnePlus 7 Pro. If you have any questions, tell us in below comment box. Stay and connect with us for the latest updates.

How to Use Dashboard on Android 9 Pie

Want to access Android dashboard? Android 9 Pie added a new Digital Wellbeing feature that includes Dashboard, Wind down, Do not disturb and manage notifications. But in this tutorial, I’ll show you how to use Dashboard on Android 9 Pie. Android Dashboard app is useful to check screen time, how many notifications you received, how many times unlock the screen, and how many times opened a particular app. Also set daily time limits for a particular app that automatically paused app after reach the limit you set.

The latest Android 10 Digital Wellbeing added new focus mode, Bedtime mode, and parental control settings. You can download Digital Wellbeing in your Android devices from the Google play store.

Read Also:

How to Use Dashboard on Android 9 Pie

You can use the Android dashboard app on your Pixel device using below given settings.

Step 1: Swipe down the notification panel from the top of the screen and tap the Settings gear icon.

Step 2: Scroll down up to Digital Wellbeing and tap on it.

Below the given Android Pie Digital Wellbeing Dashboard screen is a view on your device.

Use Digital Wellbeing dashboard on Android 9 Pie

Step 3: Tap Dashboard.

How to use Dashboard on Android 9 Pie

Step 4: By default see Screen time of app in your device.

Step 5: Tap Screen time down arrow.

Use Dashboard on Android 9 Pie

You can see screen time, notifications received and times opened.

Screen time: Useful to see how many times use apps on your device as daily or hourly.

Notifications received: How many notifications you received for a particular app in your device.

Times opened: How many times unlocked your android device

Step 6: Choose option from above given

You can also set app limit on android 9 Pie using below given settings.

How to Set App Limit on Android 9 Pie

Set app timer on Android Pie 9.0 devices

Settings > Digital wellbeing > Dashboard > Tap Timer icon > Set app timer > OK

After reach the app time limit, you can see the “app isn’t available” message on the screen in your Android 9 Pie devices. Now that Android app paused since your app timer ran out. Also, remove the app timer using the same above settings to remove the timer and use the app again.

And that’s it. We hope this makes it clear how to use Dashboard on Android 9 Pie. Are you using the Digital Wellbeing feature on your Pie devices? Let us know in the below comments section!

How to Turn On Do Not Disturb in Pixel 3a and Pixel 3a XL

Here’s how to enable do not disturb on Pixel 3a and 3a XL. By default turned off DND mode in your device. When enable do not disturb mode Google Pixel 3a & Pixel 3a XL, it will mute all sounds or vibrate when notifications arrive. Also, set custom restrictions when the screen is off or on such as don’t wake for notifications/hide notifications or hide status bar icons at top of the screen and more.

You can set schedule time to Pixel 3a do not disturb turns on automatically. Also, set event or sleeping time to use Do not disturb mode on Google Pixel 3a. By default show notification on the screen without sound when activating DND mode. Check out below given settings to turn on and use do not disturb on Pixel 3a and 3a XL.

Read Also:

How to Customize Do Not Disturb Mode on Pixel 3a XL and Pixel 3a

You can quickly enable DND mode on Google Pixel 3a and Pixel 3a XL using a quick settings tiles menu. Just swipe down notifications panel and tap Do not disturb. Let see other methods.

Step 1: Swipe up from the bottom of the home screen to open app drawer.

Step 2: Tap the Settings app.

Step 3: Tap Sound.

Here you can see vibrate for calls, Do not disturb, Shortcut to prevent ringing, phone ringtone, touch vibration, default notification sound, haptic feedback and more.

Turn on do not disturb on Pixel 3a and 3a XL

Step 4:  Tap Do not disturb.

Now change settings for calls, SMS, MMS, and messaging apps, Restrict notifications, default duration and schedule.

How to turn on do not disturb on Pixel 3a and 3a XL

Step 5: Tap Turn on now at end of the page.

Step 6: Now see Round icon on the notification bar.

All phone calls and notifications are mutes in your android phone or tablet device.

Use Do not disturb mode on Google Pixel 3a

Step 7: Tap Calls.

Step 8: Tap Allow calls.

By default don’t allow any calls in your device.

Step 9: Choose from anyone/contacts only/starred contacts only/Don’t allow any calls.

Also, allow repeat callers if the same person call a second time within a 15 minute period.

Custom restriction for DND is on or off

Enable DND mode on Google Pixel 3a

Settings > Sound > Do not disturb > Restrict notifications

You can see set No sound from notifications. Choose from no visuals or sound from notifications or custom settings.

And that’s it. I hope this little tip useful to turn on do not disturb on Pixel 3a and 3a XL. Do you still have any questions regarding this tutorial? Tell us in below comment box. Stay and connect with us for the latest updates.

How to Use Parallel Apps in OnePlus 7 Pro, 7T Pro, 7T, 7

Do you want to install two WhatsApp in OnePlus 7T, 7 Pro, and 7? What are parallel apps or Dual apps in the latest OnePlus devices? Here’s how to enable and use parallel apps in OnePlus 7 Pro and other latest OnePlus devices. Using the dual app in OnePlus 7 series, you can use two different social media accounts simultaneously to save time for switching apps one by one. To use two accounts of the same app on your OnePlus, you must turn on the app toggle on your phone using utility settings.

Use dual apps in OnePlus 7 Pro, such as Facebook, Instagram, WhatsApp, Snapchat, and other supported apps. Follow the below-given step-by-step process to clone apps on OnePlus 7 and 7 Pro (Available OnePlus 7 Pro, 7T Pro, 7T, 7).

Read More: How to Clone Apps on OnePlus 9 Pro, 9, 9RT

How to Use Dual Apps in OnePlus 7 Pro, 7T, 7T Pro, 7

How to use parallel apps in OnePlus 7 Pro

You can enable and use dual apps in OnePlus 7T, 7T Pro, 7 Pro, and OnePlus 7 using the below-given settings.

Step 1: Swipe up from the bottom of the home screen to open the app drawer.

Step 2: Tap the Settings app.

Step 3: Tap Utilities.

OnePlus 7 Pro utilities settings include several options such as App locker, Parallel apps, pocket mode, Gaming mode, and more.

Step 4: Tap Parallel apps.

By default, turn off all app toggles. A supported dual apps list appears on your device, such as Facebook, Skype, Twitter, LinkedIn, WhatsApp, and more social media apps. Installing a new app will automatically add it to the parallel app list if supported.

Step 5: Toggle on the app you want to enable parallel apps on OnePlus 7 Pro.

Step 6: Now, use two WhatsApp accounts on OnePlus 7 Pro.

Also, use other social media account you want to use on your device. If you’re going to use two different apps at the same time, you can use multi-windows mode in OnePlus 7 Pro and OnePlus 7. Watch YouTube videos and chat with Messenger simultaneously on your Android devices.

How to Enable and Use Split Screen in OnePlus 7 Pro and OnePlus 7

Step 1: Tap the Recent Apps button on your OnePlus 7 Pro.

Step 2: Tap Three vertical dots or the head icon of the app you want to use as a Split screen view.

Step 3: Touch the Split screen.

You can see the selected app appear on your device’s upper half of the screen.

Step 4: Select another app you want to use in multi-window mode.

Now use two apps on OnePlus 7 Pro at the same time.

Have you used dual apps on your OnePlus 7 Pro? Do you still have any questions about using parallel apps in OnePlus 7 Pro and OnePlus 7? Let us know in the below comments section!

Read Also: