How to Set Up Face Recognition on Samsung Galaxy Note 10 and Note 10 Plus

Do you want to unlock your Galaxy Note 10+ using face unlock lock screen? If yes, you need to set up and use face recognition on Samsung Note 10 plus and Note 10. Use your face as a password in your Note 10+ and Note 10. Lock screen security is important for any device to secure information. When you set up face unlock or trusted face, your device will unlock when the face is recognized.

You can more secure note 10 face unlock or improve face matching in different conditions such as different lighting, with or without prescription glasses, etc. Someone who looks like you or your photo sometime unlock your phone also. Remember it, face recognition is less secure compare to a fingerprint scanner. To use face recognition on Samsung Note 10 plus, register your face using below given settings.

Read Also:

How to Enable Face Recognition Lock on Galaxy Note 10 Plus and Note 10

How to use face recognition on Samsung Note 10 plus

When you’re set up face recognition on galaxy Note 10+, make sure you indoor or away from direct sunlight. Sometimes face unlock not working or face can’t recognize issues occurs. Apply below settings to set up note 10 face recognition or face ID or face unlock.

Step 1: Open the Settings app in your Note 10 plus.

Step 2: Tap Biometrics & security settings.

Step 3: Tap Face recognition.

Step 4: Tap continues.

To use face recognition, you need to set up a screen lock first from Password, PIN, or Pattern. If you already set up a screen lock on Note 10 plus, skip it. When you set up facial recognition, ensure your image is not blurry for the better match results.

Step 5: Show your face in circle view in your device or hold the phone at eye level.

Wait until complete the process.

Step 6: Your face has been registered message appears on your phone screen.

Step 7: Tap Turns on to enable face to unlock in Note 10+.

Get ready to unlock your phone by showing your face. You can see different face recognition settings for notifications in your Samsung Galaxy Note 10 plus and Note 10.  Hide content or hide notification details and shows only the icon (Notification icons only).

Read Also:

You’ll remove galaxy Note 10 plus face recognition anytime you want using face recognition settings.

And that’s it. We hope the above-given tutorial useful to use face recognition on Samsung Note 10 plus. Do you still have any question, tell us in below comment box. Stay and connect with us for the latest updates.

How to Enable Security Notifications WhatsApp Android

Here’s how to turn on or enable security notifications Whatsapp android phone. In WhatsApp end-to-end encryption which provides the security of chats between people or groups. WhatsApp and third parties can’t read or listen to chat of peoples. I will show you the process to receive notifications when a contact’s security code has changed. Your calls and the messages you send are encrypted regardless of this setting. For extra protection, every message you send has its own unique lock code and a personal key. This feature automatically enables on your latest version of WhatsApp and secure your messages or group chats, WhatsApp call on your Android device.

Daily we share vital information with friends, family members, and groups. Sometimes we shared important documents or personal moments using WhatsApp, so this end-to-end encrypted feature secured your photos, videos, messages, documents, calls from the wrong person. Using WhatsApp’s end-to-end encryption only you and your friends or other person communicating with each other and only both of you read & listen, not even WhatsApp. Follow below given simple step to enable security notifications Whatsapp Android.

Read Also:

How to Enable Security Notifications WhatsApp Android Phone

Step 1: Open the “WhatsApp” on your Android device.

click-on-three-vertical-dots-whatsapp-android-lollipop

Step 2: Tap on “Three vertical dots (More)” at the top right corner.

whatsapp-settings-android-phone

Step 3: Choose “Settings”.

open-whatsapp-account-android-phone

Step 4: Click on “Account”.

whatsapp-security-android-mobile

Step 5: Tap on “Security”.

enable security notifications whatsapp android

By default turned off or disable security notifications on your Android devices.

Step 6: Toggl on “Show security notifications”

Now, you can get notifications when the security code has changed and you can use this new code to get your calls and messages you send.

I hope you will enjoy this enable security notifications Whatsapp Android. If you have any concerns regarding the above steps then just comment on the below box. Don’t forget to share this WhatsApp trick with your friends on social networks.

How to Enable New Gesture Navigation in Android 10

Here’s how to enable Android 10 full screen gesture. You can use full gestural navigation in Android 10 using gesture settings. Android 10 added three different navigation gestures including fully gesture navigation, 2-button navigation (back button & pill icon), and 3-button navigation (back, home, and overview (Recent apps)). This Android 10’s new gesture navigation has a back gesture for back from the screen.

When enabling gestures in Android 10, to go home, swipe up from the bottom of the screen. To switch apps, swipe up from the bottom, hold, then release. To go back, swipe from either the left or right edge. Also, increase or decrease back sensitivity that may conflict with any app gestures along the edges of the screen. Follow the below-given step by step guide to enable and use gesture navigation in Android 10.

Read Also:

How to Turn on Android 10 Gesture Navigation 

You can enable and use full-screen navigation gestures on android 10 using below given settings.

Step 1: Swipe up from the home screen and tap the Settings app.

System settings in android 10 for full gesture

Step 2: Scroll down and tap on System.

Enable gestures in android 10

Step 3: Tap on Gestures.

Android 10 gestures include swipe fingerprint for notifications, jump to camera, flip camera, active edge, System navigation, double-tap to check phone, prevent ringing, and more.

Android 10 gestures

Step 4: Tap on System navigation.

Below given three android 10 gestures are available.

How to enable full screen gestures in Android 10

Gesture navigation

By default set this fully gesture navigation in your Pixel devices. It will hide the navigation bar button from the android 10 home screen.

2-button navigation

To switch apps, swipe up on the home button. To see all apps, swipe up again. To go back, tap the back button.

3-button navigation

Go back, home, and switch apps with buttons at the bottom of your screen.

Change fully gesture navigation back sensitivity on Android 10

You can find back sensitivity under system navigation in android 10. Set low or high back sensitivity using the below settings.

Use full screen navigation gestures on android 10

Settings > System > Gestures > System navigation > Settings gear icon > Adjust sensitivity to move slider left or right > OK

And that’s it. Do let us know whether you liked this tutorial or not to enable full-screen gestures in Android 10. Is there another Android 10 feature you want us to explain? Let us know in the comments section below!

How to Show Battery Percentage on Android 10

Get back the battery percentage icon on android 10? Here’s how to enable battery percentage on Android 10. By default disable percentage of battery. You can find the battery percentage under battery settings. When displaying the percentage of battery on the status bar, it will help you to see the percentage of battery left.

Different android device has slightly different settings to display battery percentage in the status bar. Enable Adaptive battery feature which is the first time added in android 9 that limit battery for apps that you don’t use often. Also, use a battery saver to extend battery life in android 10. Follow the below-given step by step process to turn on battery percentage on Android 10.

Read Also:

How to Enable Battery Percentage Icon on Android 10

You can show the battery percentage in the status bar on Android 10 using below given settings.

Step 1: Swipe up from the home of the screen to access the app drawer and tap the Settings app.

Display battery percentage in status bar on android 10

Step 2: Tap Battery.

Enable battery percentage on Android 10

Here you can see battery saver, adaptive battery, battery percentage and battery usage by apps in your android 10 and 9 Pie devices. By default turned off battery saver in your device.

How to enable battery percentage on android 10

Step 3: Turn on the toggle Battery percentage.

Now display battery percentage in the status bar on android 10 (Show above screenshot) devices such as Google Pixel, Pixel XL, Pixel 2, Pixel 2 XL, Pixel 3, Pixel 3 XL, Pixel 3a, Pixel 3a XL and upcoming Pixel 4 & Pixel 4 XL.

Enable battery saver on Android 10

You can improve battery life using battery saver in your android devices. Set a schedule to turn on battery saver in android 10 from based on your routine or based on a percentage you set. When activating battery savers, it will restrict the background activity of apps that unnecessary running in the background. Enable it using below given settings.

Show the battery percentage in status bar on android 10

Settings > Battery > Battery saver > Turn on now

Now you can see orange color with + icon in battery icon on the status bar. Battery saver automatically turns off when your device is charge 90%.

Enable adaptive battery on Android 10   

You can enable or disable adaptive battery in android 10 using battery settings. Adaptive Battery limits battery for unnecessary used apps.

Use adaptive battery in Android 10 device

Settings > battery > adaptive battery

Use the above-given settings to save battery life in your android 10 and other devices.

And that’s it. I hope this article useful to enable battery percentage on Android 10. If you have any questions, tell us in below comment box.

How to Change Icon Shape in Android Oreo 8.0 & 8.1

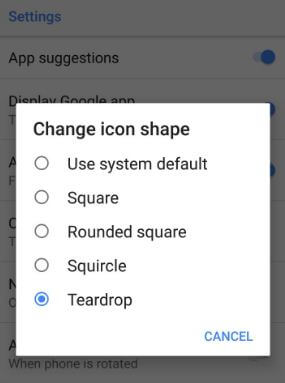
Here’s how to change icon shape in Android Oreo 8.0 devices. Android Oreo includes different icons like square, rounded square, squircle, and teardrop. By default set the icon shape in your Android devices. You can easily change the app icon using Android Oreo home screen settings. If you can’t find icon shape option in your Oreo devices, make sure to enable developer mode in Oreo. Also, use third party apps or Pixel launcher to change the app icon shape in Android 8.0 Oreo, Nougat 7.1, and Marshmallow 6.0 devices. Other new added Oreo features are Notification dots, download fonts & Emojis, picture-in-picture mode, Autofill, install unknown apps, Adaptive icons, and more.

Read Also:

How to Change The Icon Shape in Android 8.1 devices

Different android device has different settings to change icon shape in android phone. Now several Google Pixel and Pixel XL phones updated the latest Android 8.0 Oreo OS.

Change Icon Shape Android 8.0 & 8.1 Oreo

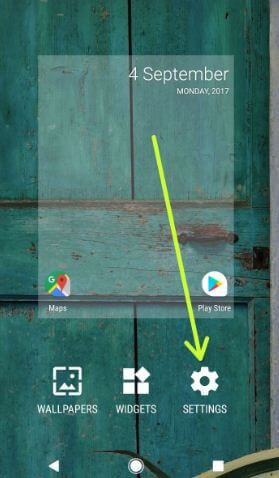
Step 1: Press and hold the Blank space in your Android Oreo home screen.

You can see wallpapers, widgets and settings options.

Tap on settings to open android O home screen settings

Step 2: Tap on the Settings gear icon.

If you can’t see change icon shape in your Oreo devices, make sure to enable developer option in the android 8.0 Oreo device. After enabling it, wait 2-3 min and you can see change app icon shape option in your Oreo home screen settings.Android 8.0 home screen settings

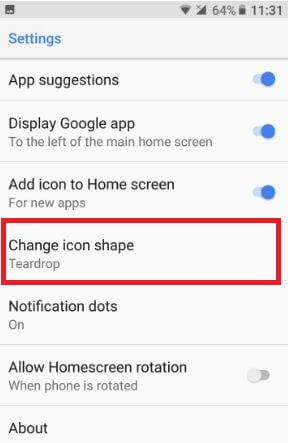
Step 3: Tap on Change icon shape.

By default set system icon in Android Oreo 8.0 and other supported devices.

Change icon shape in android Oreo 8.0 phone

Step 4: Choose the icon shape from Use system default/Square/Rounded square/Squircle/Teardrop.

This Android Oreo’s home screen settings also include app suggestion, add the new icon to the home screen, Notification dots, allow home screen rotation, and display Google app options.

I hope you will enjoy viewing this change icon shape in Android Oreo 8.0 tips. If you can’t find the option to change icon shape Pixel and Pixel XL, let us know in below comment section. Connect with us for daily Android Oreo tips.

How to Change Icon Shape in Android 9 Pie

You can change the icon shape in android Pie 9.0 using home screen settings in your devices. There are several Android Pie icon shapes available such as Square, Rounded Square, Squircle and Teardrop. By default use system default icon in your Android Pie 9.0, Oreo 8.1 and other latest android devices.

In android Pie home screen settings, you can see notification dots, At a glance, Add app icon to the home screen, Google app or Google feed for news info, home screen rotation and change icon shape. Also, use third party launcher to android p change icon shape. Follow the below-given step by step process to change icon shape in android Pie 9.0.

Read Also:

How to Change the Icon Shape in Android Pie 9.0

Check out below-given methods to change the default icon shape on your Android 9 Pie devices.


Change Shape of App Icon on Android 9 Pie

Step 1: Long press on the home screen blank space in your android Pie 9.0.

Here you can see home settings, Widgets, and wallpapers settings.

Android P 9.0 home screen settings

Step 2: Tap home settings.

Android P change icon shape

Step 3: Tap change icon shape.

By default set system icon in your android 9.0 device.

How to change icon shape in android P 9.0

Step 4: Choose from Square/Rounded Square/Squircle/Teardrop.

Now change app icon shape in your android Pie 9.0 devices. Using the above-given settings, you’ll also change android Oreo icons on your phone. Let see another useful android 9.0 home screen settings.

Related:

How to disable add the app icon to the home screen in Android 9 Pie

By default enable add the app icon to the home screen in Android 9.0 devices. Whenever you install a new app in your device, automatically add the app icon to the home screen. If you don’t want to add a new app icon to the home screen, turn off add icons to the home screen in Android Pie 9.0.

Long press on android Pie blank space > home settings > disable add icon to home screen

Now stop adding apps to home screen android Pie 9.0 after downloaded third party apps in your device.

Change Android 10 Icon Shape using Display Settings

This setting available for Google Pixel 4, Pixel 4 XL, Pixel 3, Pixel 3 XL, Pixel 3a, Pixel 3a XL, Pixel 2, and Pixel 2 XL.

Settings > Display > Styles & wallpapers > Style > + (Custom) icon > Customize font, icon, system accent color, icon shape > Enter the Style name > Apply

Alternative Way:

Long press on the blank area of Android 10 home screen > Styles & wallpapers > Styles > + icon at the last > Customize style > Enter the name > Apply 

Google Pixel and Pixel XL Running Android to change icon shape

Step 1: Swipe up from the home screen to open the app drawer.

Step 2: Tap Setting app.

Step 3: Scroll down up to the System and tap on it.

Step 4: Tap Advanced.

If disabled developer options on your device, click here to enable developer option in your android 10.

Step 5: Tap Developer options.

Step 6: Scroll down up to the end of the page.

Step 7: Tap on Icon shape under the Theming section.

By default set icon shape in your android devices.

Change default Android 10 icon shape

Step 8: Choose from Teardrop, Squircle, Rounded Rectangle or Square you want to set.

And that’s all. We hope this little tip helpful to change icon shape in android Pie 9.0. Do you know any other android 9 Pie tips you want to share with us? Tell us in below comment box.