How to Change Icon Shape in Android Oreo 8.0 & 8.1

Here’s how to change icon shape in Android Oreo 8.0 devices. Android Oreo includes different icons like square, rounded square, squircle, and teardrop. By default set the icon shape in your Android devices. You can easily change the app icon using Android Oreo home screen settings. If you can’t find icon shape option in your Oreo devices, make sure to enable developer mode in Oreo. Also, use third party apps or Pixel launcher to change the app icon shape in Android 8.0 Oreo, Nougat 7.1, and Marshmallow 6.0 devices. Other new added Oreo features are Notification dots, download fonts & Emojis, picture-in-picture mode, Autofill, install unknown apps, Adaptive icons, and more.

Read Also:

How to Change The Icon Shape in Android 8.1 devices

Different android device has different settings to change icon shape in android phone. Now several Google Pixel and Pixel XL phones updated the latest Android 8.0 Oreo OS.

Change Icon Shape Android 8.0 & 8.1 Oreo

Step 1: Press and hold the Blank space in your Android Oreo home screen.

You can see wallpapers, widgets and settings options.

Tap on settings to open android O home screen settings

Step 2: Tap on the Settings gear icon.

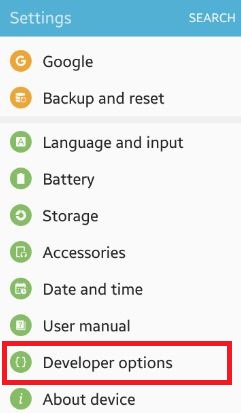
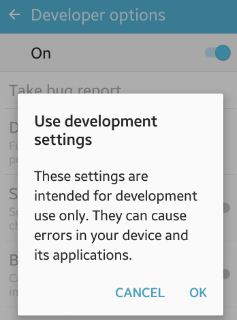
If you can’t see change icon shape in your Oreo devices, make sure to enable developer option in the android 8.0 Oreo device. After enabling it, wait 2-3 min and you can see change app icon shape option in your Oreo home screen settings.Android 8.0 home screen settings

Step 3: Tap on Change icon shape.

By default set system icon in Android Oreo 8.0 and other supported devices.

Change icon shape in android Oreo 8.0 phone

Step 4: Choose the icon shape from Use system default/Square/Rounded square/Squircle/Teardrop.

This Android Oreo’s home screen settings also include app suggestion, add the new icon to the home screen, Notification dots, allow home screen rotation, and display Google app options.

I hope you will enjoy viewing this change icon shape in Android Oreo 8.0 tips. If you can’t find the option to change icon shape Pixel and Pixel XL, let us know in below comment section. Connect with us for daily Android Oreo tips.

How to Change Icon Shape in Android 9 Pie

You can change the icon shape in android Pie 9.0 using home screen settings in your devices. There are several Android Pie icon shapes available such as Square, Rounded Square, Squircle and Teardrop. By default use system default icon in your Android Pie 9.0, Oreo 8.1 and other latest android devices.

In android Pie home screen settings, you can see notification dots, At a glance, Add app icon to the home screen, Google app or Google feed for news info, home screen rotation and change icon shape. Also, use third party launcher to android p change icon shape. Follow the below-given step by step process to change icon shape in android Pie 9.0.

Read Also:

How to Change the Icon Shape in Android Pie 9.0

Check out below-given methods to change the default icon shape on your Android 9 Pie devices.


Change Shape of App Icon on Android 9 Pie

Step 1: Long press on the home screen blank space in your android Pie 9.0.

Here you can see home settings, Widgets, and wallpapers settings.

Android P 9.0 home screen settings

Step 2: Tap home settings.

Android P change icon shape

Step 3: Tap change icon shape.

By default set system icon in your android 9.0 device.

How to change icon shape in android P 9.0

Step 4: Choose from Square/Rounded Square/Squircle/Teardrop.

Now change app icon shape in your android Pie 9.0 devices. Using the above-given settings, you’ll also change android Oreo icons on your phone. Let see another useful android 9.0 home screen settings.

Related:

How to disable add the app icon to the home screen in Android 9 Pie

By default enable add the app icon to the home screen in Android 9.0 devices. Whenever you install a new app in your device, automatically add the app icon to the home screen. If you don’t want to add a new app icon to the home screen, turn off add icons to the home screen in Android Pie 9.0.

Long press on android Pie blank space > home settings > disable add icon to home screen

Now stop adding apps to home screen android Pie 9.0 after downloaded third party apps in your device.

Change Android 10 Icon Shape using Display Settings

This setting available for Google Pixel 4, Pixel 4 XL, Pixel 3, Pixel 3 XL, Pixel 3a, Pixel 3a XL, Pixel 2, and Pixel 2 XL.

Settings > Display > Styles & wallpapers > Style > + (Custom) icon > Customize font, icon, system accent color, icon shape > Enter the Style name > Apply

Alternative Way:

Long press on the blank area of Android 10 home screen > Styles & wallpapers > Styles > + icon at the last > Customize style > Enter the name > Apply 

Google Pixel and Pixel XL Running Android to change icon shape

Step 1: Swipe up from the home screen to open the app drawer.

Step 2: Tap Setting app.

Step 3: Scroll down up to the System and tap on it.

Step 4: Tap Advanced.

If disabled developer options on your device, click here to enable developer option in your android 10.

Step 5: Tap Developer options.

Step 6: Scroll down up to the end of the page.

Step 7: Tap on Icon shape under the Theming section.

By default set icon shape in your android devices.

Change default Android 10 icon shape

Step 8: Choose from Teardrop, Squircle, Rounded Rectangle or Square you want to set.

And that’s all. We hope this little tip helpful to change icon shape in android Pie 9.0. Do you know any other android 9 Pie tips you want to share with us? Tell us in below comment box.

How to Show or Hide Android 10 Lock Screen Notifications

Want to make your android lock screen notifications private? This tutorial will help you to hide sensitive notifications on lock screen Android 10 devices. By default show notification content on lock screen Android phone or tablet devices. Android 10 shows alerting and silent notifications on the lock screen by default. Choose don’t show notifications to hide content from the lock screen. Android 10 added a new “sensitive notifications” option under the lock screen section. By default enable it, so it will show sensitive content when locked your device.

To hide notifications on android 10 lock screen, disable sensitive notifications using notification settings. Follow the below-given step by step process to hide lock screen notifications Android 10.

Read Also:

How to Hide Lock Screen Notifications Android 10

You can enable or disable hide contents of notifications on android 10 using below given two methods.

1st Method: Quickly hide notifications on android 10 lock screen

Step 1: Long press on the blank space in the android 10 home screen.

You can see home settings, widgets, and wallpapers.

Hide lock screen content using home settings android 10

Step 2: Tap home settings.

Android 10 notification dots settings

Step 3: Tap on Notification dots.

Hide notifications on lock screen android 10

Step 4: Scroll down and tap Notifications on lock screen under the Lock screen section.

You can see three options are available in your device including show alerting and silent notifications (By default set), Show alerting notifications only, or don’t show notifications.

How to hide lock screen notifications android 10

Step 5: Choose Don’t show notifications.

Also see sensitive notifications toggle which is by default turned on and show sensitive content on the android 10 lock screen when you’re device is locked.

Hide Sensitive Notification on Lock Screen Android 10

Settings > Apps & notifications >Notifications > Lock Screen > Sensitive notifications

Now hide notifications on lock screen android 10 even you’re phone locked. You can’t see apps notifications until you enable it using the above settings.

2nd Method: Hide Notifications Content Android 10 using apps & notifications settings

You can hide sensitive notifications content from the android 10 lock screen using below given steps.

Step 1: Swipe up from the home screen to access the app drawer.

Step 2: Tap the Settings app.

Step 3: Tap on Apps & notifications.

Hide contents of notifications on android 10

Step 4: Tap Notifications.

Step 5: Tap on Notifications on lock screen under the Lock screen section.

Step 6: Choose from show alerting and silent notifications (By default set), Show alerting notifications only, or don’t show notifications.

Also, hide notification content on lock screen android 10 using below given settings.

Settings > Privacy > Lock screen > Don’t show all notifications at all

Enable or Disable Notification Snoozing on Android 10

By default enable notification snoozing in android 10. So you can snooze notifications for 1 hour, 15 minutes, 30 minutes, or 2 hours in your android device. Enable or disable snoozing notification android 10 using below given settings.

Enable or disable notification snoozing on Android 10

Settings > Apps & notifications > Notifications > Advanced > Allow notification snoozing

Individually hide app notifications from android 10 lock screen

You can hide app notifications on lock screen in android 10 using below given settings.

Settings > Apps & notifications > See all apps > Select app from list > Notifications

Now hide app’s message notifications, group notifications, or block app notifications on android 10.

And that’s all. Let me know what you think about our article on how to hide lock screen notifications Android 10. What would you like to see in android 10? Let us know in the comments below!

How to Change Lock Screen Wallpaper on Android 10

Here’s how to change lock screen wallpaper on Android 10. Using this article, you can set a different wallpaper for the home screen and lock screen. Two ways to change the Android 10 lock screen and home screen wallpapers, one is the home screen, and another is using display settings. You can see different categories of lock screens wallpapers available on your devices, such as Live Earth, New elements, Sky High, Landscapes, Textures, Life, Art, Cityscapes, Solid colors, light or dark anime wallpapers, and download other cute home screen wallpapers. Also, set your own photos or choose a picture from your gallery to select light or black lock screen wallpapers Android phones and tablets.

You can set up & use a screen saver in Android 10 to set cute lock screen wallpapers from show photos, colorful backgrounds, clocks, and more when your phone is docked or charging. Below are two methods to change the lock screen and homescreen wallpapers on Android devices.

Read Also:

How to Set the Lock Screen Wallpaper Android 10

You can change lock screen and home screen backgrounds using the below-given methods.

Change Lock Screen Wallpapers on Android 10

Step 1: Long press the blank space on the Android 10 home screen.

You can see home settings, widgets, and wallpapers.

How to change lock screen android 10 wallpaper

Step 2: Tap on Wallpapers.

Change lock screen wallpaper Android 10

Step 3: Select My photos (If you want to select a picture from the gallery) or another category from the list.

Change the background images in lock screen android 10

Step 4: Select a Photo from the list.

Set wallpaper Android 10

Step 5: Tap Set wallpaper at the top right corner.

Here you can select from the home screen, lock screen, and home screen & lock screen you want to set wallpaper in Android 10.

How to change lock screen wallpaper Android 10

Step 6: Tap on the Lock screen.

Wallpaper sets a successful message to appear on the screen when complete the process is. It’s pretty easy to change the lock screen picture on Android devices.

Change Home Screen Wallpapers on Android 10 using Display Settings

Step 1: Swipe up from the home screen to access the app drawer and tap the Settings app.

Change wallpaper on android 10 using display settings

Step 2: Tap Display.

Change wallpaper on android 10 lock screen and home screen

Step 3: Tap Wallpaper.

Step 4: Select wallpaper from the in-built wallpaper or phone’s gallery.

Step 5: Tap Set wallpaper at the upper right corner.

Step 6: Choose a Lock screen.

Now set the wallpaper android phone. Select the home screen if you want to change home screen wallpaper on Android 10 devices.

Set Up Screen Saver in Android 10

If you want to show different wallpaper when your phone is charging or docking, you need to set up and use a screen saver in Android 10 using the below-given settings.

Set up and use screen saver in android 10

Settings > Display > Advanced > Screen saver > Start now button

You can change settings for current screen savers from photos, clocks, or colors. Choose photos from the camera, WhatsApp video, screenshots, WhatsApp images, and Bluetooth. Also, choose settings for when to start the screen saver from while charging, while docked, while charging, or docked or Never.

Set Screen Lock on Android

You can set your phone lock screen from Swipe, PIN, Password, Pattern lock, and biometrics security (Fingerprint scanner and Face Unlock) on your latest Android devices.

Settings > Security > Screenlock > Choose a new screen lock you want to set > Follow the on-screen instructions.

And that’s all. I hope the above-given methods worked for you to change lock screen wallpaper Android 10. What are your favorite features of Android 10? Let us know in the comment section below.

Related:

How to Change the Keyboard Language on Galaxy Note 10 plus

Want to change or switch keyboard language on Samsung Note 10+ and Note 10? Here’s How to change the keyboard language on Galaxy Note 10 plus and Note 10. All Samsung devices used Samsung’s keyboard as default. You can change the on-screen keyboard on Note 10+ using language and input settings.

You can customize Samsung keyboard settings including smart typing, keyboard size & layout, dark keyboard theme, keyboard swipe controls, touch feedback for sound & vibration and more. Also, reset keyboard settings to default. Check out the below-given step by step process to switch keyboard language on Galaxy Note 10 plus and Note 10.

Read Also:

How to Add Mulitple Languages in Keyboard on Galaxy Note 10 Plus and Note 10

You can change the keyboard input language on Samsung Note 10+ using below given settings.

Step 1: Go to Settings in Note 10 plus.

Step 2: Tap General Management.

Step 3: Tap Language and input.

Step 4: Tap On-screen keyboard under the keyboard section.

Change the keyboard input language on Samsung Note 10+

Step 5: Tap the Samsung keyboard.

Change the keyboard language on galaxy Note 10 plus

Step 6: Tap Languages and types.

By default set English (US) Qwerty keyboard.

How to change keyboard language on galaxy Note 10 plus

Step 7: Tap Manage input languages.

When first-time change, this message appears on the screen: update language data?

Step 8: Tap Update.

Now you can see the downloaded languages list.

Step 9: Turn on language toggle from list you want to add keyboard language.

Set the Display Size and Keyboard Layout on Galaxy Note 10 Plus and Note 10  

You can change the keyboard layout on galaxy Note 10 plus and Note 10 using the below steps.

Settings > General Management > Language and input > On-screen keyboard > Samsung keyboard > Style and layout > Keyboard layout > Enable or disable Number keys & Alternative character

Now, show or hide number keys and alternative characters in your Samsung devices. Some functions aren’t available in some keyboard types and layouts.

Change Keyboard Mode on Samsung Galaxy Note 10 plus

By default set standard keyboard as default modes in your Note 10+. You can see three keyboard modes available in your device. Choose it using the below settings.

Settings > General Management > Language and input > On-screen keyboard > Samsung keyboard > Style and layout > Modes > Standard keyboard, One-handed keyboard or Floating keyboard

You can also change keyboard theme as dark or light, enable or disable key borders, change speed for keyboard touch & hold delay, backspace speed and more using this galaxy Note 10 language and input settings.

And that’s it. I hope the above-given tutorial useful to change the keyboard language on Galaxy Note 10 plus and Note 10. Do you still have any questions? Tell us in below comment box. Read more about latest android tips and tricks.

How to change icon background android phone

Do you want to change icon background android phone? You have two choices to change background of icons on your android device. One is “icons only” option means only icon change on your device and the other is “icons with backgrounds” means show icon with shaded background to make them stand out on the home screen and apps screen on your android lollipop 5.1.1 and marshmallow 6.0 device.

This background icon change settings only available on latest android marshmallow device also includes on updated lollipop to marshmallow device such as Samsung galaxy J7 & J5, Galaxy S6 & S6 edge etc. You can change this background icon using display setting on your android phone. You can also change font size, font style, screen timeout and screensaver using display settings on your phone. In this tutorial, i will show you easy process to change icon background android apps and home screen apps on your android phone.

Also Read:

How to change Google Chrome background image

How to restrict apps in Android 9 Pie

How to restrict background data on android phone or tablet

How to change icon background android phone

Step 1: Tap on “Apps” from home screen on your android device

Step 2: Click on “Settingsapp

You have two options to open display settings.

tap-on-display-settings-android-phone

Step 3: Scroll down until see “Display” and tap on it or Under Edit section settings, tap on “Display

icon-background-under-display-settings

Step 4: Tap on “Icon background

You can see below screen on your android phone.icons-only-settings-android-phone

This screen is without background app icons. You have two options to set background apps icons. By default set icons only on your android phone.

change icon background android

Step 4: Choose “Icons with backgrounds

Step 5: Tap on “Done” from top of the right side

That’s all. Did you find above process to change icon background android phone is helpful? If you are facing any problem then just comment on below comment box, would be pleasure to help you. Don’t forget to share this trick with your friends. Connected with us for daily latest updates!