How to Enable Instant Apps on Android Oreo

Android 8.0 Oreo comes with several amazing features and one of them we discussed here is “Android instant apps”. Here’s how to enable instant apps on Android Oreo 8.0 & 8.1 devices. Android instant app is perfect for those people who facing the problem of low storage issues in the Android phone. This Android O feature is helpful to use app without download and installation from Google play store. Just search the app you want and open in your android device. Simply tap on the URL to open the app on the web.

Android instant apps supported Android 6.0 marshmallow to the latest versions devices. User can easily run native Android apps instantly without installation. Also, access apps from anywhere using a Web URL.

Read Also:

How to Enable Android Instant Apps on Android Oreo 8.0

Let see step by step process to enable and use instant apps on android 8.0 Oreo and other devices.

Step 1: Go to Settings in your android Oreo devices.

Step 2: Tap on Google.

Here you can see account and service section.

Tap on instant apps under service section in Google

Step 3: Tap on Instant apps under the services section.

Use instant apps on android 8.0 Oreo phone

Step 4: Choose a Google account to use instant apps without installing them on your android phone.

To turn off instant apps in Android 8.0 Oreo, choose ‘None’ option from above image.

Enable android instant apps on android Oreo 8.0

Step 5: Tap on Yes, I’M IN to use the instant app on Android phone.

You can use certain android apps without install in your android phone or tablet devices. Also, use the URL for web browsing. You can also turn off instant app feature using play store settings in your Android Oreo and Nougat device.

Use apps without installation on android phone Oreo

Play Store > Three horizontal line > Settings > User controls > Use apps without installation

How to Enable or Turn Off Instant Apps on Android 8.0 Oreo

Settings > Apps & notifications > Advanced > Special app access > Install unknown apps > Tap app > Turn on toggle button of allow from this source

How to Use Instant Apps on Android 8.0 Oreo

Step 1: Open Google Play store app.

Step 2: Search app wants to install.

Step 3: Tap Install.

Step 4: Follow the on-screen instruction.

And that’s all about how to manage and use android instant apps on your Android 8.0 devices.

I hope the above-given tutorial help to enable android instant apps on Android Oreo 8.0. Did you find it helpful? Let us know your thoughts in below comment box. Stay connected with us for the latest Android Oreo tips and tricks.

How to Change Simulate Color Space on Android

Here’s how to change simulate color space on Android and Samsung phones. By default, turn off simulated color space on your Android phone. You can change this setting on your Android device using the hardware-accelerated rendering section.

In this tutorial, I will show you a simple step-by-step process to change simulate color space Android phone. In the Hardware accelerated rendering section, you can see other settings such as Force GPU rendering, GPU view updates, hardware layers updates, Debug GPU overdraw, non-rectangular clips, 4X MSAA, and hardware overlay. You can use the drawing section to simulate the secondary display resolution.

What is Simulate Color Space?

It changes your device’s home screen and all other space default colors. You can set different color spaces, including Monochromacy, Deuteranomaly (red-green), Protanomly (red-green), and Tritanomaly (blue-yellow). This feature is helpful to visualize how your app will look on another device with another screen size via a screen overlay.

Read More:

How to Change Simulate Color Space on Android 13, Android 12, Android 11

Step 1: Go to Settings.

Step 2: Scroll down and tap on System.

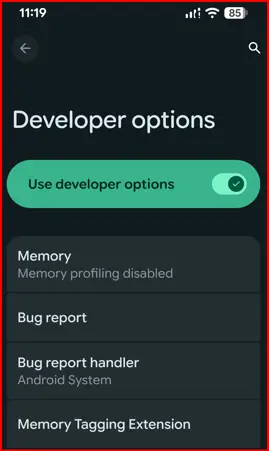
Open Developer mode settings on your Android Phone

Step 3: Tap on Developer options.

If you can’t find developer mode, you can enable it by going to Settings > About phone > Tap on Build number 7 times. You can see the “You are Now a Developer” message on the screen.

Step 4: Go to Settings > System > Developer options.

Tap Search icon to search simulated color space on your Android phone

Step 5: Tap the Search icon at the top right corner and search for Simulate color space.

Search Simulate Color Space on developer mode settings Android

Step 6: Tap Simulate color space in Hardware accelerated rendering section.

By default, select Disabled.

How to Change Simulate Color Space on Android and Samsung Galaxy

Step 7: Choose the Simulate color space option you want to set.

How to Change Simulate Color Space on Samsung Galaxy

Step 1: Go to Settings.

Step 2: Scroll down at the end and tap on Developer options.

Step 3: Scroll down and tap Simulate color space.

How to Change Simulate Color Space on Samsung Galaxy

Step 4: Choose from Disabled (By default), Monochromacy, Deuteranomaly (red-green), Protanomly (red-green), and Tritanomaly (blue-yellow)

How to Change Simulate Secondary Displays on Android 13, Android 12

How to Change Simulate Secondary Displays on Android 13, Android 12

Settings > System > Developer options > Simulate Secondary Displays > Choose from the option.

How to Simulate Color Space on Android (Older Version)

Step 1: Go to the Settings app on your smartphone.

By default, you have a hidden developer option on your older Android devices. You can enable developer options on your Android device.

Step 2: Scroll down at the end of the page and tap on Developer options.

Developer option is disable in android m

By default, turn off the toggle button of developer options.

Step 3: Toggle on the “Off” button.

You can see the below screen on your smartphone.

Tap ok to use development settings

Step 4: Tap on OK to use the development settings.

Step 5: Under the hardware-accelerated rendering section, tap on Simulate color space.

Turn off Simulate color space

By default, turn off this feature on your smartphone.

change simulate color space android

Step 6: Choose from the above-given options to change the simulated color space on your device.

Now change your device’s basic simulate color. This setting will work only when developer mode is enabled. When you disable this mode, automatically turn off the simulated color space on your device.

Above, you can see the process to change the simulated color space Android phone. Did you find the above steps helpful? If any problem occurs, let us know in below comment box, would be a pleasure to help you.

Read More:

How to see hidden system apps android phone

Want to see hidden system apps android phone? You can enable hidden files and folders on your device to display apps and files. In application manager settings, hide / show system apps on your android lollipop 5.1.1 and marshmallow 6.0 device. Using application settings, you can change system app settings and reset app preferences on android phone. Also see apps that can see on top that allow their buttons, pop-ups or other elements to appear over other apps you are using.

It’s easy to show hidden files and folder in Windows 7. In application information, you can get details of all system files and apps including data usage, notifications, storage, permission to access, battery and more settings. In this application manger, hidden list include files and apps that using in your smartphone. Also see your hidden apps and games using this setting. In this tutorial, i will show you the complete process to see hidden system apps android phone without app.

Read this:

How to change system settings Android

How to check for Windows 10 System update

How to disable app background activity on Android Oreo 8.0

How to configure mobile hotspot android

How to see hidden system apps android phone

Step 1: Open “Apps” in your android device

Step 2: Tap on “Settings” app

You can see various settings section on your smartphone.

application-settings-marshmallow-6-0

Step 3: Scroll down until see “Applications” and tap on it

application-manager-settings-phone

Step 4: Tap on “Application manager

Below see list of all apps and files of your device.

tap-on-more-under-app-manager

Step 5: Tap on “More” from top of the right side corner

see hidden system apps android

Step 6: Click on “Show system apps

Now in your android phone, you can see list of all apps and files use in your android phone.

hide-system-apps-android-phone

 Step 7: Repeat step 5 again and tap on “Hide system apps” to hide system application on your device.

That’s all. Hope you have enjoyed above trick to see hidden system apps android phone. If any problem occurs, don’t hesitate, feel free to let me know on below comment box, would be pleasure to help you.

10 Best Document Scanner Apps For Android Free Download

Here you can get the 10 best Android scanner apps 2020. PDF scanner apps are the most interesting apps. You can easily create and scan the documents with the Document scanner app. After convert PDF files, you can also upload documents to various cloud services like Google Drive, Dropbox, Evernote, box, etc. Using these document scanner apps, you can scan any type of document, share it from your Android device to other devices, convert PDF format, set document border, brightness, and other features. There are plenty of apps that will let you scan your documents and help to store them for later use. Also, a big thanks to the good quality cameras in our smartphones that lets you take good quality photos.

In this era of technology, when things are getting more and more advanced using a big scanner or printer is just a bad idea. The smartphones that we are using nowadays are portable computers that provide all the functionalities that we can expect from any computer. Here are the best Android document scanner apps in 2020. There are a lot of scanner apps like pdf, photo, document scanner, and many more scanner for Android.

Read Also:

Android Apps For Document Scanner 2020 

Let’s read below-given top best Android document scanner apps that you can use on your phone.

Adobe Scanner App – Best PDF Scanner For Android

Adobe scaner App For Android

The app contains all the necessary functions. You can also apply some effects on the pictures to make it more clear. As it contains color presets to make the document more legible if needed. One of the most promising features of this app that I like the most is the Documents conversion to PDF. So, if you want to convert the document into PDF, you can do it easily. The app is absolutely free, you can download it on Google Play Store. You can use OCR technology with easily digitalize books, business cards, and business receipts and access them via the Adobe Document Cloud. Scan photos with create high-quality PDFs and share them easier than ever before.

Download

Microsoft Office Lens

Microsoft Office Lens PDF Scanner Android App

Office Lens app is a document scanner app for  Microsoft or Android users. According to the company, the app is beneficial for school or business use. This app pocket PDF scanner to scan documents and whiteboard images. You can convert images to PDF, Word, and PowerPoint files and save to OneNote,  OneDrive, or your local device. You can even import images from the gallery. The processing and quality of output are also so good. The app provides good quality for things like receipts, whiteboards, sketches, business cards, notes, and more. The app also works for some languages like English, Chinese, German, and Spanish. The app is free to download. Interestingly, you do not need to have an Office 365 subscription.

Download

CamScanner –  #1 Best Document Scanning App

Camscanner Best Document Scanner Apps For Android

CamScanner is a popular document scanner apps for Android. It also has a variety of features, giving users more control. You can even scan apps in. Moreover, just like the above-mentioned app, it will let you save documents in PDF or JPEG format. Easy to convert pictures to PDF. Also, you’ll print documents using cloud printing. To fax documents, you have to pay. However, you can get all the functions in the free version. To get all the functions of the app, you need to pay a little amount. This #1 app is best to scan any document, receipts, business cards, notes, certificates, invoices, etc.

Features:

  • Best mobile camera scanner
  • Quickly search & extract text from the image
  • Amazing scan quality
  • Easily share documents
  • Password protection
  • #1 used & customer ratings

Download

Clear scan Free Document Scanner App For Android – PDF Scanning

Clear scan Free Documnet scanner App For Android

Clear Scan is a free PDF scanning app. Scan images into PDF Documents using mobile camera with high quality with Clear Scan app. Convert your mobile phone into a mini pocket scanner and enjoy the high-quality image in your device within just one touch with this app. This apps helps you can scan any kind of documents in your office, images, bills, receipts, books, magazines, class notes, and anything that needs to be there in your device within no time.

Download

Fast Scanner

Fast scanner App For Android

Fast Scanner app is one of the competent document scanner apps for Android. There are some editing features available too. Fast Scanner’s basic features are multiple pages scanner for documents, receipts, notes, invoices, business cards, whiteboards, and other paper text. You can save PDF files in your device or open them in other apps. You can fax the documents if you want to using this app. The app is available on Google Play store and is free to download. The only limitation is that there is a limit to the number of documents you can scan in the free version. You can scan multiple pages of documents, invoices, whiteboards, receipts, invoices, business cards, and other documents. After the scan, you can email or print as multiple pages PDF or JPEG files and save the file in your Android smartphone or tablet.

Download

Genius Scan – Mobile Scanning App

Genius Scaner App For Android

You can keep your files organized with titles, search functions, and tags. Just like FineScanner, you can upload scanned documents to a range of cloud storage platforms, including Dropbox, Evernote, Expensify, Facebook, Google Drive, OneDrive, OneNote, FTP, SugarSync, and WebDAV. If you are scanning sensitive documents, you can protect them with built-in encryption and passwords. You can free to download on Android and iOS, but offers in-app purchases. This is the best quick pocket scanner for a scan every document within a few seconds and converts into PDF files with multiple pages. Also, include image processing, smart page detection, and perspective correction. You can also upload this document to Evernote, Dropbox, Box, and other cloud services.

Features:

  • Multiple scans
  • Export documents to any files
  • Quickly scan
  • Detect page frame & corrects perspective

Download

Free PDF Scanner App with OCR

Free PDF Scanner With OCR App For Android

You can convert any document and images into high-quality digital PDF documents. After the conversation, you can upload a document to various cloud storage services like Google Drive, Evernote, Dropbox, etc.

 Features:

  • Import multiple images
  • No limits on documents
  • Built-in OCR system
  • Extract page from PDF document
  • PDF to JPEG converter

Download

Mobile Doc Scanner

Mobile Doc Scanner App For Android

This document scanner app for Android is best for scan any type of document, receipts of text pages, convert any file to PDF format and you can also share and email it from your device. This android app for document scanner is automatically found brightness, borders, corrects distortion, etc. This document scanning app for Android smartphone and tablet is #1 best app for scanning any multiple pages within a few seconds.

Features:

  • High-quality document edge detection
  • Convert any image into PDF format
  • Easily & quickly scan, upload and send
  • Manage a multi-page document
  • Good customer reviews

Download

ScanPro App – PDF Document scanner

ScanPro PDF Document Android App

This document scanning app 2020 is fast and automatic detect document, you can just move your phone to over document and it can automatically then after you can upload it. Also, it supports various cloud services including Evernote, Google Drive, Dropbox, and other services.

Features:

  • Multi-page PDF documents
  • A scan PDF document with 200+ dpi
  • Scan QR codes
  • Automatic edge detection and scanning

Download

PDF Document Scanner Classic

PDF Document scanner Classic App For Android

This is best for creating digital copies of any document within a second. You can easily convert your document file to a PDF file and store it on the SD card.

Features:

  • Back up your entire document
  • Use flash torch for irradiate your document
  • Easily transfer PDF file to MAC or Desktop
  • Support Samsung’s multi-window features

Download

Above you can get the best Android document scanner apps 2020. Which of the above Android apps for document scanner should you prefer first for document scan? If you have known other sharp and high-quality document scanning apps for Android then please share with us.

How to Change WhatsApp Status Privacy Settings Android Phone

WhatsApp introduces a new feature to share your WhatsApp status update with your contacts list or only share with specific contacts from your phone address book. This manage or change WhatsApp status privacy settings Android phone or tablet won’t affect status updates that already sent to contacts. Using WhatsApp privacy settings, you can show or hide WhatsApp status from individual people from your contact list. You can upload the small videos, live photos, and live animated GIFs photos on the status that disappear from the story after 24 hours.

You can hide WhatsApp last seen, profile photo, About, choose who can add me to group settings in privacy settings. Also, turn off read receipts if you want to show someone status without knowing them on your Android or iPhone devices.

Read Also:

How to Change WhatsApp Status Privacy Settings Android Phone or Tablet

Step 1: Open the “WhatsApp” app on your android phone or tablet.

Tap more to WhatsApp settings phone

Step 2: Tap on the “Three vertical dots/Menu” icon from the top of the right corner.

Settings in WhatsApp app android phone

Step 3: Tap on “Settings”.

account settings in WhatsApp application

Step 4: Touch “Account”.

Privacy settings in WhatsApp android phone

Step 5: Tap on “Privacy” under the account section.

WhatsApp status settings android phone

Step 6: Tap on “Status”.

You can show below three options.

My contacts: All your WhatsApp contacts see your status update

My contacts exceptions: It will hide the WhatsApp status update from selected contacts.

Only Share with: Share WhatsApp status update with a specific contact.

change whatsapp status privacy settings android

Step 7: Choose from options and tap Done to manage WhatsApp status privacy settings on your device.

How to Change Privacy Status on WhatsApp Android

Step 1: Open the “WhatsApp” app on your device.

Tap on status screen in WhatsApp

Step 2: Tap on the “Status” tab.

Step 3: Touch “Three vertical dots” from top of the right side screen.

WhatsApp status privacy settings android phone

Step 4: Tap on “Status privacy”.

Step 5: Choose from the options.

You can control who can see your WhatsApp status updates in privacy settings. Share all of your daily activities with your contacts.

Did you find the above steps helpful to change WhatsApp status privacy settings android phones? If you have any kind of trouble, let us know on below comment box. Share this WhatsApp Status tricks with friends if you found it useful.

How to Factory Reset Google Pixel 4 XL and Pixel 4

This tutorial explains to you how to factory reset Pixel 4 and Pixel 4 XL running Android 10 OS. You’ll need to perform a factory data reset or hard reset Pixel 4 XL and Pixel 4 if several issues occur such as phone won’t turn on, blank screen, stuck on Google Logo, forgot PIN or Password, touch screen not working and more. Two ways to perform a factory reset Google Pixel 4 XL and Pixel 4, one is using phone settings and another is using recovery mode. Before performing a reset Pixel 4 & 4 XL, make sure backed up your important data safely. It will remove all phone data including Google account, third party apps, photos, videos and more.

If your android device won’t power on, enter your android into recovery mode using hardware key to fix problems. Check out below-given methods to factory data reset Pixel 4 and Pixel 4 XL.

Read Also:

How to Factory Reset Pixel 4 and Pixel 4 XL   

You can reset frozen Google Pixel or another android 10 devices using below given phone settings. Before performing master reset Pixel 4 XL, confirm your phone data safely to another device.

1st Method: Reset my Pixel 4 to factory settings when device power on

Step 1: Go to the settings app.

Step 2: Scroll down and tap on System.

Step 3: Tap on Advanced.

Factory reset Pixel 4

Step 4: Tap on Reset options.

Factory reset Google Pixel 4 XL

Step 5: Tap on Erase all data (Factory reset).

How to factory reset Pixel 4

Step 6: Tap on Erase all data.

Confirm your PIN or Pattern or Password to unlock the screen.

Factory data reset Pixel 4 XL

Step 7: Tap on Erase all data again.

It will take some time to perform a reset Pixel 4 and 4 XL devices. Now your Pixel device reset to factory settings.

2nd Method: How to Factory reset Pixel 4 and Pixel 4 XL When locked

If you’re Google Pixel 4 or Pixel 4 XL won’t power on or unresponsive screen issue, boot your device into recovery mode using below-given power and volume down button.

Step 1: Make sure to switch off your Pixel 4 & 4 XL.

Step 2: Long press the power button and volume down button at the same time until turn on the screen

Step 3: Tap Volume down button until view recovery mode.

Step 4: Press the Power button to enter Pixel 4 & Pixel 4 XL into recovery mode.

Step 5: You can see the Android Robot exclamation mark symbol with the “No command” message.

Step 6: Now tap & hold the power button and press the volume up button only once to view the recovery mode menu.

See Google Pixel 4 recovery mode settings including Reboot system now, Reboot to bootloader, Apply update from ADB, Apply update from SD card, Wipe data/factory reset, Power off and more options.

Step 7: Press the volume down button until highlight Wipe data/factory reset.

Step 8: Press the power button.

This message appears on the screen: Wipe all user data? This cannot be undone! (Show below screenshot)

How to factory reset Pixel 4 and Pixel 4 XL

Step 9: Press the volume down button to select Factory data reset.

Step 10: Press the power button.

Now, wait until you remove all your phone data. When you’re Pixel 4 device start again, you can use your Google account to download apps and other data.

And that’s it. We hope above given one of the methods useful to factory reset Pixel 4 and Pixel 4 XL. Do you still have any questions? Tell us in below comment box. Don’t forget to share this article with your social media if you found it useful.