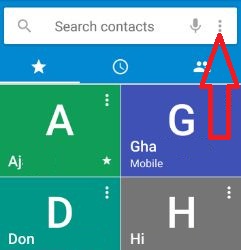
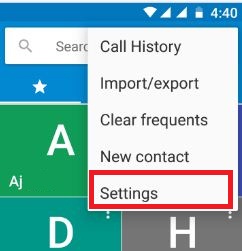
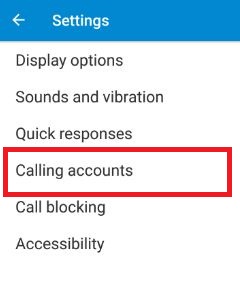
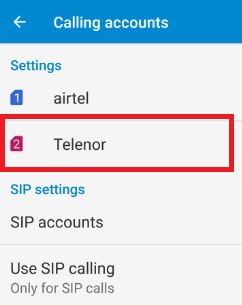
How to turn on smart dual SIM android phone

Enable or turn on smart dual SIM android lollipop (5.1.1) and marshmallow (android 6.0) device. You can receive calls from both SIM cards even during calls on your android phone. You can manage dual SIM on your device using SIM card manager settings. When both SIM activate, sometimes some service or function may not work properly or charge applicable for any process on your android phone.

When activated dual SIM on android device, If SIM card 1 is out of reach, incoming calls will be forwarded to SIM 2 and if SIM card 2 is out of reach, incoming calls will be forwarded to SIM 1. You can also set other SIM card settings such as phone calls, text messages, mobile data, icon, name and network mode. Follow below given steps to activate or turn on smart dual SIM android phone.

Read this:

How to change SIM name and color in Android 10

How to reduce screen size in Android phone

How to restrict background data android phone

How to turn on smart dual SIM android lollipop, marshmallow

Step 1: Open “Apps” from your device home screen

Step 2: Tap on “Settings

open-sim-card-manager-android-phone

Step 3: Scroll down until see “SIM card manager” and open it

smart-dual-sim-android-phone

Step 4: Under General section, tap on “Smart dual SIM

By default disable dual SIM on your device.

turn on smart dual SIM android

Step 5: Tap on “OK” to activate dual SIM android phone

enter-sim-card-1-sim-card-2-number

Step 6: Enter SIM card 1 & SIM card 2 number and tap on “Next

You can see below screen on your android phone. By default choose both SIM cards.

activate-both-sim-card-android-phone

Step 7: Click “Finish” from below of the right side corner to turn on dual SIM android phone.

You can also choose from SIM card 1 to SIM card 2 and SIM card 2 to SIM Card 1 options to set it your smartphone. That’s all.

Did you find above process to turn on smart dual SIM android phone helpful? If any problem occur when implement this, let us know on below comment box, would be pleasure to help you. Stay connect with us for daily updates!

How to stop phone speaking android

Do you want to stop phone speaking android device? Some voice command that cause your phone to speak reply. You can stop your android phone from speaking temporarily or turn off talkback on your device. Sometimes my device automatically started talking.

When talkback is enable on your device, it describes whatever you select, touch, open & close settings on your android phone. It observes all your actions, text you type, retrieve window content etc. It navigates all your phone activity and if you want to activate any settings, double tap that particular option in your android phone. Follow below given two different ways to stop phone speaking android device.

Read this:

How to create and manage event on Moto G4 Plus

How to use dexterity and interaction Android 6.0

How to switch texting from iMessage to android phone

How to disable talk back mode or stop phone speaking android device

You can disable or turn off talk back on your android 5.1.1 lollipop and marshmallow 6.0 devices.

Step 1: Tap “App drawer” from home screen on your Moto G4 plus and other android phone

Step 2: Open “Settings” app

You can show various sections such as wireless & networks, device, personal and system.

Accessibility under system sections

Step 3: Under system section, tap on “Accessibility

tap on talkback under accessibility settings

Step 4: Tap on “Talkback” under services section

By default turn off talkback on your phone.

stop phone speaking android

Step 5: Enable / disable talkback on your android phone

When enable this feature, talkback speaking all your actions and alerts of events such as notifications, incoming calls, Enable / disable settings and more.

To stop your android phone from speaking temporarily, follow below given steps:

Step 1: Touch & hold a blank screen area on your home screen

You can show wallpapers, widgets and settings options.

Tap & hold the blank screen area of phone

Step 2: Touch on “Settings

Touch voice under search option

Step 3: Under search section, tap on “Voice

By default, turn on speech output in your android phone.

Speech output on moto G4 plus


Step 4: Tap on “Speech output

Change voice settings on moto g4p lus

Step 5: Choose “Hands-free only

That’s all.

Did you find above steps helpful to stop phone speaking android phone? If you have any question regarding this talkback feature, let us know via below comment box, would be pleasure to help you. Feel free to share this article with your friends on social network.

How to change system settings android phone

Do you want to change system settings android phone? You can change settings using application manager settings on android lollipop 5.1.1 and marshmallow 6.0 device. In this setting, you can change & manage app settings, storage, data usage and turn on or off and apps with permission settings. Select which apps can change system settings, such as turning Bluetooth on or off on your device.

It’s easy to change system apps settings android device. In change system settings, you can show or hide system apps and reset app preference settings on your android phone. You can see all hidden apps on your android device. But in this tutorial, i will show you step buy step guide to change system settings android phone.

Read Also:

How to modify system settings in Android Nougat 7.0

How to update Android Nougat 7.1.2 to Android Oreo 8.0

How to set desktop backup password android phone

How to change system settings android phone, lollipop, marshmallow

Step 1: Open “Apps” on your android 5.1 & 6.0 device

Step 2: Tap on “Settings” app

You can see various below options.

open-application-under-settings-opt

Step 3: Scroll down until see “Applications” and tap on it

open-application-manager-under-apps-settings

Step 4: Tap on “Application manager

tap-on-more-from-top-side-settings

Step 5: Tap on “More” from top of the right side corner

You can see below screen on your device.

change system settings android

Step 6: Click on “Change system settings

You can see list of enable or disable apps on your android phone.

change-system-settings-android-phone

Step 7: Tap on “Turn on” from drop down list & tap any option to change system settings

To show hide system apps and reset app preferences, tap on “More” from top right side corner.

tap-more-on-change-system-settings-option

Step 8: Tap on “Show system apps

Now, you can see all hide apps on your device and change settings you want.

Did you find above process to change system settings android phone helpful? If any problem occur, don’t hesitate to let me know, would be pleasure to help you. Don’t forget to share this article with your friends on social network.

How to enable auto update security policy android

Do you want to enable auto update security policy android phone? Increase the security of your android lollipop (5.1.1) and marshmallow (android 6.0) device by updating the security policy. In your device, you can set automatically update your security policy when your device connected with Wi-Fi only. Also update it using mobile data network but it take long time.

It’s easy to enable / disable auto update security policy android phone. You can send security reports to Samsung via Wi-Fi for threat analysis. All reports will be encrypted before being sent. This information is strictly for the purpose of analyzing and solving your device security related issues that users are experiencing. Company will never give your information to third parties or other customer. Follow below given steps to enable auto update security policy android phone such as Samsung galaxy S7 & S7 edge, Galaxy S6 Edge, Galaxy J7 & J5 etc.

Read Also:

How to add or remove phone number Facebook on PC or Laptop

How to enable security notifications WhatsApp Android

How to change Wi-Fi password on android phone

How to enable auto update security policy Android lollipop 5.1.2, marshmallow

Step 1: Open “Apps” from home screen on your android device

Step 2: Tap on “Settings app

lock-screen-security-settings-android-device

You can also open Lock screen and security from “Edit menu” of settings.

Step 3: Scroll down until see “Lock screen and security” and tap on it

open-security-settings-under-lock-screen-security

Step 4: Under security section, tap on “Other security settings” . You can see this settings at the end of the page.

open-security-policy-updates-android

Step 5: Tap on “Security policy updates

You can see “update now” option to check update of security policy. If already installed latest update, you can see this message: Your security policy has already been updated to the latest version.auto-update-security-policy-android

By default disable auto update security policy feature.

enable auto update security policy android

Step 6: Turn on or enable “Auto update” under security policy updates settings

You can also set security policy updates download settings using Wi-Fi only / Wi-Fi or mobile network available. That’s all.

Did you find above process to enable auto update security policy android is helpful? Don’t hesitate to let me know on below comment box, would be pleasure to help you. Connect with us for daily updates!

Best Slow Motion Video Apps For Android in 2020

Today’s Best Android smartphones pack cameras that rival even the DSLRs. Had its own Android device but still want to enjoy and create slow-motion videos, here are some of the best slow motion apps for Android in 2020. One of the most important and trending features of a smartphone camera is the ability to record slow-motion videos. Not only the slow-motion videos have had had they also provided an extra layer of creativity. Slow-motion effects can make a corporal video really fun to watch and provide a completely different video viewing experience.

Using these android apps for slow-motion video, you can record video with lowest or highest speed, manage video resolution, control video frame rate, color effect, and more. You can also share videos with your friends or family on social media sites such as Instagram, WhatsApp, YouTube, etc. Here are the best slow-motion video maker apps for Android.

Read Also:

Best Android Apps For Slow Motion Video

Check out below given top best slow motion apps for your Android phone or tablet devices.

Video Editor & Video Maker – InShot

Best Android Slow Motion Apps

Slow Motion Camera is one of the favorite slow motion video apps for everyone on this list for two reasons: A creative and well-designed interface and lots of interesting features. First of all, you can create slow-motion videos either by shooting a live camera video or importing a video from the gallery. This application provides crop, trim, rotate, change audio, apply effects, and a lot of other services to create and edit slow-motion video.

Download

Video shop – Video Editor App – Best Slow Motion Video Apps For Android

Best Slow Motion Video Apps For Android Videoshop

Video Shop and Editor is one of the best slow-motion video editing apps for android. In this application, you can shoot video using a camera or you can edit already shouted video using the gallery. You can use other features like trimming, add color, effects, add music, etc. One feature of the app which we are going to focus on in this application is the ability to apply slow-motion effects to any video. The best part about using Video shop is that you can select a part of a clip where you want to apply the slow-motion effect.

Download

Video Speed Changer: SlowMo FastMo

Video speed changer slow motion app for Android

This application title suggests changing the speed of the video. In this app, you can change video in slow motion or fast motion. You can also edit and create a new video in slow motion and you can add different effects, sounds, and images with animations. You can either shoot a video directly from the application in slow motion mode or convert existing videos on your smartphone at variable slow motion rates. So if you want a feature-rich yet simple slow-motion video app then go with Video Speed changer.

Download

Slow Motion Video Zoom Player

Slow Motion Video Zoom Player App For Android

While this application name is a mouthful, it does bring a lot of features to the app. For example, you can play a specific range of video files at a reduced speed and we can also increase the playback speed. The good part of this app, even the audio syncs with the slow-motion video so it gives a sensation of time slow down. Further, you can export the videos in multiple resolutions from low to high quality into your gallery. In addition, the application has support zooming into videos that are kind of unique so that is great. Not to mention, there is a video to GIF converter, support for Picture-in-Picture (PiP) mode, reverse and fast playback, and more.

Download

Slow-Motion Video FX

Slow motion video FX App for Android

It will use to make fast or slow-motion videos on your android device and share it with social media sites such as Instagram or YouTube and more. You can record any video & set speech slow or fast and set video quality. When complete the video record it will look funny.

Install Now

Slow-Motion Frame Video Player App

Slow motion frame video player app for Android

This is best to play HD videos, control video frame rate, set color effect, and audio pitch. Its media hardware acceleration consumes low CPU power and the best battery saver. Also manage, sort, and share videos with others.

Install Now

In this, we can provide great Slow-motion supported and making video Android apps. If you have any questions please share it with us.

LG G4 wont turn on after charging: How to fix

Fix LG G4 wont turn on after charging your device. In my LG G4 device completely died battery, so I plug it on charging, when I left it then my device not turns on. It may be happen due to various reason such as over charging, hardware problem, battery problem and more. But you don’t worry, below you can see list of best ways to fix the issue of your LG G4 wont turn on after factory reset or hard reset or update.

Read Also:

How to fix poor sound call quality on Android phone

How to fix Pixel 3 XL Won’t turn on

How to fix LG V30 touch sensitivity issues

How to fix LG G4 wont turn on after charging or Update

Check out below given troubleshooting methods to fix won’t power on LG G4 after fully charging.

Bad battery

First of all check the drained battery problem or not. Connect your device to power source & check start charging. If not then look into cord and power wall adapter and see if any damage or not.

Press the the power button

Press power button several times to check the issue with powering of your LG G4 wont turn on.

Check charging port

Use charging cable to charge other device and if it does not work, you will require replacing a charging port of your android phone. Now check your LG G4 wont turn on or not.

Damaged panel

Remember your phone recently impact when dropped any place or water and other reasons to damage power panel. If this is the reason of LG G4 wont turn on, you can quickly fix this issue to use right replacement parts.

Boot LG G4 into recovery mode & Wipe cache patition

Step 1: Turn on your LG G4 phone and other device

Step 2: Press & hold the volume down button and the power button at the same time until the phone switch on.

You can view “Android system recovery” screen on your device. By default “start” button set on android phone.

LG G4 wont turn on

Step 3: Press the volume down button until see recovery mode

Step 4: Press the power button to restart into recovery mode

You can see the above screen of android robot with red triangle icon on phone.

Step 5: Press volume buttons to scroll to wipe cache partition, press the power button to select it.

This message seen on your device screen: Wipe cache partition?

Wipe cache partition on Android phone

Step 6: To confirm, tap volume buttons to scroll to “Yes” and press the power button to select it.

Clearing the cache may take 5-10 minutes.

Step 7: Use the volume buttons to scroll to “reboot system now”, press the power button to select it.

Above given step also useful for other device such as Moto G4 plus, Nexus 6P /6, Galaxy S7 & S7 edge and other devices.

Boot LG G4 into safe mode if device won’t powered on / unresponsive

Safe mode not allow using third party apps of your LG G4 and other devices. It determines which app may be causing the error.

To enable safe mode on LG G4:

Step 1: Press and hold the power button at same time

Step 2: Select & hold power off until displayed “Restart in safe mode

Step 3: Tap “Turn on”, from reboot to safe mode immediate

This process takes up to one or two minutes.

Step 4: When your LG G4 restarting, safe mode appears in the lower left side corner of the screen

Did you find above given troubleshooting steps helpful to fix LG G4 wont turn on after charging? Don’t forget to mention which method worked for you. Share this article with your friends on social network!