How to Enable Auto Rotate Screen in Android 11

Do you want to auto rotate screen when you rotate the phone on your stock Android 11 OS? Here’s how to enable auto rotate screen in Android 11. By default, you need to manually rotate your phone screen. When enabling screen rotation, it will automatically rotate landscape mode in your device. This screen rotation applies to the settings of the app only. To rotate home screen, you need to enable it individually on your Android devices.

Read Also:

How to Turn On Auto Rotate on Android 11

Before enabling auto-rotation, you can rotate the screen using the given settings in your stock Android 11 (Pixels) devices.

Step 1: Swipe up from the bottom to open the App drawer.

Step 2: Tap on any App from the list.

Manually rotate your phone screen on stock Android 11

Step 3: Rotate your phone and tap on Auto–Rotate at the bottom left corner.

You can see rotate the phone screen.

Auto rotate screen when you rotate the phone on your stock Android 11

Step 4: Again rotate the phone and tap on Rotate icon to set landscape mode.

Step 5: To disable auto rotation, pull down the notification panel and tap on Auto-rotate.

How to Enable Auto Rotation on Android 11 Stock OS

How to Enable Auto Rotate Screen in Android 11

Step 1: Swipe down the notification panel at the top and swipe the left side until viewing Auto-rotate and tap on it.

Step 2: Open the app drawer and tap any app or phone settings. Now, rotate the phone to automatically rotate the screen in your Android device.

Note: Not working for home screen rotation.

Alternative Ways:

How to Enable Auto Rotation on Android 11

Settings > Display > Advanced > Toggle on Auto-rotate screen

Enable Auto Rotate Screen in Android 11

Settings > Accessibility > Toggle on Auto-rotate screen under the Interaction controls section

How to Enable Home Screen Rotation on Android 11

It will rotate your home screen automatically when you rotate the phone.

Home settings to enable home screen rotation stock Android 11

Step 1: Long press on the blank area of the home screen and tap on Home settings.

How to Enable Home Screen Rotation on Android 11

Step 2: Toggle on Allow home screen rotation.

Step 3: Go to the home screen and rotate your phone to the auto-rotate screen.

How to Enable Screen Attention on Android 11

It will prevent your phone screen from turning off if you’re looking at it.

Step 1: Go to Phone settings.

Step 2: Tap on Display.

Advanced settings to use screen attention on Android 11

Step 3: Tap on Advanced.

Turn on Screen attention on Android 11

Step 4: Tap on Screen attention.

How to Enable Screen Attention on Android 11

Step 5: Toggle on Screen attention.

And that’s all about enable auto rotate screen on Android 11 stock OS. Which is your favorite Android 11 feature? Tell us in below comment box.

How to Enable Split Screen on Android 11

Do you want to use 2 apps at the same time on your stock Android 11 OS? Here’s how to enable split screen on Android 11. Split-screen or multi-window mode feature is useful to open two apps at the same time on any phone. You can easily chat with friends and watching movies or videos at the same time on your Android devices. Not all apps supported this split-screen mode feature.

Read Also:

How to Enable Split Screen Multitasking in Android 11

Step 1: Swipe up from the bottom and hold to open the Recent apps list in your stock Android.

Open Recent apps to use split screen mode in Android 11

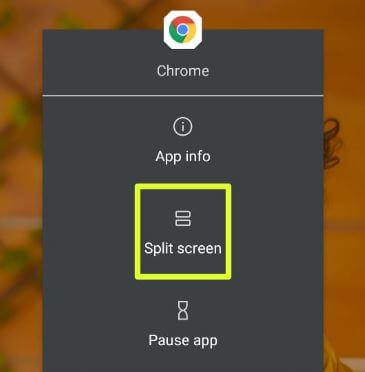
Step 2: Tap on the App icon at the top.

How to Enable Split Screen Multitasking on Android 11

Step 3: Tap Split screen.

Use 2 apps at the same time on your stock Android 11

Step 4: Upper half of the screen view the selected app.

Step 5: Select the second app from the recent apps list or choose from the app drawer.

Step 6: You can see the bottom half of the screen set.

How to Adjust Window Size in Split Screen Mode

How to Enable Split Screen on Android 11

Tap and hold the middle of the horizontal line (-) and drag it up or down to adjust the window size in your Android devices.

How to Exit Split Screen Mode in Android 11

Tap and hold the middle of the line and drag it to the bottom of the screen and drag it to the top or bottom to close split screen multitasking on your Android devices.

How to Use Dual Apps in Samsung One UI 3.1

If you have a Samsung Galaxy One UI device, you can use the dual messenger/dual apps feature to use two WhatsApp or Facebook accounts at the same time on your device.

Step 1: Go to Settings.

Step 2: Scroll down and tap on the Advanced feature.

Step 3: Tap on Dual messenger.

Step 4: Toggle on the App you want to use.

Step 5: Tap on Install.

Step 6: Tap on Confirm.

Do you still have any questions regarding enable split screen on Android 11? If you have any questions, tell us in below comment box.

How to Hide Notification Content on Lock Screen Android 11

Here’s how to show or hide notification content on lock screen Android 11 stock OS. By default show sensitive content on lock screen in your Android devices. You can show sensitive content only when locked or hide all notifications from the lock screen on your Android 11. Also, individually hide or disable app notifications on your stock Android to hide all notifications from the lock screen and home screen.

Read Also:

How to Show or Hide Lock Screen Notification on Android 11

Step 1: Pull down the notification panel at the top and tap on the Settings icon.

Apps and notification settings to hide sensitive content on Android 11

Step 2: Tap on Apps & notifications.

Change notifications settings in your Android 11

Step 3: Tap on Notifications.

Notifications on lock screen on your Android 11


Step 4: Tap on Notifications on lock screen under the notifications on the lock screen section.

How to Hide Notification Content on Lock Screen Android 11


Step 5: Choose from Show conversations, default, and silent (By default)/Hide silent conversations and notifications/Don’t show any notifications.

How to Show Sensitive Content When Unlocked Your Phone

Step 1: Swipe up from the bottom to open the app drawer and tap on the Settings app.

Step 2: Tap on Display.

Advanced settings to hide content on lock screen Android 11 Stock OS

Step 3: Tap on Advanced.

Show sensitive content on lock screen in your Android Stock OS

Step 4: Scroll down and tap on Lock screen.

Hide Lock Screen Notification on Android 11

Step 5: Tap on Notifications on lock screen under the what to show section.

How to Show or Hide Lock Screen Notification on Android 11

Step 6: Choose from Show all notification content (By default)/Show sensitive content only when unlocked/Don’t show notifications at all.

How to Hide Sensitive Notifications When Your Phone Locked

How to Hide Sensitive Notifications When Your Phone Locked on Android 11

Settings > Apps & notifications > Notifications > Toggle off Sensitive notifications

How to Disable Wake Screen for Notifications on Android 11

When enabling wake up notifications, it will automatically wake up screen when you receive a new notification on your phone even locked.

How to Disable Wake Screen for Notifications on Android 11

Settings > Display > Advanced > Lock Screen > Toggle off Wake screen for notification under the When to show section

How to Block or Disable App Notification on Lock Screen Android 11 Stock OS

Step 1: Pull down the notification panel at the top and tap the Settings icon.

Step 2: Tap on Apps & notifications.

Step 3: Tap on See all apps.

Step 4: Select the App from the list.

Disable App Notification on Lock Screen Android 11

Step 5: Tap Notifications.

How to Block or Disable App Notification on Lock Screen Android 11

Step 6: Toggle off All notifications.

You can’t see notifications on your screen. Open the chats you want to view receive notifications on your Android devices.

Which lock screen notification content settings do you use in your Android device? Tell us in below comment box.

How to Limit Data Usage on Android 11

Do you want to reduce data usage on your Android 11 stock OS? Here’s how to limit data usage on Android 11 devices. You can disable app background data, turn off auto-sync, and set a data limit on Android 11 to restrict data usage. Your Android device will turn off cellular (Mobile) data once it reached the limit you set. Also, set a data warning to get alerts about data usage in your device. You can check mobile data usage and Wi-Fi data usage in your stock Android 11 using network and internet settings.

Read Also:

How to Set a Data Limit on Android 11 Stock OS

You can set a daily data usage limit in your stock Android 11 devices using the below step-by-step process.

Step 1: Swipe up from the bottom to open the app drawer and tap the Settings gear icon.

Step 2: Tap on Network & internet.

Mobile network settings to reduce data usage in stock Android 11

Step 3: Tap on the Mobile network.

How to Limit Data Usage on Android 11

Step 4: Tap on Data warning & limit.

Set data warning and limit to stop mobile data usage in Android 11

Step 5: Tap on the Data warning.

How to Set a Data Limit on Android 11 Stock OS

Step 6: Enter the limit for data usage and tap Set.

Limit Data usage on Android 11

Step 7: Toggle on Set data limit.

Reduce Data Usage on stock Android 11

Step 8: Tap on OK.

Step 9: Tap on the Data limit.

Step 10: Enter the data usage limit and click on Set.

How to Turn off Background Data of Individual App

Step 1: Swipe down the notification panel and tap the Settings gear icon.

Step 2: Tap Network & internet.

Step 3: Tap the Mobile network.

Step 4: Tap App data usage.

Step 5: Tap the App usage more mobile data.

How to Turn off Background Data of Individual App in Android 11 OS

Step 6: Toggle Background data off & on what you want.

How to Disable Auto-Sync in Android 11

Step 1: Go to Phone Settings.

Step 2: Scroll down and tap the Accounts.

How to turn off Auto-Sync Android 11 OS

Step 3: Toggle Automatically sync app data off to disable it.

How to Disable Auto-Sync in Android 11

Step 4: Click on OK.

That’s the end of the list to limit data usage on Android 11 devices. Do you have any alternative methods? Share it with us in below comment section.

How to Change Notification Sound on Samsung S21 Ultra/S21+/S21/S20 Ultra/S20+/S20

Do you want to set custom notification sounds on Samsung Galaxy S21 Ultra/S21 Plus/S21/S20 Ultra/S20 Plus/S20? Here’s how to change notification sound on Samsung S21 Ultra 5G and other devices. You can set  different notification sounds for different apps on Samsung Galaxy S21 Ultra/S21+/S21 using app settings. Select the S21 Ultra sound from the default available sounds and set it as tone. You can’t set the third-party or downloaded tone as notification sound on your Samsung Galaxy. But set a custom ringtone in your Samsung One UI devices.

Read More: How to Change Google Messages Notification Sound on Any Android Phone

How to Change Notification Sound on Samsung S21Ultra, S21 Plus, S21

How to Change the Notification Sound on Galaxy S21 Ultra

Step 1: Swipe down the notification panel at the top and tap on the Settings icon.

Step 2: Tap on Sounds and vibration.

Step 3: Tap on the Notification sound.

Step 4: Select the Notification sound from the list you want to set in your S21 series.

You can’t set custom notification sound to your latest Samsung devices.

How to Change Message App Notification Sound in Samsung Galaxy (Older Version)

Step 1: Open the App drawer and tap on the Messages app.

Step 2: Tap on Three vertical dots (More) at the top right corner.

Step 3: Tap Settings.

Step 4: Tap on Notifications.

Step 5: Tap on General notifications.

Step 6: Tap on Sound.

Step 7: Choose the Sound from the list.

How to Set S21 Ultra Sound for Specific App (One UI 7): Google Messages App

Long-press the Google Messages app > i icon on the pop-up > Notifications > Notification categories > Incoming Messages > Sound > Select the sound from the list.

How to Set a Different Notification Sound for Individual Apps on Samsung S21 Ultra/S21+/S21/S20/S20+/S20 Ultra

Step 1: Go to Settings.

Step 2: Tap on Notifications.

Step 3: Select the App (We select Instagram).

Make sure to enable “Allow notifications”.

Step 4: Scroll down and tap Notification categories.

Step 5: Tap on Messages.

Step 6: Tap on Sound.

Step 7: Choose a notification tone you want to set.

How do I Change Notification Sound on Samsung S20 Ultra? 

You can change the notification sound on Samsung galaxy from the default sounds only. Choose a sound from the list you want. Also, silent notification sound in your Samsung One UI. Go to Settings > Sounds & vibration > Notification sound > Choose a sound.

How to Change System Sound Theme in Samsung One UI 7/8

Settings > Sounds and vibration > System sound theme > Choose from Galaxy/Calm/Fun/Retro

Do you still have any questions regarding changing the notification sound on Samsung Galaxy 5G?  Tell us in below comment box.

Read Also:

How to Use Locked Folder in Google Photos

Do you want to hide your personal photos in the Google Photos app? Google Photos add a new locked folder feature to hide sensitive photos & videos in your Pixel 5/Pixel 4a 5G/Pixel 4/ Pixel 4 XL/Pixel 3/Pixel 3 XL/Pixel 3a/Pixel 3a XL. Here’s how to set up and use a locked folder in Google Photos. You can use your device screen lock security (Fingerprint/PIN/Password/Pattern lock) to secure it. Items are locked folders that can’t be backed up or shared. They also won’t appear in your photos gird, search, or apps that access your device photos.

Read More: How to Create a Folder on Google Pixel

How to Set Up a Locked Folder in Google Photos in Pixel 5/Pixel 4a 5G/Pixel 4/4XL/3/3 XL/3a/3a XL

You can use a camera to take and save private photos & videos to your locked folder in Google Photos. Make sure the Google Photos app is updated with the latest version.

Step 1: Open the Google Photo app on your Pixel and other devices.

Library settings in Google photos app in your Pixels

Step 2: Tap on Library at the bottom right corner.

Utilities settings to use Google photos locked folder feature

Step 3: Tap on Utilities.

Set up locked folder in Google Photos in Pixels

Step 4: Tap on Set up locked folder.

Step 5: Unlock your phone screen using your current lock screen security.

Step 6: Select the photos & videos you want to hide and tap on Move at the top right corner.

This pop-up message appears: Move items to a locked folder?

Step 7: Tap on Move.

Now, selected photos have been moved to a locked folder in your Pixel devices.

How to Use Locked Folders in Google Photos

Step 1: Open the Google Photos app in your Pixels.

Step 2: Select Photos or videos in your Pixels.

Open any photos and move it to locked folder in your Pixel

Step 3: Tap on Three vertical dots at the top right corner.

Hide your personal photos in the Google photos app on Pixel 5 or Pixel 4a 5G

Step 4: Tap on Move to locked folder.

Hide sensitive photos & videos in your Pixel 5 using locked folder

Step 5: Tap on Move.

You must unlock the locked folder using your current screen lock to view moved photos.

How to Get Back Photos to Gallery from Locked Folder in Pixel 4a 5G/Pixel 5/Pixel 4/4XL/3a XL

Step 1: Open the Google Photos app.

Step 2: Tap Library at the bottom right corner.

Step 3: Tap Utilities.

How to Use Locked Folder in Google Photos

Step 4: Tap the Locked folder.

Step 5: Unlock the locked folder.

Step 6: Select pictures or videos you want to return to the phone gallery and tap Move at the bottom left corner.

How to Change Camera Storage Location in Pixels

By default, camera photo default storage is a phone gallery. If you want to store photos directly in a locked folder, follow the below-given steps.

Step 1: Open the Camera app on your Pixel.

Tap on storage icon at the camera at the top in your Pixel device

Step 2: Tap on the Storage icon in the upper right corner.

By default, set photo gallery.

How to Set Up a Locked Folder in Google Photos in Pixel 5

Step 3: Tap on the Locked folder.

Step 4: Capture the photo or video you want.

Step 5: Only these photos or videos are in the locked folder. You can’t find it in your Google Photos or phone gallery.

Do you still have any questions about using the locked folder in the Google Photos app in your Pixels? Tell us in below comment box. Stay and connect with us for the latest Google Photos update.

Read Also: