How To Enable Dark Mode on Android 9 (Pie)

This tutorial explains manually enabling dark mode on Android 9 (Pie). You can find device theme settings in display settings on your Android 9.0 devices. By default, set the theme automatically based on the wallpaper you select. If you set black wallpaper, the Android theme is dark; if you put white wallpaper, the Android theme is light. You can manually change the Android 9 theme to a dark mode or light mode you want.

Recently, Google released Android P Beta 3 or Android P Developer Preview 4 for Google Pixel devices. This Android P Beta 3 included a device theme settings option. You can download updates via OTA if you have already installed Android P Beta or use factory images. Follow the below-given step-by-step process to enable Android 9 dark mode manually.

Read More:

How To Enable Dark Mode (Dark Theme) On Android 9.0

To change the theme in Android 9.0 (Pie), follow the below-given settings in your devices.

Step 1: Swipe down the notification panel and tap the Settings gear icon.

Step 2: Tap Display.

Android P dark theme

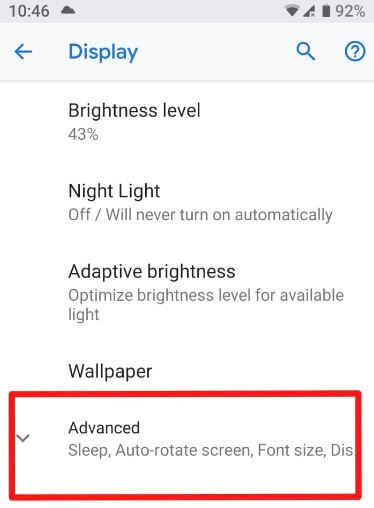
Step 3: Tap Advanced.

Change theme in android P 9.0 device

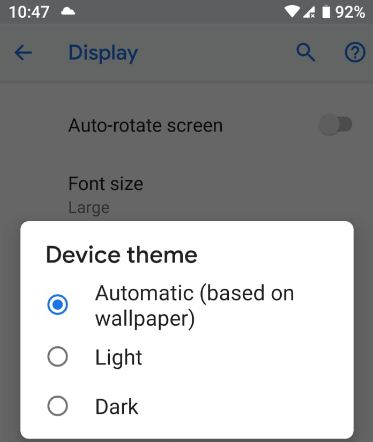
Step 4: Scroll down to the Device theme and tap on it.

By default, the Android 9 theme is set as automatic (based on wallpaper).

How to turn on dark mode in android P 9.0

Step 5: Choose Dark to activate Android 9 dark mode.

Changing the wallpaper in Android 9 will affect your Android theme. This Android 9 dark theme is helpful to extend the battery life of your device. Also, set the light theme in Android 9.0 if you don’t want to use a dark theme.

Read Also: How to Enable Ambient Display on Android

How to Change Wallpaper in Android 9 (Pie)

If you set dark wallpaper on your device, then the Android 9.0 theme is automatically set as black. And if you select white (Light) wallpaper, set the Android theme as light.

Step 1: Go to Settings in your Android 9.0.

Step 2: Tap Display.

Step 3: Tap Wallpaper.

Step 4: Select the Light or dark wallpaper you want to set.

Step 5: Tap Set wallpaper at the upper right corner.

Step 6: Choose Homescreen/ Lockscreen/Both.

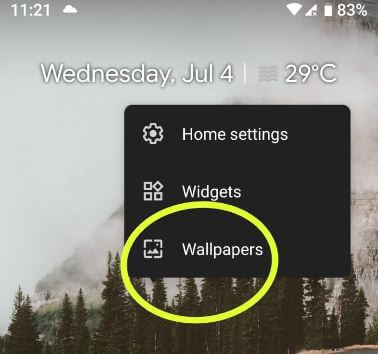
Now, change your device menu, notification panel, and other settings in your Android 9.0 device. You can also change the Android wallpaper using the settings.

Long press on the blank space in the home screen > Wallpapers > Select wallpaper > Set wallpaper > Home screen/Lock screen/Both.

And that’s all. We hope this clarifies how to turn on dark mode in Android Pie 9.0. Stay and connect with us for the latest updates. If you have any questions, please tell us in the comment box below.

Related:

How to Install Android P Beta 3 on Google Pixel

Recently my Google Pixel device gets Android P Beta 3 (Android P developer preview 4) updates. Android P Beta 3 now available for Google Pixel, Pixel XL, Pixel 2, Pixel 2 XL, and other devices. Let see how to download and install Android P Beta 3 on Google Pixel, Pixel 2 XL, and other android devices. You can get an OTA update if already install android P Beta in your Pixel and Non-Pixel devices such as OnePlus 6, Xiaomi Mi Max 2S, Nokia 7 Plus, Sony Xperia XZ2 and more. Also, download Android P Beta 3 on Google Pixel and other devices using factory Image.

If you have Google Pixel device and already install android P Beta then check software update settings and download Android P Beta 3 on your Pixel devices. Let see how to install Android P Beta 3 on Google Pixel, Pixel XL, Pixel 2, and Pixel 2 XL 9.0.

Read Also:

How to Download and Install Android Pie Beta 3 on Google Pixel 9.0

Step 1: Go to Settings in your Pixel 9.0 device that already install Android P Beta.

Step 2: Tap System.

Step 3: Tap Advanced.

Android P developer preview 4

Step 4: Scroll down up to the end of the page and tap System update.

Step 5: Tap Check for updates.

You can see the message: System update available. This Android P Beta 3 update size is 262.5 MB.

How to install Android P Beta 3 on Google Pixel XL

Step 6: Tap Download and install.

Step 7: Wait for download update and after completed download tap Restart now.

Let see new android P Beta 3 or Android P developer preview 4 changes for Google Pixel, Pixel 2, Pixel XL and Pixel 2 XL devices.

Android P Beta 3 changes for Google Pixel, Pixel XL, Pixel 2 XL, Pixel 2 9.0

  • Manual dark theme
  • Back button in the navigation bar
  • App actions now work on first-generation Google Pixel and Pixel XL
  • Status bar icons are now smaller
  • New rotation lock button
  • Battery saver icon change when activated
  • Always on display hides notifications
  • New icon on keyboard switcher
  • Bluetooth A2DP hardware offload option in developer options
  • New animation when opening contacts

You can check out here what’s new in Android P Beta 3 (With images & settings) or Android developer preview 4 for Google Pixel, Pixel XL, Pixel 2, and Pixel 2 XL.

Source: XDA-developers

And that’s all. I hope this little tip helpful to download and install Android P Beta 3 on Google Pixel, Pixel 2 XL, and other devices. If you have any kind of trouble, tell us in below comment box.

How to turn on Natural tone in Huawei P20 Pro

Here’s how to turn on Natural tone in Huawei P20 Pro and P20. This Huawei P20 natural tone feature is helpful to automatically adjust color temperature (White balance) that suitable for environment in your device. By default disable natural tone in your Huawei P20 and P20 Pro EMUI 8.1 devices. To use this environment friendly feature, activate it.

You’ll enable natural tone in Huawei P20 Pro and P20 under color & eye comfort in display settings. Also use this setting to adjust color style and temperature and turn on blue light in Huawei P20 Pro for easily reading at night or dim light. Follow below given complete step by step process to turn on Natural tone in Huawei P20 Pro and P20.

You May Like This:

How to take ultra Snapshot on Huawei P20 Pro

How to enable dark mode in Huawei P20 Pro

How to use Dolby Atmos in Huawei P20 Pro & P20

How to turn on Natural tone in Huawei P20 Pro and P20 EMUI 8.1

How to turn on Natural tone in Huawei P20 Pro

Step 1: Swipe down notification panel and tap Settings icon

Step 2: Tap Display

Step 3: Tap Color & Eye comfort

Here you can see Natural tone, color mode & temperature and Eye comfort.

Step 4: Turn on Natural tone toggle button

Now activate natural tone in Huawei P20 Pro and P20 Oreo 8.1 devices and automatically set color temperature based on light in your devices. You can also change color mode & temperature settings and turn on eye comfort in your phone.

Color mode & temperature

Set color style and temperature you want to set in your device. You can set color mode as Normal or Vivid in your Huawei P20 Pro and P20 device. Also set color temperature as warm or cold or default in your phone.

Eye comfort

By default disable eye comfort in your device. It’ll enable blue light in Huawei P20 Pro and P20 device to easily look device screen to read in dim light. Also see warmer tint on the screen. You can set schedule time for activate eye comfort in your phone and set color temperature for eye comfort as cooler or warmer.

And that’s all. Do you still have question about turn on Natural tone in Huawei P20 Pro and P20? Tell us in below comment box. Don’t forget to share with others, if you found it helpful.

How to take ultra snapshot on Huawei P20 Pro

Huawei P20 Pro has three rear cameras including 40 MP RGB (f/1.8), 20 MP Monochrome (f/1.6) and 8 MP Telephoto (f/2.4). Also including several camera features such as Master AI, 3D Portrait, super slow motion videos and more. But in this tutorial, I’ll show one of the handy Huawei P20 Pro camera tips. Let see how to take ultra snapshot on Huawei P20 Pro EMUI 8.1 devices.

This Huawei P20 Pro ultra snapshot settings helpful to take a quick snapshot in your device when screen is off. By default set this setting, so whenever you double tap the volume down button in your device, it will automatically taking a snapshot. Follow below given step by step process to take ultra snapshot on Huawei P20 Pro and P20 Oreo 8.1.

You May Like This:

How to improve battery life on Huawei P20 Pro and P20: 8 Ways

How to switch navigation button in Huawei P20 Pro

How to capture screenshot on Huawei P20 Pro and P20

How to take ultra snapshot on Huawei P20 Pro and P20How to take ultra snapshot on Huawei P20 Pro and P20


Step 1: Open camera app in your device

Step 2: Tap Settings gear icon at upper right corner

Here you can see Huawei P20 Pro camera settings such as enable Master AI, GPS tag, capture smiles, 4D predictive focus and other settings.

Step 3: Scroll down up to end of the page and tap ultra snapshot

Step 4: Choose take a quick snapshot

Step 5: Now press volume down button two times when screen is off to quickly capture snapshot in your Huawei P20 Pro

If you want to open camera when double tap volume down key, choose open camera instead of take a quick snapshot. Also turn off this volume down settings in your Huawei P20 Pro and P20 devices.

Camera > Settings > Ultra snapshot > Take a quick snapshot / Open camera / Off

You can choose settings from above you want to use in your device. Let see other handy Huawei P20 Pro camera tips you should know.

Capture smiles

Automatically take photos when your face detected as smiles in your device.

4D Predictive focus

Show the point of focus on moving objects in real time.

You can take burst shoot to touch & hold shutter icon and use volume button for shutter in your Huawei P20 Pro and P20 device.

And that’s all. Did you found above tutorial helpful to take ultra snapshot on Huawei P20 Pro and P20? If you have any question, tell us in below comment box.

How to use Picture in picture mode in Huawei P20 Pro

Want to use Picture-in-picture mode on Huawei P20 Pro and P20 EMUI 8.1? Here’s how to enable and use Picture in picture mode in Huawei P20 Pro. By default some of the apps enabled to use PIP mode in your device such as Google play movies & TV, Google Maps, YouTube and more. Different device has different types of apps that already turned on PIP mode.

This Picture-in-picture mode is helpful to use two apps in your device. It will allow app to use picture-in-picture mode while app is open or after you leave it. You can see this leave app on top of the screen in your device. Not all apps supported this Picture-in-picture mode. Follow below given step by step process to use Picture in picture mode in Huawei P20 Pro and P20 Oreo 8.1.

Relevant Article:

How to use Picture-in-picture mode in WhatsApp android device

How to use voice control in Huawei P20 Pro and P20

How to fix Picture-in-picture mode not working in android Oreo 8.0

How to enable and use Picture in picture mode in Huawei P20 Pro and P20

How to use Picture in picture mode in Huawei P20 Pro

Step 1: Swipe down notification panel and tap settings gear icon

Step 2: Tap Apps & notifications

Step 3: Tap Apps

Step 4: Tap Settings icon at bottom of the screen

Step 5: Tap Special app access

Here you can see several important settings including ignore battery optimization, Do not disturb access, draw over other apps, notification access, Picture-in-picture, unrestricted data access and more settings.

Step 6: Tap Picture-in-picture

List of supported PIP mode apps are view in your device.

Step 7: Tap app to enable/disable PIP mode in Huawei P20 Pro and P20

Now enjoy PIP mode in Huawei P20 Pro and P20 devices. Let see other helpful Huawei P20 Pro settings called usage access.

Read Also:

How to change picture size and video size on Galaxy Note 9

How to send picture from Galaxy Note 9 in text messages

How to enable/disable usage access in Huawei P20 Pro and P20

This usage access feature is allows an app to track what other apps you’re using and how often, as well as your device language settings, carrier and other details.

Settings > Apps & notifications > Apps > Settings > Special app access > Usage access > Turn app permit usage access on or off

And that’s all. We hope this makes it clear how to enable and use Picture in picture mode in Huawei P20 Pro and P20. If you have any kind of trouble, tell us in below comment box. Read more Huawei P20 Pro tips.

How to Show Battery Percentage on Huawei P30 Pro, P30 Lite, P30, P20 Pro, P20, Mate 20 Pro

Here’s how to display battery percentage on Huawei P20 Pro status bar. By default display battery icon only at the upper right corner side beside time in your phone. You can show or hide battery percentage icon in the status bar on Huawei P20 Pro and P20 devices under battery settings. This setting is helpful to display the remaining battery percentage in the battery icon in your device.

There are three options available for display battery percentage in Huawei P20 Pro status bar including Do not show, next to battery icon and inside battery icon. You’ll choose your favorite option or also hide battery percentage if you don’t want to show in the status bar in your device. Follow the below-given step by step process to show battery percentage on Huawei P20 Pro status bar.

Read Also:

How to Add Battery Percentage Icon on Huawei P20 Pro 

How to show battery percentage on Huawei P20 Pro status bar

You can change the battery percentage icon in the latest Huawei devices using below given settings.

Show or Hide battery percentage in the status bar on Huawei P30 Pro, P30 Lite, P30

Step 1: Go to settings in your latest Huawei devices.

Step 2: Scroll down and tap on Battery.

Step 3: Tap on Battery percentage.

Step 4: Select from Do not show/Next to battery icon/ Inside battery icon.

For Huawei P20 Pro and P20:

Step 1: Swipe down the notification panel and tap the Settings icon.

Step 2: Tap Apps & notifications.

Step 3: Tap Notifications & status bar.

Step 4: Tap Battery percentage.

Here you’ll see Do not show/Next to battery icon/ Inside battery icon and other options.

Step 5: Choose from Next to the battery icon/Inside battery icon to display the battery percentage in the status bar.

Now show battery percentage in the status bar on Huawei P20 Pro and P20 devices. If you want to hide battery percentages then choose Do not show option. In other Huawei P20 Pro status bar settings, you can see display carrier name and display network speed options. Let see about these two settings.

Display carrier name:

Enable/disable carrier name in the status bar in Huawei P20 Pro and P20 devices.

Display network speed:

Turn on display network speed in Huawei P20 Pro and P20 devices to show network speed in the status bar. Whenever surf the web, you can see network speed in your device status bar.

And that’s all. I hope this little tip helpful to show battery percentage on Huawei P20 Pro status bar. If you have any questions, tell us in below comment box.