How to Change the Navigation Button on Huawei P30 Pro, P30, P20 Pro, P20, Mate 20

Here’s how to switch Huawei P20 Pro navigation button order or position. You can change the navigation button on Huawei P30 Pro, P30, P20 Pro, P20, Mate 20 under navigation system settings.  Easy to switch them back and recent apps key in your navigation bar. We already discussed hide navigation buttons in Huawei P20 Pro and P20 EMUI devices. You can see four different style combinations of navigation buttons in Huawei P20 Pro and P20. Also added button for quick access notification panel and quick settings menu.

Read Also:

How to Switch Navigation Button on Huawei P20 Pro/P20

How to switch Huawei P20 Pro navigation button

Let see the steps to change Navbar buttons in Huawei P20 Pro and P20  and other latest EMUI devices.

Step 1: Swipe down the notification shade and tap the Settings gear icon.

Step 2: Scroll down up to System and open it.

Here you can see several settings including system update, system navigation, language & input, date & time, simple mode, data transfer, backup & restore, reset, and more.

Step 3: Tap System navigation.

In the Huawei P20 Pro navigation system, you can see gestures, three-key navigation, and navigation dock options.

Gestures: Swipe inward from the left edge/right edge to go back // Swipe up from the bottom of the screen to return home screen // Swipe up from the bottom of the screen and pause to view recent tasks/apps.

Three key-navigation: Select this option and tap on Settings to change the navigation button order. Also, enable hide navigation keys option to hide the navigation bar button.

Navigation dock: By default hide or remove the navigation dock on Huawei devices. You can enable it if you want to hide navigation buttons.

Step 4: Choose the Three key-navigation.

Step 5: Tap on Settings.

Step 6: Select the Navigation button style you want to use.

Make sure to enable navigation bar under virtual navigation bar buttons settings. You can also enable navigation gestures on Huawei P20 Pro and P20 using the below settings.

How to Use Full-Screen Navigation Gestures in Huawei P20 Pro and P20

Step 1: Go to Settings on your Huawei devices.

Step 2: Tap System.

Step 3: Tap System navigation.

Step 4: Tap on Gestures.

Step 5: Now you can see a horizontal line at the bottom of the screen to open the app drawer and recent apps.

Enjoy the navigation gestures on Huawei P20 and the P20 device. And that’s all.

We hope this article helpful to switch Huawei P20 Pro navigation button position. If you have any questions, tell us in below comment box.

How to Reduce Screen Size on Android

Do you want to adjust the display size on your Android phone? In this tutorial, I’ll show you how to reduce screen size on Android devices. You can use Android display size settings to increase or decrease the screen size to bigger or smaller. Also, change the screen resolutions (Samsung Galaxy) to adjust the screen size on your devices. Download and install the third-party app or Android launcher to change the icon size.

Read More: How to Change Font Style and Font Size on Android

How to Reduce the Screen Size/Display Size on Android Phone

Android devices have slightly different settings to change the screen size or screen resolution size.

How to Reduce Screen Size on Android Stock OS: Google Pixel

You can see the display size option in the display settings on your Android phone.

Step 1: Open the app drawer and tap Settings app.

Use Android display size settings to increase or decrease the screen size

Step 2: Tap Display.

Adjust the display size on your Android phone

Step 3: Scroll down and tap Display Size and Text (Android 14 Beta 1) or Display Size (Android 13).

How to Reduce Screen Size on Android Devices

Step 4: Increase or Decrease the display size on your phone.

It will make your phone’s screen bigger or smaller, including font size, icon size, etc.

How to Change Screen Size on Samsung Galaxy

It will make the screen bigger or smaller on Samsung Galaxy devices.

Step 1: Go to Settings.

Step 2: Tap on Display.

Step 3: Swipe down and tap on Screen Zoom.

Step 4: Move the slider left to right to respectively decrease or increase the screen size (Screen Smaller or Bigger).

How to Change Screen Resolution on Samsung One UI

Settings > Display > Screen Resolution > Select the Resolution you want to use on your Samsung phone.

How to Reduce Screen Size (Display Size) on OnePlus

Step 1: Go to Settings.

Step 2: Tap Display & Brightness.

Step 3: Scroll down at the end and tap on Font & display size.

Step 4: Set the OnePlus display size as Small, Default, or Large.

How to Change the Screen Resolution on OnePlus

Settings > Display & Brightness > Scroll down and tap Screen Resolution > Choose Auto select, FHD+, or QUD+.

Read More:

How to recover lost contact in android phone from Gmail

Annoying by accidentally deleted all contacts from android device? Here’s the simple way to recover lost contact in android phone from Gmail. You’ll retrieve deleted contacts from android phone memory or SIM card, if your android phone is synced with your Google account. Also restore deleted contacts using root your android device and find contacts database file to check contacts.

In some of the android device, you can recover contacts using phone app in your android device after factory reset . In latest android Oreo and Nougat device, you can’t find this way. Let see some possible solutions to restore or recover lost contact in android phone from Gmail.

Read Also:

How to upload music to cloud from PC or Mac

How to fix Google contact not syncing on android Oreo, Nougat

How to transfer data from iPhone 8 to Google Pixel XL

How to recover lost contact in android phone from Gmail

You’ll restore deleted android contacts with Gmail if your device is sync with your Gmail account.

1st Method: Restore lost contacts using android phone from Gmail

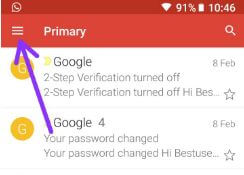
Step 1: Open Gmail in your android phone

Gmail app settings in android devices

Step 2: Tap on Three horizontal lines at top right side corner

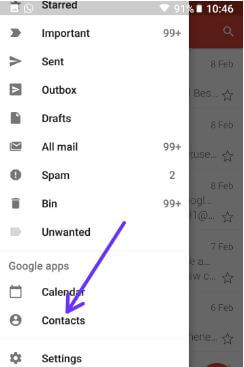
Contacts settings in Gmail app android

Step 3: Tap on Contacts under Google apps

If available contacts, you can see list of contacts in your Gmail.

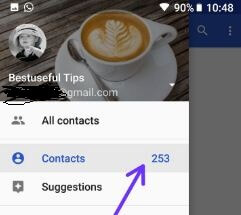
Step 4: To view how many contacts, tap on Three horizontal lines

Restore lost contacts using android phone from Gmail

You can see above given screen in your android phone with contacts.

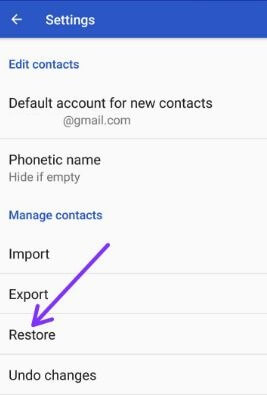
Recover lost contact in android phone from Gmail

Step 5: Select settings & Tap on Restore under Manage contacts

Step 6: Choose account & press OK to restore Google contacts

Read Also:

How to recover deleted photos from Android device

Best data recovery software to restore lost data on Android phone

2nd Method: Recover lost contact in android phone from Gmail using PC

Step 1: Log in your Gmail account

Select contacts in your Gmail account on PC

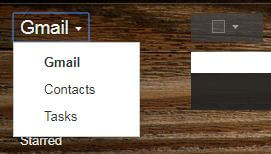
Step 2: Tap on Gmail at top left side & select Contacts

Now you’ll see list of all contacts with name and phone number.

Restore lost contacts in android from Gmail

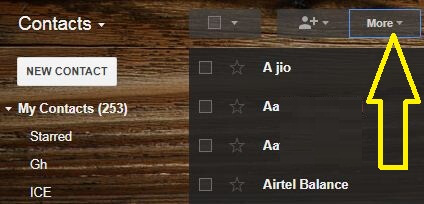
Step 3: Tap on More button

Restore contacts in android devices

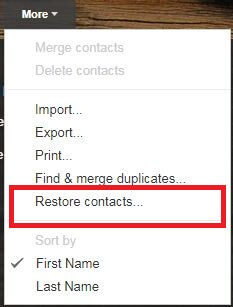
Step 4: Select Restore contact

You can see restore contacts screen in your Google account. Now back up last 30 days contact from Gmail in your android devices. You’ll also import contact or find & merge duplicate contacts also using this setting.

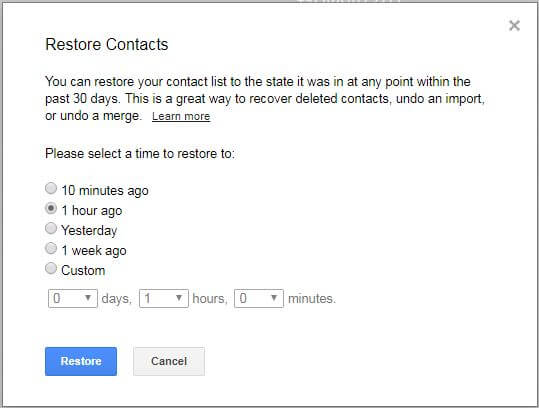
Step 5: Select time to restore contact from 10 minutes ago/1 hour ago/yesterday/1 week ago/Custom

How to recover lost contact in android phone from Gmail

Step 6: After select time, tap on Restore button

Now restore deleted contacts in your android devices. This two method is one of the easiest methods to recover lost contacts in android devices.

And that’s it. I hope this tutorial will helpful to Recover lost contact in android phone from Gmail account. Do you have any other easy tips to restore android contacts? Share with us in below comment box. Don’t miss out our other android tips.
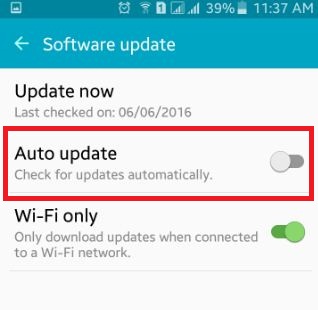
How to turn off auto update android phone

Most of the latest android phone  or tablet such as lollipop or marshmallow devices enable or turn on the auto update software / app on devices. It’s easy to disable / turn off auto update android phone or tablet devices. We have auto update software, apps and games on our android device using Wi-FI or mobile data. We have already learned to turn off app updates on android lollipop (5.1.1), KitKat and other devices. Mobile data take time to update software or data on device so most of the people updated their devices using Wi-Fi only.

Using this software update settings you can enable / disable auto update of software on your android phone or tablet devices. Also set download updates when your device connected to a Wi-Fi network. Follow below given steps to disable / turn off auto update android lollipop (5.1.1) and latest marshmallow (android 6.0) devices.

Read Also:

How to uninstall updates in Windows 10 PC or Laptop

How to enable auto update security Android device

How to update apps android phone or tablet

How to turn off auto update android phone or tablet

Step 1: Open “Settings” app on your android phone or tablet devices

click on about device under system settings

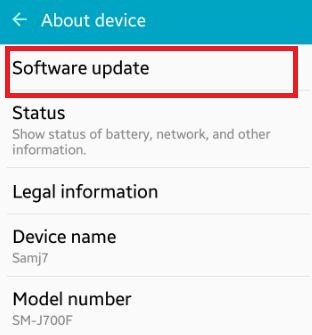
Step 2: Scroll down until see “about device” under system section

update software on android lollipop

Step 3: Tap on “Software update”

How to turn on auto update android phone

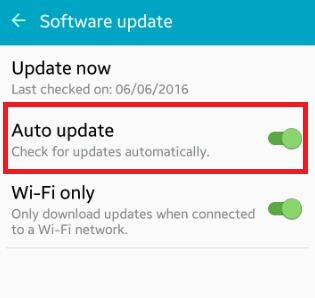
By default turn on or enable auto update of software on your android lollipop (5.1.1) and other devices

How to turn off auto update android phone

Step 4: Disable / turn off auto update android phone or tablet device

Below you can see Wi-Fi option that is by default enable so when your device connected with any Wi-Fi network it will automatically check the app or software updates and if available update it automatically. You can also disable Wi-Fi button if not update using Wi-Fi. That’s it.

Above you can see the complete guide to turn off auto update android lollipop and other devices. If you have any question regarding above steps then comment on below box. Don’t forget to share this trick with your friends on social networks.

How to Fix Android Oreo Sound Issues

Several users reported audio or sound issues after upgrading to Oreo 8.0 OS. Have you been experiencing this sound issue on your Pixel or Nexus running Android 8.0 Oreo device? Let see some troubleshooting guide to fix Android Oreo sound issues. When listening to music or playing games in Oreo suddenly drop the sound and I will restart my device to fix it. If you find any app related issue, enable safe mode in your device. Also, check if missing any app update or software update that will fix the latest Oreo bug fixes. Also, several users reported Bluetooth issues in android 8.0 Oreo.

Read Also:

5 Handy to Fix Android Oreo Sound Issues

Try below given several methods to fix Android Oreo 8.0 problems.

 Restart your Android

This is one of the easiest solutions to fix android Oreo problems. Tap & hold the power button in your pixel and tap the restart button. After a restart, your device check fixes the audio issue or not.

Check System Software Update & app update

First of all check system software update on Oreo is available or not. This update fixes critical bugs and improves the performance and stability of your Pixel and Nexus devices.

Settings > System > System updates > Check for update

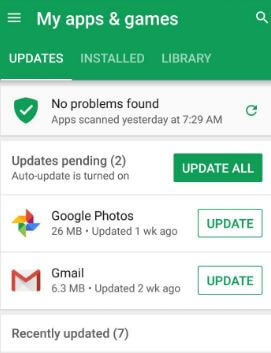
Check any app update

Update apps in android Oreo device

Google Play store > Three horizontal line at the top left corner > My apps & games > Updates

Uninstall App

Step 1: Go to Settings in your Android Oreo device.

Step 2: Tap Apps & notifications.

Step 3: Tap App info.

Step 4: Tap App wants to uninstall.

Step 5: Tap App details under store.

Step 6: Tap Uninstall.

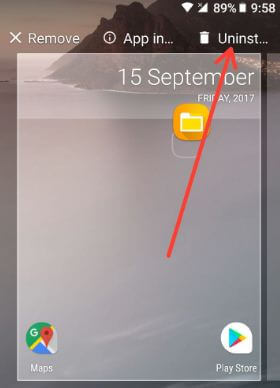
After uninstalled app, restart your device and reinstall it in your device and check fix app sound problem in android Oreo or not. You will also uninstall apps in Oreo using below shortcut trick.

Fix android Oreo sound issues

Alternative Way: Tap & hold the app and drop app to the top of the screen where you can see the “Uninstall” option in your Android device.

Enable Safe Mode

If any app related issue in your android 8.0 devices, enable safe mode in Oreo device to find third party downloaded app that causing audio issue in Oreo device.

Step 1: Tap & hold the Power button in your Pixel and other Oreo devices.

Step 2: Touch and hold Power off button until view Reboot to safe mode.

Step 3: Press OK to reboot safe mode android 8.0 Oreo devices.

It will take 30-40 seconds to restart your device.

Step 4: You can view the Safe mode icon below of the left side screen.

You will see all third-party apps disabled. Check your device working normally in safe mode. If not find any problem, it means any downloaded app occur this issue. Find that app and remove it from your device.

If none of the above-given methods worked, factory reset your android 8.0 Oreo device using below steps.

Factory Reset Android 8.0

It will erase all your android Oreo data. So before resetting your Oreo device, backup and restore data on your Oreo devices.

Step 1: Turn off your Android 8.0 device.

Step 2: Press & hold the volume down button and the power button at the same time until the phone vibrates.

You can view the Android system recovery screen on your android Oreo 8.0. By default start button show on Google Pixel XL & Nexus devices

Step 3: Press the volume down button until view recovery mode.

Step 4: Press the power button to restart into recovery mode.

You can see the above screen of the Android robot exclamation mark with a red triangle on your phone.

Step 5: Press & hold the power button and volume up button the same time to scroll to wipe data/factory reset, press the power button to select it.

This message show on your Google pixel & pixel XL screen: Wipe all user data?

Step 6: To confirm, press volume down buttons to scroll to Yes and press the power button to select it.

Clearing the cache may take 3-5 minutes.

Step 7: Press the volume down buttons to scroll to the Reboot system now, press the power button to select it.

You can also factory data reset your Android 8.0 Oreo using the below settings.

Settings > System > Reset > Factory data reset > reset phone > Erase everything

And that’s it. Is your Pixel or Nexus phone affected with this sound issue? Do you have any tips to fix android Oreo sound issues? Tell us in below comment section. Stay connected with us for the latest Android 8.0 Oreo tips.

Best Data Recovery Software to Restore Lost Data

Have you understand the heart-stopping problem of lost data, it is a very disappointing situation when you lost your data without backup. But now you have the best solution for that problem in the form of EaseUS Best data recovery software to restore lost data. It can serve you a multipurpose solution as per your need in a rapid fast speed than any other software.

EaseUS data recovery software 12.8 is the best software among all software, which is useful for the recover your data easily and quickly which was formatted, deleted or lost from your PC, laptop, any other external device. EaseUS Best data recovery software to restore lost data is available in the free version as well as pro version as per your need. Choose it as per your data recovery software requirement.

Don’t Miss This:

EaseUS best data recovery software 2020: Most Popular

Best data recovery software to restore lost data

Around 7.2 million people make their data recovery partnered EaseUS and they are fully satisfied with it. EaseUS data recovery wizard free edition having a capacity of recovering your hard drive, USB drives, memory cards, and any other storage devices. It is no doubt Best data recovery software to restore lost data. This is the all in one data recovery software for all situation of data loss.

The facility and the benefits you provide from EaseUS Android data recovery software and the purposes you served by it are you recover data from all the categories and formats and any type of files, now you can imagine the power of EaseUS best data recovery software to restore your lost data. The data you can recover by EaseUS is as under.

EaseUS data recovery wizard free is useful for recover lost files, pictures, video, your documents, your visual audios, deleted filed, errors of formatting, partition losses, operating system crashes, virus attacks and many other data loss scenarios. Features of EaseUS best data recovery software to restore your lost data are here.

EaseUS Best data recovery software for Android, iOS

You can quickly recover accidentally deleted files recovery, formatted recovery although you have lost your data from your disk which is a very special feature of EaseUS, recovery of recycle bin after emptying it, even if your whole partition is missing your lost partition data can recover, ease us is also repairs the damage of hard drive, virus attacks are also protected by EaseUS very finely when your operating system is crashed EaseUS provided a downloadable WinPE bootable media so that you can recover your lost data which was affected by operating system crashing and last but not the least RAW partition recovery is also to access by EaseUS Best data recovery software to restore lost data.

The other benefit of EaseUS is its simplicity, you can get you all recovery in just 3 clicks very efficiently and no recovery prior experience is required. Second is two quickest and useful scanning method quick scan and deep scan and last is the preview of recovery by which you can choose your appropriate and required recovery.

EaseUS best recovery software to restore lost data is useful for recover more than 1000 file types which are in the category of audio, document, video, graphics, email files and other files like a zip file, etc.  In all categories the all qualities are considered and especially in email files are outlook files and outlook express files. So, no files are out of the radar range of EaseUS.

3 versions of data recovery software are available in EaseUS which are data recovery wizard free, data recovery wizard pro and data recovery wizard pro+winpe. In data recovery wizard free you can get 2 GB data access and in other you get unlimited data access, on the other hand, you have not to license for the free version and the bootable media for an emergency is only available in data recovery wizard pro+winpe. So choose your required EaseUS Best data recovery software to restore lost data.

Technological specifications of EaseUS data recovery software:

Devices which supported are – PC/laptop, hard drive, USB drive, external disk, SSD, microcard, camcorder, digital camera, music player, video player, raid, cf/sd card, zip drive, pen drive, and other storage devices.

Operating systems: Windows 10/8.7/8.1/7/XP/vista and windows server 2016,2012,2008,2003

File system- fat(fat12,fat16,fat32), exFAT, NTFS, ntfs5, ext2/3, hfs+, refs -> Disk space required is 32 MB minimum for installing, CPU is at least x86 and ram of minimum 128 MB.

Short user guide for how to recover lost data by EaseUS

1] Find your data lost location and start searching and select a location to start the process

2] Scan your device or computer for retrieving lost data you can also pause and resume.

3] Get the preview and get your lost files after filtering and select what you need and the necessary data.

So that’s all about the EaseUS best data recovery software to restore your lost data and by all the parameters it is the best of best so kindly try it and provide better security to your important data.